
warp2diesel
Full Access Member
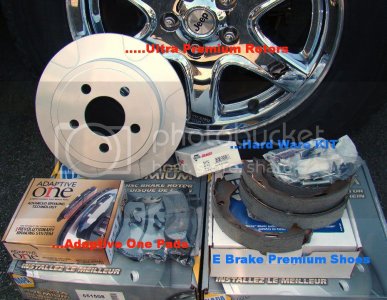
I had to replace my rear rotors that were suffering from a bad case of rust where chunks were falling off and the brakes pulsed every time I stopped. The rotors were so bad that the drum would not clear the parking brakes and the aluminum pop rivets had all the heads pop off on one side and 2 out of three on the other. One side I had to cut a slot in the rotor and crack the drum to get it off. most of the time you back off the parking brake adjustment and slide the rotor off, not when the rotors were as bad as mine. Not wanting to put pop rivets back in, I did an upgrade.
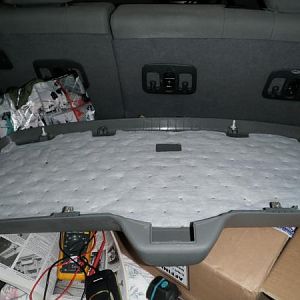
To get the parking brakes and backing plates off, you need to pull the axles first.
First remove the rear cover and contain the oil don't want the EPA or other wacko organization issuing any fines, besides, who wants the mess.
Remove the pin bolt
Remove the spider gear pin/shaft
Remove clips
Axle shafts ready to remove
Axle shafts removed
One Bean Counter Aluminum Pop Rivet holding on one side, plug hole to keep out dirt and rust.
Remove rivets by driving out snap off pins and drill out the remains. Tap holes to 1/4-20 NF or 7mm, 6mm will strip out.
Put Red Loctite onto Button Head bolts that are cut off so they do not stick out the back of the caliper adapter.
Slide the assembly onto the axle housing with Loctite on the studs
Tighten up nuts and paint with Bar B Q Black high temp paint, I painted more after the photo to get the spot I missed.
Brake shoes mounted
Assemble the rest, fill with oil and test drive. After doing the Job in Slimy Midwest too close to the corn field High Humidity 95F (35C) heat, the AC felt great.
To get the parking brakes and backing plates off, you need to pull the axles first.
First remove the rear cover and contain the oil don't want the EPA or other wacko organization issuing any fines, besides, who wants the mess.
You must be registered for see images attach
Remove the pin bolt
You must be registered for see images attach
Remove the spider gear pin/shaft
You must be registered for see images attach
Remove clips
You must be registered for see images attach
Axle shafts ready to remove
You must be registered for see images attach
Axle shafts removed
You must be registered for see images attach
One Bean Counter Aluminum Pop Rivet holding on one side, plug hole to keep out dirt and rust.
You must be registered for see images attach
Remove rivets by driving out snap off pins and drill out the remains. Tap holes to 1/4-20 NF or 7mm, 6mm will strip out.
You must be registered for see images attach
Put Red Loctite onto Button Head bolts that are cut off so they do not stick out the back of the caliper adapter.
You must be registered for see images attach
Slide the assembly onto the axle housing with Loctite on the studs
You must be registered for see images attach
Tighten up nuts and paint with Bar B Q Black high temp paint, I painted more after the photo to get the spot I missed.
You must be registered for see images attach
Brake shoes mounted
You must be registered for see images attach
Assemble the rest, fill with oil and test drive. After doing the Job in Slimy Midwest too close to the corn field High Humidity 95F (35C) heat, the AC felt great.
Last edited:
")