Rear parking brake pop rivets failed, how to fix

Disclaimer: Links on this page pointing to Amazon, eBay and other sites may include affiliate code. If you click them and make a purchase, we may earn a small commission.

warp2diesel

Full Access Member
Joined
Feb 10, 2009
Messages
47
Reaction score
0
Location
Aurora, IL
I had to replace my rear rotors that were suffering from a bad case of rust where chunks were falling off and the brakes pulsed every time I stopped. The rotors were so bad that the drum would not clear the parking brakes and the aluminum pop rivets had all the heads pop off on one side and 2 out of three on the other. One side I had to cut a slot in the rotor and crack the drum to get it off. most of the time you back off the parking brake adjustment and slide the rotor off, not when the rotors were as bad as mine. Not wanting to put pop rivets back in, I did an upgrade.
To get the parking brakes and backing plates off, you need to pull the axles first.
First remove the rear cover and contain the oil don't want the EPA or other wacko organization issuing any fines, besides, who wants the mess.
You must be registered for see images attach

Remove the pin bolt
You must be registered for see images attach

Remove the spider gear pin/shaft
You must be registered for see images attach

Remove clips
You must be registered for see images attach

Axle shafts ready to remove
You must be registered for see images attach

Axle shafts removed
You must be registered for see images attach

One Bean Counter Aluminum Pop Rivet holding on one side, plug hole to keep out dirt and rust.
You must be registered for see images attach

Remove rivets by driving out snap off pins and drill out the remains. Tap holes to 1/4-20 NF or 7mm, 6mm will strip out.
You must be registered for see images attach

Put Red Loctite onto Button Head bolts that are cut off so they do not stick out the back of the caliper adapter.
You must be registered for see images attach

Slide the assembly onto the axle housing with Loctite on the studs
You must be registered for see images attach

Tighten up nuts and paint with Bar B Q Black high temp paint, I painted more after the photo to get the spot I missed.
You must be registered for see images attach

Brake shoes mounted
You must be registered for see images attach

Assemble the rest, fill with oil and test drive. After doing the Job in Slimy Midwest too close to the corn field High Humidity 95F (35C) heat, the AC felt great.
 
Last edited:

warp2diesel

Full Access Member
Joined
Feb 10, 2009
Messages
47
Reaction score
0
Location
Aurora, IL
Does anyone ever was under there vehicle more then once in never?


That's alot of corrosion in them ther pics,I would cry and then most likely off myself if my junk looked that bad.

??????? Might want to edit so we can understand you comment.

Corrosion on the backing plate is normal for the Salt Belt Midwest, even 304 stainless Steel gets rusty.
As much as I rip Bean Counter Engineers, I don't want to think of how much it would cost to make everything out of 316 stainless Steel and titanium. I use a lot of Anti seize when I assembled the brakes.
See what you miss out on living in the South West.
 
Last edited:

LibertyTC

Well-Known Member
Staff member
Moderator
Joined
Oct 24, 2008
Messages
9,099
Reaction score
1,766
Location
B.C. Canada
Warp2diesel I guess the salt belt eats parts alive.
Did it take two years in the region for them to get like this?
I guess what I am trying to determine is if you should refresh the braking system annually?
 

warp2diesel

Full Access Member
Joined
Feb 10, 2009
Messages
47
Reaction score
0
Location
Aurora, IL
Warp2diesel I guess the salt belt eats parts alive.
Did it take two years in the region for them to get like this?
I guess what I am trying to determine is if you should refresh the braking system annually?

Five years of road salt did it. Rotors were much worse than the backing plate.
 

warp2diesel

Full Access Member
Joined
Feb 10, 2009
Messages
47
Reaction score
0
Location
Aurora, IL
I thought it was kinda funny... But then again my brain works kinda funny too :)
I was on your island a few years ago, they ever catch the illegal drug makers that trashed out the sewer pipes with Hydrogen Sulfide? Wrought iron pipe should last fifty years, it corroded in less than five years from the H2S.
That crap can destroy even 316 stainless steel and makes road salt look like distilled water.
 

LibertyTC

Well-Known Member
Staff member
Moderator
Joined
Oct 24, 2008
Messages
9,099
Reaction score
1,766
Location
B.C. Canada
I know some winters here my precious KJ is exposed to road salts. Luckily our temperature goes often close or above freezing, so the car wash is possible and effective.
However check this product out for those in the real cold and salt belt.
http://www.eastwood.com/eastwood-road-salt-neutralizer-gallon.html
I would be tempted to have this handy and use it and wash best you can!
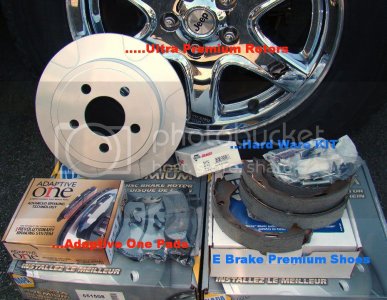
I inspect my brakes every spring and clean or replace with Napa Ultra Premium rotors and Adaptive one Pads.
40969[/ATTACH]"]
You must be registered for see images attach

They have Onyx Guard™ corrosion resistant coating, but keeping them clean is paramount after salty drives.
http://www.napabrakes.com/wps/portal/napabrake/c0/04_SB8K8xLLM9MSSzPy8xBz9CP0os_gAiwBXQw93IwN_T1MTAyOf4DAPp-CAIG83Q_2CbEdFAO6aDVE!?WCM_GLOBAL_CONTEXT=/wps/wcm/connect/affinia_websites_content_en/affinia.websites.content/Products/General/napa_brakes/Rotors/Ultra+Premium/
 

Attachments

  • NapaRearBrakesComplete.jpg
    NapaRearBrakesComplete.jpg
    148.4 KB · Views: 0

elementx

New Member
Joined
Jun 9, 2012
Messages
1
Reaction score
0
Location
cleveland ohio
I ran into the same issue and a quick google search brought me here. Thanks for the great photos.

I was about to drill out holes like you did so I could tap them for 1/4x20 bolts, but on my 07 liberty the holes would compromise part of the axle housing.

Instead, I drilled the old rivets out (#7 bit) and used three 3/16" rivets with some washers and it worked great!

I hate the smell of gear oil, ugh.
 

dirtywatadave

New Member
Joined
Jun 6, 2015
Messages
2
Reaction score
0
Location
Central Massachusetts
warp2diesel, this post guided me through my repair. Thanks for the help. I just wanted to offer this... I did not remove the emergency brake assembly, though I did disco the E brake cable and remove the backing plate. I drilled out the rivets with the assembly still attached to the axle housing. I found 1/4" drill was too small, and I could not cut the threads with the tap. I had to go up to a 5/16 tap and a 17/64 drill bit. I found the metal was hard to drill with the tools I have, so I used the shortest #5 hex head bolt I could get at NAPA, and a lock washer. I was only able to cut about 7 threads deep by hand, working very carefully, with PB Blaster and a Q-Tip to clean it out. I'd cut 1 rotation, maybe 1 1/2... back it off, try to cut a little deeper, and if I felt too much resistance, I backed it out, hit it with the PB Blaster, and wiped it clean with Q-Tips. It took an hour? Hour and a Half? Not sure, but I had to be very patient, work slow, have faith in myself- and whisper a little prayer now and then (like, "Jesus Christ! WTF!" That's a prayer, right?). The only other thing I might suggest is I wished I had put the E brake back together before I slid the axle back in. It seems stupid, but with the axle hub out of your way... well, it's out of your way.
 

Beetlemn73

Full Access Member
Joined
Oct 13, 2006
Messages
35
Reaction score
0
Location
Bethlehem, NH
Thanks for photos. I just did mine and the ebrake was not working right. I see that I switched the placement of the actuators near the orange spring. The passenger side got a bit hot, but did not smoke.
 
Top