You are using an out of date browser. It may not display this or other websites correctly.
You should upgrade or use an alternative browser.
You should upgrade or use an alternative browser.
OME or Bilstein shocks for LibertyTc's KJ?
- Thread starter Ry' N Jen
- Start date
Disclaimer: Links on this page pointing to Amazon, eBay and other sites may include affiliate code. If you click them and make a purchase, we may earn a small commission.
Dmut
Full Access Member
I wonder why didn't you put a lower isolator between coil and shock?
btw, mine clevis is that rusty too.
btw, mine clevis is that rusty too.
No isolator..that is a darn good question...should there be one with the Bilstein set up?
It was 22" level all the way around as is, no one mentioned to use bottom isolator.
Going to PM Tom & HJ and see if he has isolator on his bilstien set up. Jeeze..that isolator if needed, would crank up the front end if it fits onto the bilstien ring no idea.
Here is the isolator sitting from the left over stock set up..I guess I could re-use them..if they are needed.
39232[/ATTACH]"]
You must be registered for see images attach
Attachments

huntbuggy
Full Access Member
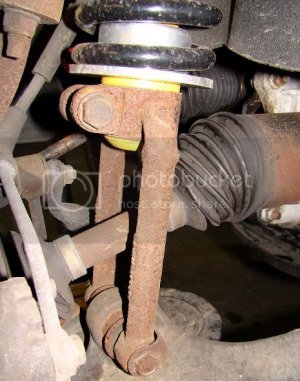
After closer inspection the boot on one was open/torn on the inside edge, and they both spin pretty freely, the driver's side is the worst - it's a wonder the bolt came off but I guess it was rusted so solidly in the knuckle I'd never have known unless reading about crappy balljoint posts on here and LOST. After 10 years of use and abuse they were probably due - too bad they're not serviceable... but at least the JBAs are.
Got three of the UCA nuts loose and still working on the last driver's side one - wild forest of brake lines and steering column on that one. Got a little late after work to be impacting but have an elbow 1/2 drive joint and extensions that seem to put the gun nested in the power steering cooler lines and it might work. Lovely design - even though the KJ does have lots of room in the engine bay compared to some new stuff, that placement of brake lines directly over bolts takes the cake.

(This pic taken below the master cylinder and brakeline hub)
After the past week am ready to do whatever it takes for the arm to come out. And am well stocked on sawzall blades and grinder cutting wheels...
Got three of the UCA nuts loose and still working on the last driver's side one - wild forest of brake lines and steering column on that one. Got a little late after work to be impacting but have an elbow 1/2 drive joint and extensions that seem to put the gun nested in the power steering cooler lines and it might work. Lovely design - even though the KJ does have lots of room in the engine bay compared to some new stuff, that placement of brake lines directly over bolts takes the cake.
(This pic taken below the master cylinder and brakeline hub)
After the past week am ready to do whatever it takes for the arm to come out. And am well stocked on sawzall blades and grinder cutting wheels...
Last edited:
huntbuggy
Full Access Member
No isolator..that is a darn good question...should there be one with the Bilstein set up?
It was 22" level all the way around as is, no one mentioned to use bottom isolator.
Going to PM Tom & HJ and see if he has isolator on his bilstien set up. Jeeze..that isolator if needed, would crank up the front end if it fits onto the bilstien ring no idea.
Here is the isolator sitting from the left over stock set up..I guess I could re-use them..if they are needed.
(Sorry I was jacking your thread - in retrospect should've started a build thread...)
Promised pic of paint and OME/Bilstein setups done last few days...
So when I reassembled the fronts I just reused the old rubber isolators, noticed messing around before that without them the spring could actually spin some. I think the bevels in the isolator that hold the cut coil ends at top and bottom just help keep the spring in place.
Wouldn't affect height much at all as the coilover assembly isn't really all that "taller" than the stock from what I could tell, but might affect spring rate and compression characteristics? It might vibrate though which would suck.
Next time you have it apart say to throw in some clevis lift or conduits would probably pop it in. Not sure if you can tell in the pic but one of the bottoms is a bit smooshed at the end of the coil - might want to go with new(er) isos or it might just be because the spring is so much stronger than stock.
From the pics everywhere looks like everyone parks in a creek like me. :happy175:
Last edited:
huntbuggy
Full Access Member
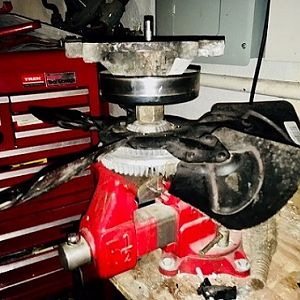
Oh yeah, put a 17mm deep impact socket there to show the trick I found for spreading the clevis exactly enough to go over the Bilstein foot. Started with a few sockets and found 17 fit best and dug out a deeper one so if you leave the body of it hanging out below the clevis bolt area you have leverage to pop it out with your fingers once everything's on...
One more silly tip for a how-to.
One more silly tip for a how-to.
Wow this really ***** for me. I am going to have to tear down the whole front end.
First off no where in the Bilstien instructions does it mention how to mount coil onto aluminum plate or mention that rubber iso's should be added. Can you say contact them tomorrow?
SO let's actaully get this clarified YOU NEED TO USE BOTH THE TOP AND BOTTOM RUBBER ISLOATORS IN THE ISTALLATION WITH THE STOCK TOP PLATE AND MAKE SURE THAT THE F"CKN BOTTOM RUBBER ISOLATOR IS USED. There that feels better. At least I have the top iso installed.
Considering all the time and research that I have done in forums, no one mentioned or was I able to see a photo of the installed set up using Bilstiens. A simple photo posted up would have prevented me from now having this big time problem.
SO now is it safe to drive with the coil sitting directly onto the aluminium base plate?
If there is extra height now involved as now adding the bottom iso, what is going to be my height if I leave the 3/8 Boiler steel shims in/ Or do I take them out?? Does anyone now what is now best? This is unbelievable....I am at loss for words.
I had these installed by a mechanic..and paid him well....will see what he says, as this whole thing needs to come apart and now fine tuning is simply out of the question.
Well I guess you learn from your mistakes..just do not learn like me.
Dmut
Full Access Member
it's a basic rule, to always use isolators when assembling coils and shocks. because isolator works as bushing, eliminating metal to metal tensions.Wow this really ***** for me. I am going to have to tear down the whole front end.
First off no where in the Bilstien instructions does it mention how to mount coil onto aluminum plate or mention that rubber iso's should be added. Can you say contact them tomorrow?...
tommudd
Moderator
answered your PM
Thanks Tom & Troy for responding to my Pm's....And Dmut for pointing out they forgot to install the lower iso's.
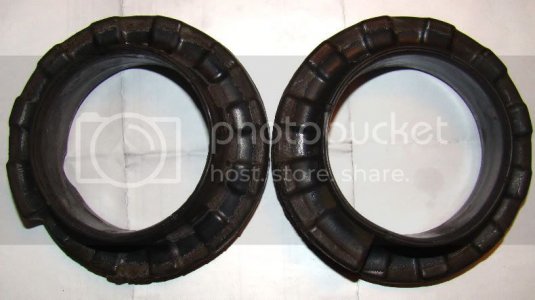
Just came from mechanics shop.
I explained that no different as the top plate with the rubber isolator that got moved with the stock top plate, as a cartridge type strut system, the old bottom isolators should have been installed with the new Bilstiens's & OME 927's.
I brought in the stock shocks and showed him the rubber isolators that now need to be installed.
39235[/ATTACH]"]
Friday at his responsibly (no charge) he will start over and ensure that they get installed.
Also trying to plan on clevis lift amount, probably start at 2 conduits passenger side and 3 driver's side. What Fun!!
Just came from mechanics shop.
I explained that no different as the top plate with the rubber isolator that got moved with the stock top plate, as a cartridge type strut system, the old bottom isolators should have been installed with the new Bilstiens's & OME 927's.
I brought in the stock shocks and showed him the rubber isolators that now need to be installed.
39235[/ATTACH]"]
You must be registered for see images attach
Friday at his responsibly (no charge) he will start over and ensure that they get installed.
Also trying to plan on clevis lift amount, probably start at 2 conduits passenger side and 3 driver's side. What Fun!!
Attachments
huntbuggy
Full Access Member
answered your PM
huntbuggy
Full Access Member
All UCA bolts are loosened out but this driver's front looks like a challenge...

WTF. Those are old original steel lines and fittings... not much give. Will I have to remove the front brake fitting and line just to remove this bolt?!
WTF. Those are old original steel lines and fittings... not much give. Will I have to remove the front brake fitting and line just to remove this bolt?!
Last edited:
rockymountain
Full Access Member
remove the bolt on that brake line fitting so you can move it. Then you'll be able to get the bolt out a lot easier. Just take the bolt out from the wheel well.
huntbuggy
Full Access Member
Thx again RockyMountain, just removed the 10mm bolt holding in the fitting, but still not much give - will try messing around tapping it in a bit through the body carefully, might just be rusted stuck... like everything else. :disgust:
huntbuggy
Full Access Member
UCA readiness
Just needed a bunch of brake cleaner and some coaxing, good tips.
Interesting how the new bolt retainers are straight, not bent upwards like the original ones... no worries. Guess just be careful with placement up against the body or below on the frame rail putting them back in - they look like a nice item to slice into brake lines if you're not watching what you're torquing.
Now just have to check the mail like a kid at Christmas every day for the JBA package!
Any news on your fronts LibertyTC? Go ahead and put two conduits in there - everyone's doing it")
Just needed a bunch of brake cleaner and some coaxing, good tips.
Interesting how the new bolt retainers are straight, not bent upwards like the original ones... no worries. Guess just be careful with placement up against the body or below on the frame rail putting them back in - they look like a nice item to slice into brake lines if you're not watching what you're torquing.
Now just have to check the mail like a kid at Christmas every day for the JBA package!
Any news on your fronts LibertyTC? Go ahead and put two conduits in there - everyone's doing it
Last edited:
Ya but not everyone has missing lower isolators..:whip:
Going back to shop Friday AM to have them remove the works and install the Iso's. (properly):whip:
Keep in mind that I also have boiler's shims in 3/8 steel in there....
Will know more on clevis lift from your measurements Mitch...
I dread the JBA 4.5 coming up on mine soon too.
Should I get some new bolts ready or what is the deal?
tommudd
Moderator
You shouldn't have to replace the bolts since they are more or less protected up were they are. The last set we installed here the KJ was really rusted up and they came out no problems. I've done 5 sets of JBA UCASs now and never had problems with the bolts
huntbuggy
Full Access Member
Tom's probably right. I only got new ones because the retainer literally fell off one of mine and two others were rusted to sh*t so no bolt head left - holding the retainers saved my skin in removal. Where I appear to have had leaks, and a thick coating of grime and buildup - the one bolt and nut under there was PERFECT... guess too clean can sometimes be a problem. Will be putting a coat of Rustcheck protectant once everything is done and then retightened... someday.
(That and I'll stop parking in the creek... thx guys.)
Posted in the clevis section - and will cross on LOST - would love some honest feedback if Boiler's+2 conduits is pushing it with my old CVs?

(That and I'll stop parking in the creek... thx guys.)
Posted in the clevis section - and will cross on LOST - would love some honest feedback if Boiler's+2 conduits is pushing it with my old CVs?
huntbuggy
Full Access Member
(Man I cleaned off a lot of rust and grime for less Titanic and creek-parking look, hard to make this thing very photogenic - Will have to visit the detailing forum more often like TC)
Looks better than mine in the cleaning department. Gave whole thing mud bath though!
As HJ would say, how come you did not use back to black on the boot...??
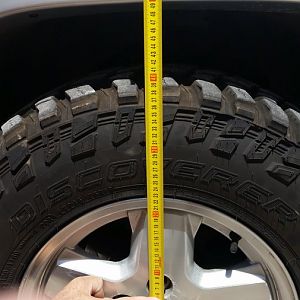
Mitch as long as you stay under 23" Hub to flare you should be fine. Both springs will settle about 1/2 " and the driver's side front a bit more. That is when fine tuning of clevis like adding one more on driver's side comes in.
Once you have it on the ground I sure would like to know where you sit cause mine is off without the Iso right now. I am prepping 3 drivers and two pass conduits to go in with iso Fri.
As HJ would say, how come you did not use back to black on the boot...??
Mitch as long as you stay under 23" Hub to flare you should be fine. Both springs will settle about 1/2 " and the driver's side front a bit more. That is when fine tuning of clevis like adding one more on driver's side comes in.
Once you have it on the ground I sure would like to know where you sit cause mine is off without the Iso right now. I am prepping 3 drivers and two pass conduits to go in with iso Fri.
Similar threads
- Replies
- 4
- Views
- 3K
- Replies
- 14
- Views
- 7K