Actual Lift Amount - Lets Compare Fender Heights

Disclaimer: Links on this page pointing to Amazon, eBay and other sites may include affiliate code. If you click them and make a purchase, we may earn a small commission.

duderz7

Full Access Member
Joined
Jan 20, 2016
Messages
1,632
Reaction score
1,419
Location
Weiser, ID
I wouldn't trust those lower cam tabs that have been welded on. Random hunks of steel between coils in shot springs to gain lift is never a good idea. I would venture a guess that the suspension geometry is far from ideal. I'm not saying you can't do what you're doing, and I'm not trying to offend, but it looks like a hack job. But you seem to having fun so carry-on, it's your rig afterall. Where does it measure? Hub to fender flare. Inquiring minds want to know.
 

joshgoble

Setting on 37x13.5x 17
Joined
Apr 29, 2023
Messages
134
Reaction score
55
Location
Baird TX
I wouldn't trust those lower cam tabs that have been welded on. Random hunks of steel between coils in shot springs to gain lift is never a good idea. I would venture a guess that the suspension geometry is far from ideal. I'm not saying you can't do what you're doing, and I'm not trying to offend, but it looks like a hack job. But you seem to having fun so carry-on, it's your rig afterall. Where does it measure? Hub to fender flare. Inquiring minds want to know.
Well as i said previously Im looking for the coil overs to do away with all spacers and the geometry is the same as factory. Every thing except the steering rack and outer tie rods which will be raised 3 3/4 inches to correct the bump stear. I just hadnt gotten that far as I previously stated. And 340 MPa. With a tensile strength of about 470MPa isn't just a hunk of steel.
As far as center of hub to fender right now is running at 29 inchs. And when finished with the new coil overs it should be closer to 30.
 

joshgoble

Setting on 37x13.5x 17
Joined
Apr 29, 2023
Messages
134
Reaction score
55
Location
Baird TX
I wouldn't trust those lower cam tabs that have been welded on. Random hunks of steel between coils in shot springs to gain lift is never a good idea. I would venture a guess that the suspension geometry is far from ideal. I'm not saying you can't do what you're doing, and I'm not trying to offend, but it looks like a hack job. But you seem to having fun so carry-on, it's your rig afterall. Where does it measure? Hub to fender flare. Inquiring minds want to know.
And if you could point me in the direction of 26 to 28 inch coil overs that Will fit a kj the spacers will be gone.
 

KJowner

Full Access Member
Joined
Oct 20, 2022
Messages
2,240
Reaction score
1,381
Location
Uk
If it was mine I'd want more metal in the extension brackets where they join the car, overlapping the joint and something more than a couple of long butt welds holding the suspension arm on, the brackets would be much stronger if they were boxed in and triangulated. I'd be very concerned about the current setup snapping off.
Also looks like a fluxcore mig has been used without any weld prep?
It's an interesting project but in my opinion needs a lot more strength adding.
 

sleazy rider

Retired moto tech and gearhead
Joined
Dec 8, 2020
Messages
540
Reaction score
501
Location
SE Michigan
Yup, I expect those non-reinforced welds to fold like white bread under flex stress.
 

joshgoble

Setting on 37x13.5x 17
Joined
Apr 29, 2023
Messages
134
Reaction score
55
Location
Baird TX
If it was mine I'd want more metal in the extension brackets where they join the car, overlapping the joint and something more than a couple of long butt welds holding the suspension arm on, the brackets would be much stronger if they were boxed in and triangulated. I'd be very concerned about the current setup snapping off.
Also looks like a fluxcore mig has been used without any weld prep?
It's an interesting project but in my opinion needs a lot more strength adding.
I was asked for pictures it is far from done and I agree with you about boxing in but at a certain point you have to look at what it is your building off and the fact it is only held in place by two 14 mm & two 12 mm bolts and yes the metal was cleaned with a grinding disc before being strung with 5p+ and filled 7018.

Now when I get it completed I’ll post the photos then every one can nitpick and make the remarks on what i should have or should not have done. But f
 

KJowner

Full Access Member
Joined
Oct 20, 2022
Messages
2,240
Reaction score
1,381
Location
Uk
If it was mine I'd want more metal in the extension brackets where they join the car, overlapping the joint and something more than a couple of long butt welds holding the suspension arm on, the brackets would be much stronger if they were boxed in and triangulated. I'd be very concerned about the current setup snapping off.
Also looks like a fluxcore mig has been used without any weld prep?
It's an interesting project but in my opinion needs a lot more strength adding.

Not trying to get at you, just suggesting that adding more metal might stop something nasty happening, it would be unpleasant if something came off at 50+.
When you post on here you will get comments from people who will point out something they think is unsafe. If you look at the original design you will see its significantly stronger than 2 add on plates stitch welded in place, you have increased the amount of leverage applied and decrease the strength at the point the suspension attaches to the car, you state its not finished but you them say you have done 1200 miles in it! I admire what you're doing but as I said earlier I think you should put a lot more strength in it before you start using it.
 

joshgoble

Setting on 37x13.5x 17
Joined
Apr 29, 2023
Messages
134
Reaction score
55
Location
Baird TX
Not trying to get at you, just suggesting that adding more metal might stop something nasty happening, it would be unpleasant if something came off at 50+.
When you post on here you will get comments from people who will point out something they think is unsafe. If you look at the original design you will see its significantly stronger than 2 add on plates stitch welded in place, you have increased the amount of leverage applied and decrease the strength at the point the suspension attaches to the car, you state its not finished but you them say you have done 1200 miles in it! I admire what you're doing but as I said earlier I think you should put a lot more strength in it before you start using it.
I attached a picture of the adjustable spring tower I have started. Any suggestions on directions to go from here would definitely be appreciated and considered.

Well I suppose I should have just waited to post the picture . I was asked for them. And the fish plates will be on the inside of the Bracket Not really visible from the front and yes it is trial and error here so yeah it’s add something drive it adjust it drive it and check it again. And if I something comes up and there a problem the process starts over but I don’t have a set up to bounce and vibrate it to get everything settled so I do the next best thing I drive it down a wash board dirt road. After that’s done I figure it will be about as settled as it’s going to get. And I was saying it has not been a problem as of yet not that I’m not planning to reinforce it . But point out the paint jobs ***** when you are showing lead body work is kinda jumping the gun. But I had finally made it to the point it I felt it wasn’t the dumbest thing in the world I had done and it wasn’t a death trap. And I was not going to steer someone in the wrong direction if they felt that they wanted to follow suit. But anyway I don’t mind comment or ideas that would make it a better set up And help . But doubting my ability to do simple math and geometry is pointless. Those comments are pointless and some what out of line considering they know nothing about or of me. And I will have something to say that is equivalent to to their comment. Unless they are right. Then I would just say thank you and change it.
You must be registered for see images attach
 

joshgoble

Setting on 37x13.5x 17
Joined
Apr 29, 2023
Messages
134
Reaction score
55
Location
Baird TX
As you can tell adding metal to the point of over kill isn’t much of an issue when I’m working on the final draft.
 

Attachments

  • image.jpg
    image.jpg
    274.7 KB · Views: 5

joshgoble

Setting on 37x13.5x 17
Joined
Apr 29, 2023
Messages
134
Reaction score
55
Location
Baird TX
As you can tell adding metal to the point of over kill isn’t much of an issue when I’m working on the final draft.
I’m planning on drilling the holes out to 7/8 inch to lighten the load on the unstrung weight and a cross brace once I figured out where is a good place that it won’t be in the way
 

Attachments

  • image.jpg
    image.jpg
    219.5 KB · Views: 7

Celticlady

Full Access Member
Joined
Apr 19, 2025
Messages
67
Reaction score
33
Lets all measure our true lifted (or un-lifted) heights. I have a couple of pics below showing how you need to measure so that we are comparing apples to apples. List your year, type of lift, miles on current suspension setup, and front and rear fender heights. List right and left also if they happen to differ more than 1/4". I'd like to see the measurements for as many stock un-lifted KJs too with the least amount of miles so we can help people in the future to tell if/how much their stock springs are sagging. I would also like to see the height from those of you that are SFA'ed. (So the rest of us can be jealous).

2007 Sport
Daystar 2.5" Lift plus 3/8" Clevis
35k miles on Jeep, 15k miles on the lift
Stock Springs
Stock Bumper
Front Fender Height: 22.25
Rear Fender Height: 21.25

My fenders measured this the day after I installed the lift and have not dropped any... YET. 8)

Also, no need to list tire and wheel size. It is irrelevant for this measurement. This just measures the suspension height and it will be the same whether you have stock wheels and tires, or if you stuff 35's under there.

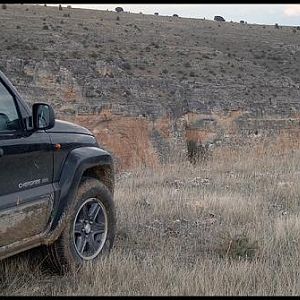
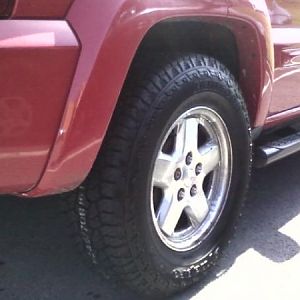
Measure the distance from the center of the wheel hub to the bottom of the fender flare.
You must be registered for see images attach


Take the measurement at the bottom of the rounded outer edge of the fender flare. The green line in the pic shows where to take the measurement. The fenders bevel down as they go in closer to the inner fender well. So, if we all just measure to the spot I marked in green in the pic, we will have an even comparison. In this picture, it measures 22.25"
You must be registered for see images attach
 

Attachments

  • IMG_0774.jpeg
    IMG_0774.jpeg
    170.9 KB · Views: 12
  • IMG_0776.jpeg
    IMG_0776.jpeg
    216.7 KB · Views: 11
  • IMG_0778.jpeg
    IMG_0778.jpeg
    195 KB · Views: 11
  • IMG_0779.jpeg
    IMG_0779.jpeg
    167.2 KB · Views: 12

Celticlady

Full Access Member
Joined
Apr 19, 2025
Messages
67
Reaction score
33
Having a hard time with this site... again.

2.5" Rock Father front 2729 coils over OME struts. Ranco progressive rear springs. Extended rear shocks.

The right is 1/2 higher. It's been that way since I bought it 200,000 miles ago.
Standard size 10 ply trail tires

My own creation front winch bumper. I did not like anything offered. I did not like their structure, or lack there of.Mine covers the washer bottle and the lower radiator/condenser. My bumper has 3/8" x 2" wide strut that uses the front undercarriage bolt has a anchor. The winch torque is to the real frame. Not that tinny sheet metal that disaster plastic bumper is sheet metal screwed into. And prices were insane. After I build my own, I understood the insane pricing.

Skid Row skid plates. I have not got one for the tank yet. Thats next on the list. I made my own hitch slid plate. Thinking it would be enough. I have recent drag marks on my tank. Not good.

I have not been able to locate a rear diff skid plate. Lots of front skid plates. Which is not needed with the skid row skid plate. Lots of Dayton skid plates. But not THIS Dayton. Probably will have to make my own.

I do recommend these skidrow slid plates. Every KJ should have the bolt holes for the front plate. I put in 3/8 riv-nuts for trans and 4wd skid plates. If you think it makes it hard to work on your jeep it's not. The skid plates have holes to change the oil. I just had to put a new transmission in. It took longer to put it on 4 jack stands than to drop the plates.

The only way to do a 2.5"'lift with stock springs is spacers. Today my spacers went into scrap bin where they belong. IMO and others opinions, stock springs on spacers give you an awful ride. They throw around in your seat. The jeep feels very unstable. They clunk and bang because the strut spring is dragging over your upper control arm and ball joint Even with after market upper control arms that set the top of your yoke out from the strut spring.

I just took my KJ on a test ride down my very rocky dry creek bed. Before I had to sit forward of the seat back and pivot my hips on the seat like a horse saddle or I would get thrown all over.

Smooth ride. No clunking banging.
 

Celticlady

Full Access Member
Joined
Apr 19, 2025
Messages
67
Reaction score
33
My way of finding wheel center. Then measuring by resting the end of tape measure on machinist square.

At first I did not see his point for this.
Then realized he was right. It not only does not matter what tire size, it doesn't matter if your tires are flat
 

Attachments

  • IMG_0771.jpeg
    IMG_0771.jpeg
    284.6 KB · Views: 10

Latest posts

Members online

Top