What did you do to your jeep today?

Disclaimer: Links on this page pointing to Amazon, eBay and other sites may include affiliate code. If you click them and make a purchase, we may earn a small commission.

seafish

Full Access Member
Joined
Jan 10, 2024
Messages
149
Reaction score
197
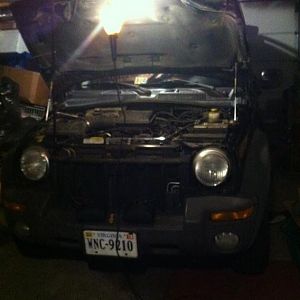
Getting closer and closer to Giddyup being back together --
Radiator and intercooler went back in and also plumbed up with new hoses.
Put a little smear of silicone grease on the hose bibs to keep them from totally sticking next time I need to pull them.

You must be registered for see images attach
 

seafish

Full Access Member
Joined
Jan 10, 2024
Messages
149
Reaction score
197
BEFORE reinstalling the fan shroud, I performed an operation on it which I am calling the "Butt Cheek" fan shroud modification. :rolleyes:

Instead of separating the top and bottom halves like many people have done, I accurately marked it and then used a long carpenters hand saw to slice the shroud vertically into RIGHT and LEFT halves.

By cutting it vertically, each half of the shroud still uses 1 oem bracket and also 1 oem bolt to secure it into place on the back of the radiator. Then I simply drilled 4 holes over the fan blade area and used 2 zipties right at the top center of the shroud to pill and hold the 2 halves tightly together.

It takes a little effort to rotate each half around the fan blade into or out of position, but it is totally doable and will make future service on the serpentine belt, or anywhere on the front of the engine, MUCH easier.

You must be registered for see images attach
 
Last edited:

seafish

Full Access Member
Joined
Jan 10, 2024
Messages
149
Reaction score
197
Finally today I also had to MacGyver my air box AGAIN...

I hadn't yet seen a broken section of plastic RIGHT where the turbo intake hose attaches and clamps to the box. Even though the new silicone hose would have slid past the broken section, this is clearly a weak spot that was just going to keep on cracking, so I needed to find a way to solidly reinforce it.

I ended up taking an extra 3" stainless steel hose clamp and first pried the buckle off and then used a grinder to cut the clamp to a circumference that let it fit perfectly INSIDE the box inlet. I pulled out my trusty (but not crusty ;)) tubes of JBWeld and mixed up enough epoxy to spread on the inside of the hose bib (first cleaning it with acetone). Finally I embedded the stainless hose clamp into the epoxy (also first cleaning it with acetone) and then added a little more epoxy on each side of the hose clamp where the plastic on the air box was missing.

The coolest part about this fix is that the hose clamp, being from a larger diameter clamp then the intake bib, simply slipped right in and then EXPANDED into the epoxy...no need to clamp or otherwise hold it while the epoxy dries overnight!!!

A little light sanding tomorrow and it'll be ready to install.

You must be registered for see images attach

b
 
Last edited:

turblediesel

memberable
Joined
May 31, 2015
Messages
3,414
Reaction score
1,143
Location
Alaska
Then I performed an operation which I am calling the"Butt Cheek" fan shroud modification. :rolleyes:
Instead of separating the top and bottom halves like many people have done, I used a hand saw to slice the shroud vertically into RIGHT and LEFT halves.
By doing it that way, each half of the shroud still has 1 hook and also 1 bolt to hold it in place. Then I drilled 4 holes over the fan blade area and used 2 zipties right at the top center of the shroud to hold the 2 halves tight together. It takes a little effort to rotate each half around the fan blade into or out of position, but it is totally doable!!!
You must be registered for see images attach
Really thinking outside of the fan shroud there!
 

sota

Full Access Member
Joined
Apr 6, 2011
Messages
2,330
Reaction score
1,132
Location
NJ
water leak located.
upper passenger corner of the windshield leaks on to the headliner.
windshield is OE, so no idea if it's been changed (probably not) so i'm suspecting FL sun degradation of possibly insufficient glue in that corner, that finally gave up.
 

KJowner

Full Access Member
Joined
Oct 20, 2022
Messages
911
Reaction score
534
Location
Uk
Driving along happily at 60~70 mph when the battery light winked on and the chime sounded, then it went off I parked at the shop and investigated, the alternator bearing was a bit noisy, finished shopping and went home, by the time I got there it sounded like a wrecked washing machine, I know what I'll be doing on my Jeep tomorrow.
 

seafish

Full Access Member
Joined
Jan 10, 2024
Messages
149
Reaction score
197
the alternator bearing was a bit noisy, finished shopping and went home, by the time I got there it sounded like a wrecked washing machine,

Is that he original alternator?

How many miles/km are on it?

Are you going to get it rebuilt, use an oem replacement or install a reman alternator?
 

KJowner

Full Access Member
Joined
Oct 20, 2022
Messages
911
Reaction score
534
Location
Uk
Is that he original alternator?

How many miles/km are on it?

Are you going to get it rebuilt, use an oem replacement or install a reman alternator?
143,000 miles, as far as I know its the original Denso, I have a spare second hand one so that will be going straight on tomorrow. I'll get the old one rebuilt, most of the parts places only seem to have new Chinese alternators with no exchange and I don't want one of them. The spare is similar milage so probably not a long term solution.
 

KJowner

Full Access Member
Joined
Oct 20, 2022
Messages
911
Reaction score
534
Location
Uk
Can you find and post the Denso part# when you are putting the replacement on?

TIA
I'll take a picture today, I was wrong with the one that just failed, it's Chinese and doesn't look that old...
 

turblediesel

memberable
Joined
May 31, 2015
Messages
3,414
Reaction score
1,143
Location
Alaska
Driving along happily at 60~70 mph when the battery light winked on and the chime sounded, then it went off I parked at the shop and investigated, the alternator bearing was a bit noisy, finished shopping and went home, by the time I got there it sounded like a wrecked washing machine, I know what I'll be doing on my Jeep tomorrow.
I have the Litens decoupler part number...
Mopar #134D2 0001
Liten Made in Canada
#5301 3554 AF-001

If you need one.
 
Last edited:

Jeremy-WI

Full Access Member
Joined
May 20, 2017
Messages
374
Reaction score
188
Location
Home
Been there done that… Thankfully, the worst part of the fix is putting everything back together.
Actually getting the new one in wasn't that bad after I decided to put the front in first, then there was plenty of room to put the rear together at the transfer case. Before that I installed a AC Delco remanned starter- that was the worst part
 

seafish

Full Access Member
Joined
Jan 10, 2024
Messages
149
Reaction score
197
So with the air box and the turbo intake hose still out of the way, it was the perfect time to flush the likely original power steering fluid completely out of the reservoir, PS pump, steering box and the lines.

Of course I started by removing all the dirty fluid from the rezzy with a turkey baster, but when it was low enough, I also removed the return line going into it and then capped the port on the rezzy that the return line went into. Then I clamped the return line into a one gallon bucket which I placed where the airbox used to be and also put a large funnel into the top of the PS rezzy and filled it back up with fresh ATF+4.

I jacked up the front end until both tires were off the ground and had a friend slowly turn the steering wheel lock to lock. Of course this slowly pushes out all of the old contaminated fluid, even without the PS pump running. I had him stop about every 6 turns and added more fresh ATF+4 to the rezzy until the fluid came out looking just like what I was pouring in. Overall, she took just over 2 quarts, though shell prolly still burp some air and need a top off after I run her for a bit...which is getting so much closer now!!!

Below is a photo of the set up ... and also a pic of the grossness that came out--

You must be registered for see images attach
 
Last edited:
Top