Some of the programming stuff isn’t too bad if you have the wire harness in there already. I was able to add automatic headlights to my 07 Commander with swapping in a new light/blinker stalk (left side of steering wheel) and the correct light sensor for the top of the dash. The wire harness for the light sensor was right there under a dummy plug in the dash and JScan enabled the function in the Front Control Module. Enjoying a nice upgrade now.


You are using an out of date browser. It may not display this or other websites correctly.
You should upgrade or use an alternative browser.
You should upgrade or use an alternative browser.
What did you do to your jeep today?
- Thread starter TheQ
- Start date
Disclaimer: Links on this page pointing to Amazon, eBay and other sites may include affiliate code. If you click them and make a purchase, we may earn a small commission.
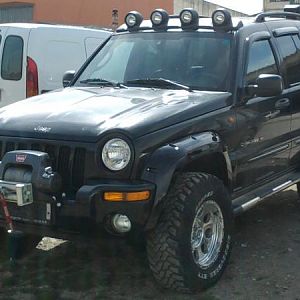
That is pretty sweet, I been looking for something similar for my Avy, but buying one pre built is so expensive. I haven't seen to many good bumpers for the liberty, my younger brothers xterra has sweet aftermarkets, but same thing the company made good stuff, then closed shop.Yes the CRD springs are a bit harsh, so I recently changed to 2927 spring. It rides alot better and has better suspension flex with the softer spring rate.
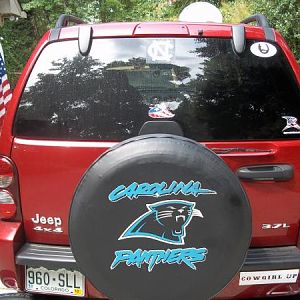
Front bumper is a ARB bumper I bought used and refurbished. More Pictures on the front bumper: Front Bumper
Rear bumper is a Rock Lizard Fabricatons bumper, but they are no longer in business. More Pictures on the rear bumper: Rear Bumper
I would be happy with a used ARB for my liberty been looking. yours is cool, I like the stance tires look big too what size are they.
The link for the front and rear go to the same page, can you post your front bumper link. thanks,Yes the CRD springs are a bit harsh, so I recently changed to 2927 spring. It rides alot better and has better suspension flex with the softer spring rate.
Front bumper is a ARB bumper I bought used and refurbished. More Pictures on the front bumper: Front Bumper
Rear bumper is a Rock Lizard Fabricatons bumper, but they are no longer in business. More Pictures on the rear bumper: Rear Bumper
atikovi
Member
No programming needed it was plug and play. Just like the cruise control I installed last week.
Got shipped the wrong part for my strut rehab project … Grrr. I won’t be doing that this weekend, I guess.
I did my headlights with 2k clear lacquer, they were almost opaque, after a quick wet sand and a wash with alcohol I put 3 coats on wet on wet, they can up glass clear. There are a few deep cracks in the lens that you can still see from certain angles but they are so much better than they before, I did the high level brake light as well, that came up like new.Scored a fog light kit at a junkyard. $40 total. Lenses just need restoring.
You must be registered for see images attach
Just don't be tempted with 1k, it's awful stuff!
It's only cause we know how that feels, particularly on a Friday!!

I sussed out the last bits of my manual transmission Master and Clutch slave uograde/replacement.
Long story short - I hate the 'lubed for life/sealed/prebled/unserviceable' shit that you get from the parts stores... Because they are idiotic. No fluid is good forever, and bleeding a system is just not hard.
So I bought a Dorman MC and SC, separately. Intwrwstingly, there is no seperately-available clutch hydraulic line available for the application. However, there are fittings available (-3 JIC and - 4 JIC, as you like) to go in place of the normal barbed fittings which slide into nylon line and roll-pin in place, allowing you to fabricate a nice, massively-overkilled, hydro line for thr system. I'm using -4, because I couldn't find -3 with field-replaceable hose ends (ie, I want to be able to have 6' of line in the back of the jeep and fab a new line in the boonies, if I need to. Not thet I expect to - this hose is good for something like 3000psi, and I'll be sleeving it in heatshield sleeving for heat and abrasion resistance.
Unfortunately, I forgot to order 45deg and 90deg (and maybe a 180deg, to make the final turn into the SC) adapters, so I won't be able to do it this weekend. But I'll spend that time helping my son get ahead of his XJ's overheating issue, by installing a flex fan and spacer in place of the factory clutch fan. Also, will finalize my plans for the (electric) cooling fan bypass circuit... I want the aux fan to run for 5 minutes after he turns the jeep off, so that it will help address the vapor lock issue he is having at present. It's just a good idea, honestly, so I'm going to do it to all of our Jeeps (90 and 97XJs, 94 ZJ, and 05 KJ)
I *may* just lay in a separate circuit, with a coupler for a 1/8NPT thermostatic switch in the upper rad hose, and that controlling a relay separate from the ECM entirely. This would be allowed to activate any time the coolant in the upper hose got above 200, so it would activate on and off as convection flow circulates in the engine after shutdown. I ran my S10 like this after installing a 350 and it worked great. Not sure yet.
Other stuff I've done over the past few months-
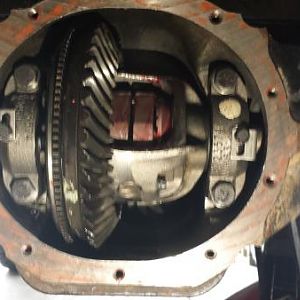
-R&R my factory LSD POS (which had nearly completely grenaded, so bad thet I got what sounded like a bad CV joint sound out of the rear when turning - spider gears in it were missing skads of steel, abd there was a pile of steel in the bottom of the diff) rear axle for a same year replacement with open diff. Beautiful gears in the salvage yard part, and it cleaned up well with some OSPHO and a wire brush.
-Did the above, with plans to do this, which I did last month - installed an Aussie Locker. I've heard they aren't available for 05-07 8.25. Wrong. Just have to have the open diff. It went in easily, and has been working well in my DD. I don't anticipate trouble. Yes, it feels a bit different, and makes some noise. So?
-continuing to ponder ideas to fix the shit e-brake. This is holding up my remote start install. I have pretty much settled on a way to delete the clockspring in the lever, but I need to take some measurements to be sure.
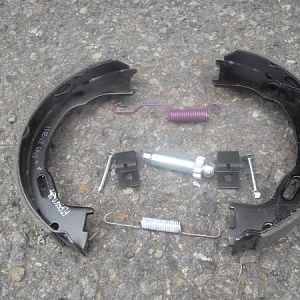
Installed my knock off spartan locker today - didn't get any pics though. I did run into one snag with trying to fit the side gear into the carrier - it was rubbing on the rough casting area of the carrier so I had to trim down the side gear to clear the carrier otherwise it would not sit in all the way and I couldn't get the cross pin through. Going on a 4 day backcountry trip next weekend so hopefully will get a chance to test the locker out.
Can’t wait to hear about the trip report & how the locker did.Installed my knock off spartan locker today - didn't get any pics though. I did run into one snag with trying to fit the side gear into the carrier - it was rubbing on the rough casting area of the carrier so I had to trim down the side gear to clear the carrier otherwise it would not sit in all the way and I couldn't get the cross pin through. Going on a 4 day backcountry trip next weekend so hopefully will get a chance to test the locker out.
You must be registered for see images attach
All I had to do was threaten them with fire, they came right off with the impact! The Bernzomatic torch was never even turned on, LOL.
I guess a week sitting with the penetrating oil helped too.The next step is to get these clevis forks cleaned up and painted.
Wire wheeled / brushed, wiped with mineral spirits, and zapped with Rustoleum Rust Reformer paint.
Those are At The Helm’s 1/4 inch top plate spacers on the left.
You must be registered for see images attach
Those are At The Helm’s 1/4 inch top plate spacers on the left.
You must be registered for see images attach
The clevis forks in the second photo remind me of the M-shaped hovering robots/ships in the classic 1980’s movie, Tron. I can imagine they just cleared the fence and are headed this way!
Any reason you're not running the KK strut assemblies? I understand they give an inch of lift.You must be registered for see images attach
All I had to do was threaten them with fire, they came right off with the impact! The Bernzomatic torch was never even turned on, LOL.
The next step is to get these clevis forks cleaned up and painted.
These are actually from a KK. The 08-09? have cast clevis forks but the 09/10-12 have pressed steel forks. The cast version looks stronger in my opinion, which is why I went with that. The lift height is the same across KK years. You’re right it is higher than the KJ version. And also technically these are from a KA Nitro, which is a KK clone (same part numbers).Any reason you're not running the KK strut assemblies? I understand they give an inch of lift.
Last edited:
Link has been fixed.The link for the front and rear go to the same page, can you post your front bumper link. thanks,
31x10.5-R15 TiresThat is pretty sweet, I been looking for something similar for my Avy, but buying one pre built is so expensive. I haven't seen to many good bumpers for the liberty, my younger brothers xterra has sweet aftermarkets, but same thing the company made good stuff, then closed shop.
I would be happy with a used ARB for my liberty been looking. yours is cool, I like the stance tires look big too what size are they.
Must be a rabid squirrelYou must be registered for see images attach
Let’s see how this goes…
So what your saying is it was easy so I should send mine your way to clean up nice like that. Those look good!Wire wheeled / brushed, wiped with mineral spirits, and zapped with Rustoleum Rust Reformer paint.
You must be registered for see images attach
Those are At The Helm’s 1/4 inch top plate spacers on the left.
You must be registered for see images attach
Similar threads
- Replies
- 22
- Views
- 4K
- Replies
- 173
- Views
- 35K