What did you do to your jeep today?

Disclaimer: Links on this page pointing to Amazon, eBay and other sites may include affiliate code. If you click them and make a purchase, we may earn a small commission.

Johnny O

Just hangin' out.
Joined
Apr 29, 2021
Messages
2,432
Reaction score
3,294
Location
Bellevue NE
I’m working on tracing my tail light issue (my left running lamp is not getting power)
had similar issue on Bert, took months to find the plastic housing had melted a little, bubbling over the contact ring thus breaking the circuit. A few seconds with an exactor knife fixed the issue.
 

Johnny O

Just hangin' out.
Joined
Apr 29, 2021
Messages
2,432
Reaction score
3,294
Location
Bellevue NE
Got the new CV and Boot for Berts forward prop shaft. Kids are bringing it over tomorrow soI can doo me last Bert project.

Managed to snap off the first frame bolt on KHAAAAN! So once morning patio coffee feasibility study is done, I get to start today with a drill and tap.
 

turblediesel

memberable
Joined
May 31, 2015
Messages
3,417
Reaction score
1,147
Location
Alaska
Got the new CV and Boot for Berts forward prop shaft. Kids are bringing it over tomorrow soI can doo me last Bert project.

Managed to snap off the first frame bolt on KHAAAAN! So once morning patio coffee feasibility study is done, I get to start today with a drill and tap.
Try a left-handed drill bit. Sometimes they'll back out while drilling.
 

CherokeeLiberty

Full Access Member
Joined
Nov 14, 2018
Messages
540
Reaction score
760
Location
Northern MN
had similar issue on Bert, took months to find the plastic housing had melted a little, bubbling over the contact ring thus breaking the circuit. A few seconds with an exactor knife fixed the issue.
Unfortunately, my test light says there’s no power to it period. I wish it would have been that simple! I’ll tackle it another day.
 

Johnny O

Just hangin' out.
Joined
Apr 29, 2021
Messages
2,432
Reaction score
3,294
Location
Bellevue NE
Try a left-handed drill bit. Sometimes they'll back out while drilling.
It started out shockingly well as pictured below...
You must be registered for see images attach
but the bolt has a twist...things went horribly wrong shortly thereafter...
 

lfhoward

Well-Known Member
KJ Supporting Member
Joined
Dec 9, 2012
Messages
2,290
Reaction score
2,462
Location
Philadelphia, PA
Suspension rebuild project, continued.

All New bushings and ball joints installed in the refurbed LCA’s.
You must be registered for see images attach


My rebuilt JBA adjust a struts arrived. A company called Wheel Every Weekend did the work in California! Ian and Brittany, the owners, were great to deal with, and their work is amazing.
You must be registered for see images attach


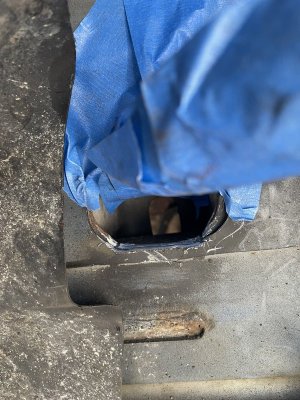
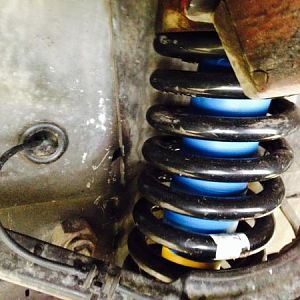
WEW is a licensed Bilstein shock rebuilder, and they redid mine and even tig welded in a schrader valve to recharge the Nitogen and make it easier to rebuild them next time around.
You must be registered for see images attach


The springs are new Eibach coilover springs because the old ones from 2012 looked and acted tired. JBA’s original equipment was a custom variable rate spring, so on WEW and JBA’s recommendations I went with a main spring and a smaller tender spring on top of that to get a similar effect.

The shoulder bolts from the original kit linking the top plates to the shocks put up a fight and lost. The threads on the bolts and nuts were basically destroyed taking them off. I was able to source the exact same part at the local Ace Hardware.
You must be registered for see images attach


JBA Offroad sent me a brand new set of their upper control arms as a lifetime warranty replacement. They look awesome! They came with more modern greaseable bushings (my old ones were rubber) and brand new ball joints.
You must be registered for see images attach


JBA recommends opening up the UCA pockets on the Jeep to allow for more travel and reduce the chance of breaking an arm. A ball pein hammer and some spray paint did that job. [edit: Hammering works on the front pocket, but the rear pocket is beefier and requires a Dremel with a cutting wheel.]

Here are the new JBA UCA’s, refurbished LCA’s, and rebuilt JBA adjust a struts, installed. I will be tackling the knuckles, rotors, calipers, sway bar links, and tie rod ends next, so that I can get this thing on its wheels! I love having the shiny JBA red in the wheel wells. :cool:
You must be registered for see images attach


One more thing before I quit for the day: I put my rebuilt Rock Lizard sliders back on. I cut out some rusty parts and welded in new steel, which I documented in another thread. Nice to have those sliders on again both as steps to get in, and protection from Philadelphia automotive chaos. Oh yeah, and rocks. ;)
You must be registered for see images attach


EDIT:
Ian and Brittany from Wheel Every Weekend asked me to post that unfortunately they can’t rebuild any more of the JBA Bilstein 7100 shocks like mine, because it took 8 hours to do my one set.
As someone who is married to a small business owner, I can totally understand that refurbishing this specific type of shock is not a cost effective use of their time.
I am grateful to be able to keep running my JBA adjust a struts and have them live another Jeep life. Thanks Ian and Brittany! — Lauren
 
Last edited:

sota

Full Access Member
Joined
Apr 6, 2011
Messages
2,332
Reaction score
1,132
Location
NJ
since when did JBA upper arms have a lifetime warranty?
 

lfhoward

Well-Known Member
KJ Supporting Member
Joined
Dec 9, 2012
Messages
2,290
Reaction score
2,462
Location
Philadelphia, PA
I took a break from suspension work today and reinstalled the air box, battery tray, TIPM, and battery in the engine bay. Then I gave it an oil change with Mobil-1 Truck & SUV 5W30 full synthetic. I’ve been using that for the last 7 oil changes or so, and it seems to make the engine smoother. Jeepy also got a new pair of RainEx wipers, because the old ones were more than 2 years old and very streaky. I haven’t plugged the battery in just yet, as the wheel speed sensors are still disconnected and that would cause an instant check engine light. Can’t wait to test it though.
 

AJ9P

Full Access Member
Joined
Feb 16, 2021
Messages
215
Reaction score
167
Location
Wisconsin
The Liberty is still at the mechanics, but i went and cleaned the interior i pulled out to save some bucks. Its amazing how much junk that carpet holds. I plan on doing the outer rockers once it comes back
 

Luke

Interloper
Joined
Oct 21, 2008
Messages
4,083
Reaction score
519
Location
Bancroft, Canada
I took a break from suspension work today and reinstalled the air box, battery tray, TIPM, and battery in the engine bay. Then I gave it an oil change with Mobil-1 Truck & SUV 5W30 full synthetic. I’ve been using that for the last 7 oil changes or so, and it seems to make the engine smoother. Jeepy also got a new pair of RainEx wipers, because the old ones were more than 2 years old and very streaky. I haven’t plugged the battery in just yet, as the wheel speed sensors are still disconnected and that would cause an instant check engine light. Can’t wait to test it though.
You are excelling at making me feel reeeally lazy lately :rolleyes:
 

lfhoward

Well-Known Member
KJ Supporting Member
Joined
Dec 9, 2012
Messages
2,290
Reaction score
2,462
Location
Philadelphia, PA
You are excelling at making me feel reeeally lazy lately :rolleyes:
I have been saving up parts for a long time, meaning to do this work. Then a cracked control arm and a dead shock in a coilover made the Jeep undriveable. This is tiring work. I hope it will be running and driving again soon, because I am feeling pretty beat up! LOL We’ll see how far I can get today. This is binge wrenching.
 

duderz7

Full Access Member
Joined
Jan 20, 2016
Messages
1,424
Reaction score
1,151
Location
Weiser, ID
I have been saving up parts for a long time, meaning to do this work. Then a cracked control arm and a dead shock in a coilover made the Jeep undriveable. This is tiring work. I hope it will be running and driving again soon, because I am feeling pretty beat up! LOL We’ll see how far I can get today. This is binge wrenching.
I've been there (binge wrenching) I had to remind myself a few times while I had mine torn down that I wasn't building a show truck. I was spending way too much time on the tiniest details that made no difference.
 

lfhoward

Well-Known Member
KJ Supporting Member
Joined
Dec 9, 2012
Messages
2,290
Reaction score
2,462
Location
Philadelphia, PA
Yeah, mission creep is a real thing. I cut into a LCA by accident with a grinder while extracting a seized clevis bolt for a coilover. Then I needed to get a replacement LCA (junkyard). Then I figured, I should replace the bushings on both LCA’s since they were original. Which meant I found a 20 ton press for cheap on Craigslist. And then I got an air powered jack for it to make things easier. The replacement LCA was so rusty and the bushings so bad, I also polished and painted both. The mouse got his cookie for sure.

From
You must be registered for see images attach

You must be registered for see images attach

To
You must be registered for see images attach

You must be registered for see images attach
 

lfhoward

Well-Known Member
KJ Supporting Member
Joined
Dec 9, 2012
Messages
2,290
Reaction score
2,462
Location
Philadelphia, PA
The pockets under JBA’s UCA’s need to be trimmed underneath to avoid damage to the arms and allow greater downtravel. This was recommended directly to me by JBA. I understand the recommendation on the forums used to be that the arms would self-clearance but after having broken UCA’s I will go with the manufacturer’s advice on this.

The front pocket has thin walls and was easily clearanced with a ball pein hammer. (Note, clearancing at the top of the pocket is not needed because extended bump stops prevent excessive uptravel.)
You must be registered for see images attach


The rear pockets though have thick walls and the hammer barely touched them. So cutting was necessary. I masked off the arms with painters tape to protect them. (Ideally do the cutting before installing the arms.)
You must be registered for see images attach


I used a metal cutting wheel on a Dremel to cut horizontally just above the pocket floor. Then I used a sawzall and cut downward on both sides. A chisel and hammer got the pieces of steel out. Then I used a grinding stone on the Dremel to smooth out the jagged edge and round off the bottom lip as best I could. All in all I removed between 1/4 to 1/8 inch of material from the pocket.
You must be registered for see images attach


Then I spray painted to discourage rust.
You must be registered for see images attach


Other side
You must be registered for see images attach


The above mod will reduce the chance of cracked arms in the future as well as provide more downtravel in the IFS when articulating off road.
 

Attachments

  • IMG-8140.jpg
    IMG-8140.jpg
    121.7 KB · Views: 9
Last edited:

Johnny O

Just hangin' out.
Joined
Apr 29, 2021
Messages
2,432
Reaction score
3,294
Location
Bellevue NE
Well, today was the day. Got the prop shaft CV rebuilt and replaced the accordion boot. Greased the JBAs and cleaned the filters.

From here on out it is all on the kids. They asked to keep the lights, skid plates and snorkel for their adventures- sorry gang.

Took my last drive in the trusty old hunk of junk. Sure have a ton of memories of wicked-cool adventures in that little tank.

See yinz down in the underworld that is the Wrangler parts of this forum!
 

sota

Full Access Member
Joined
Apr 6, 2011
Messages
2,332
Reaction score
1,132
Location
NJ
when I redid the suspension, I just went on Rock Auto and ordered a complete Mevotech kit, sans uppers. those I got from JBA.
was cheaper than buying all the bushings and ball joints separately, and spending all that time replacing them.
 

lfhoward

Well-Known Member
KJ Supporting Member
Joined
Dec 9, 2012
Messages
2,290
Reaction score
2,462
Location
Philadelphia, PA
when I redid the suspension, I just went on Rock Auto and ordered a complete Mevotech kit, sans uppers. those I got from JBA.
was cheaper than buying all the bushings and ball joints separately, and spending all that time replacing them.
I did consider that, but didn’t know if the aftermarket LCA’s would be as beefy as the Mopars that I had. What do you think, having owned both? I suppose they are plenty strong, since you plow with your rig. Rock Auto is where I got all my Moog bushings that I installed.
 
Top