HOW TO: Install New A-Arms

Disclaimer: Links on this page pointing to Amazon, eBay and other sites may include affiliate code. If you click them and make a purchase, we may earn a small commission.

DJSKJ

Full Access Member
Joined
Oct 22, 2009
Messages
149
Reaction score
1
Location
California
Downtown,
Did you use that thing on the upper ball joint or the lower? I am looking at renting a puller from either Autozone or Pepboys for the lower ones.
Just checked my shipping status and I should receive my new A arms tomorrow.

DJ
 

Downtown

Full Access Member
Joined
Mar 16, 2007
Messages
62
Reaction score
3
Location
**** Rapids, MN
Yes I only used it on the upper BJ.
You can pop the lower loose without any special tools.

THIS CAN BE DANGEROUS ATTEMPT AT YOUR OWN RISK!!!

1. Loosen your lug nuts

2. Jack the jeep up and place it on a jack stand. Do this so the suspension on the side you're working on can hang at full droop.

3. Take off the tire.

4. Clean the exposed threads of the BJ stud.

5. Loosen your BJ nut so that you see about 4-5 threads between the nut and control arm. Coincidently that would be about 4-5 turns :gr_grin:

6. Place your jack directly under the stud/nut of your lower BJ and start jacking up your suspension. Stop just befor the chassis lifts off of the jack stand. (This was enough for my passenger side lower BJ to pop loose)

7. Take out your Big Effing Hammer and start persuading your BJ's stud out by pounding here (see pic). The hammer should make contact in the same spot that my finger makes contact. The shock of the hammer blow plus the weight of the jeep is what makes this work.
You must be registered for see images attach


8. After it breaks loose remove the BJ nut.
 
Last edited:

DJSKJ

Full Access Member
Joined
Oct 22, 2009
Messages
149
Reaction score
1
Location
California
Hmm, that is an interesting way. Since I have not attacked this yet I can speak of specific problems I may/will encounter. I assume you recommend this over a puller? Thanks for info. I really do appreciate it.

DJ
 

twack

Full Access Member
Joined
Mar 3, 2009
Messages
1,131
Reaction score
5
Location
rochester mn
Hmm, that is an interesting way. Since I have not attacked this yet I can speak of specific problems I may/will encounter. I assume you recommend this over a puller? Thanks for info. I really do appreciate it.

DJ

we like using hammers around here :smokin:
 

Downtown

Full Access Member
Joined
Mar 16, 2007
Messages
62
Reaction score
3
Location
**** Rapids, MN
Hmm, that is an interesting way. Since I have not attacked this yet I can speak of specific problems I may/will encounter. I assume you recommend this over a puller? Thanks for info. I really do appreciate it.

DJ

I got this technique from the Haynes manual for my libby :gr_grin:
 

DJSKJ

Full Access Member
Joined
Oct 22, 2009
Messages
149
Reaction score
1
Location
California
All done. I did not replace the lower ball joints, they were fine. I did replace the the tie rod ends on both sides. Both went pretty smooth, however the alignment was way out when I finished. So I am getting aligned as I type this.
Thanks for all info.

DJ
 

LibertyFever

Full Access Member
Joined
Aug 17, 2007
Messages
936
Reaction score
3
Location
New Brunswick, Canada
Wow I wish I had read this posting this morning before tackling the job of replacing a single UCA on my Libby. This afternoon I replaced a single UCA on the passenger's side because of a bad ball joint.

I'll just add my two cents, before starting the job make sure you have all the tools required. I found I needed a 15 mm socket, a 10 mm wrench, and a 21 mm socket & wrench. I too used a BFH to know the old ball joint out.

I simply replaced a single UCA on my Libby with a stock one for now. When the one on the other side goes I'll replace both of them with a pair from JBA's.
 

HoosierJeeper

Gold Supporter/Admin
Staff member
Administrator
Joined
Jan 20, 2009
Messages
20,855
Reaction score
266
Location
Western WI
Thread revival...I know.
Twack, is it 100% necessary to move the steering shaft? Did you have to do anything special to ensure that the steering would line back up again?

Thanks.
 

Cardhu

Full Access Member
Joined
Aug 29, 2011
Messages
685
Reaction score
5
Location
Great White North
you don't need to remove the steering shaft.

deep 18 mm sockets and 12 - 16 inches of extensions to get back one on driver side, come in from front horizontally. you can use a wobble to get it most of the way there but will likely blow apart when you torque it. The deep socket will grab it sufficiently and over the end of the bolt.

You might need a second set of hands to put the bolts in as i just reached up from underneath to put in the bolt while someone lined up the arm.

Struggled for 2 hours or more when i did mine till i figured out the extension routine.

Torque with all 4 wheels on the ground else they will be preloaded . 80 ft pounds i believe.

castle nut is 27 mm and 65 ft lbs then to nearest hole for pin.

I would also recommend opening the bottom of the pockets as I didn't and they will make contact, eventually.

Assuming your doing the JBA 4.5s, check torque on ball joint bolts x 4, 20 ft lbs.
 

HoosierJeeper

Gold Supporter/Admin
Staff member
Administrator
Joined
Jan 20, 2009
Messages
20,855
Reaction score
266
Location
Western WI
Couple more questions if that's ok:
1. Is is absolutely nessessary to open up the pockets? (How do you know if they aren't open enough? Will not opening them limit flex?)
2. The nut at the ball joint....how do you tighten that on the ground with the wheels on? Or are the UCA bolts the only ones to torque down on the ground?

Thanks
 

tjkj2002

Full Access Member
Joined
Dec 17, 2006
Messages
10,612
Reaction score
39
Location
Somewhere between being sane and insane!
Couple more questions if that's ok:
1. Is is absolutely nessessary to open up the pockets? (How do you know if they aren't open enough? Will not opening them limit flex?)
2. The nut at the ball joint....how do you tighten that on the ground with the wheels on? Or are the UCA bolts the only ones to torque down on the ground?

Thanks
No need to open the pockets,the UCA's will self clearnace without damaging the UCA's and create a natural bumpstop so you don't over extend the suspension and cause binding in the CV's.

You tighten the balljoint nuts before putting the wheel on,no need to have full weight on them before torquing,only rubber bushing joints require full weight on them before torquing.
 

rockymountain

Full Access Member
Joined
Apr 20, 2007
Messages
1,734
Reaction score
27
Location
Spencerville, IN
HJ you are smart to ask these questions. Now I need to re-torque my uppers with weight on them because I didn't when I installed my a-arms. I just didn't know you had to do that. Hopefully I didn't hurt too much by driving it all pre-loaded for this long. I feel real stupid right now. :pp:
 

HoosierJeeper

Gold Supporter/Admin
Staff member
Administrator
Joined
Jan 20, 2009
Messages
20,855
Reaction score
266
Location
Western WI
Will this grease gun kit work? Is the grease ok to use? Says for automotive.
You must be registered for see images attach

You must be registered for see images attach

You must be registered for see images attach

You must be registered for see images attach
 

Cardhu

Full Access Member
Joined
Aug 29, 2011
Messages
685
Reaction score
5
Location
Great White North
1. The metal in the pocket will "self clearance" on the uca near the bushing at the body (~2 inches out). tapping bottom of the pocket with the grinder to remove that metal will also eliminate the problem, spray paint it if you do grind it. Don't need to but nice to do. it will fold the lip on its own.

Sorry no pic. It folds easily from the uca, didnt even scuff the powder coating on the arms where it made contact.
You only need to do the bottom, your likely on your extended bumpstops when stuffed so the roof of the pocket won't make contact with the arm.

edit: just saw page after your question, natural bumpstop seems logical. never thought of it that way.

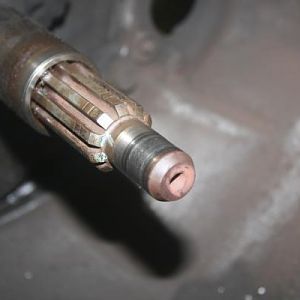
2. ball joint is assembled with wheel off. bushings on upper control arm should be "finger tight". mount ball joint in its mount, torque the castle nut, put in split pin, put on tire, lower vehicle, bounce it a little. Then torque the bolt that goes inside bushings, 80 ft lbs.

Don't forget to retorque again after a couple hundred miles if your ocd about such things. requires removing battery tray and air cleaner again to gain access, Doesn't take long if you've done it once.

That grease gun will work fine, but buying the full sized one for a better selection of grease options, depending on your evolving needs. The grease is also cheaper in the long run, not that the ball joints require a lot.

I bought the cheap lu max canadian tire trigger operated one for to have a free hand to adjust the ball joint if the zerk isn't taking grease. $12 vs $18. If you have it don't worry about it.

For grease selection to use synthetic grease or marine grease as i'm not a fan of anything with graphite as i'll also use that grease on o rings for electrical connectors or pressure connectors for other types of survey tools. graphite is conductive and makes a mess so i tend to stay away. Any grease is better then no grease so there is not real do not use for that application.
 
Last edited:

mightybeet

Full Access Member
Joined
Nov 22, 2006
Messages
281
Reaction score
0
Location
connecticut
do the 4 bolts that hold the upper ball joint to the jba uca need to be torque to some fancy number?

also having a hard time removing the upper ball joint that came with the jba uca from the knuckle. pickle fork is not thick enough/no leverage. will a pitman arm tool work?
 

CzarKJ

Full Access Member
Joined
Mar 3, 2013
Messages
2,605
Reaction score
3
Location
Townsend, MA
do the 4 bolts that hold the upper ball joint to the jba uca need to be torque to some fancy number?

also having a hard time removing the upper ball joint that came with the jba uca from the knuckle. pickle fork is not thick enough/no leverage. will a pitman arm tool work?


80ftlbs when the wheels are on the ground and arms under pressure.
 

Latest posts

Members online

Top