it's not OE, and it's got a crack in its case.NOT sure what brand BBB is, but if the failed alternator is OEM, then I like the idea of replacing it with the one from the parts Jeep and then having the failed one rebuilt by a reputable auto/electric starter/alternator repair shop if you still have one on your area.
Or even rebuild it yourself with quality parts.
IOW… cheap rebuilds from fast parts stores use poor quality parts and are bound to fail sooner then a properly rebuilt OEM unit.
Just my .02


You are using an out of date browser. It may not display this or other websites correctly.
You should upgrade or use an alternative browser.
You should upgrade or use an alternative browser.
What did you do to your jeep today?
- Thread starter TheQ
- Start date
Disclaimer: Links on this page pointing to Amazon, eBay and other sites may include affiliate code. If you click them and make a purchase, we may earn a small commission.
it's not OE, and it's got a crack in its case.
Ya…those two things tend to go hand in hand
")
Brendon Holt
Full Access Member
I learned today while reading some old threads that your PS fluid should be moving around when you open the reservoir cap with the Jeep running at idle. Mine is like a placid, red pond. No movement in the fluid. Was trying to diagnose the power steering whine, and I think I found at least part of the problem. Will probably end up doing the pump and the high pressure line and go from there. I don't want to do the rack
Because it's MUCH easier.why would you pull the MC to do the clutch master or slave? I did that job (twice!, sort of) without having to pull the MC.
Replaced the MC. Brakes seem to be better. It's just going to take time to be sure the semi-random seizing doesn't return.
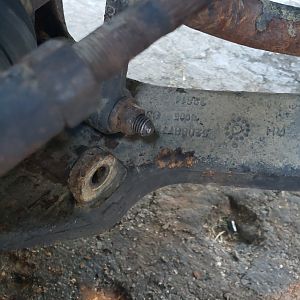
Found this while we were at it...
Look closer...
So that is the JBA (IIRC?) arm rubbing rhe tire. Options are to kiss it with a flap disk next time I have it in the air, or to install spacers. New wheels with more offset would work too, but that's just ridiculous.
Not sure if I'll dress it with a grinder or install spacers. If I go spacers, they will be bullet, as cast is for moron (literally, for engineering reasons).
Found this while we were at it...
You must be registered for see images attach
Look closer...
You must be registered for see images attach
So that is the JBA (IIRC?) arm rubbing rhe tire. Options are to kiss it with a flap disk next time I have it in the air, or to install spacers. New wheels with more offset would work too, but that's just ridiculous.
Not sure if I'll dress it with a grinder or install spacers. If I go spacers, they will be bullet, as cast is for moron (literally, for engineering reasons).
Wow that rubbing! I would NOT take a grinder to your JBA arms, as it would weaken them perhaps fatally and you would lose your lifetime warranty. Probably wheel spacers or wheels with more offset are a better option. What do you need, a quarter or half an inch of room?
What tire size is that? My 245/75R16 tires clear the arms but I don’t think 265/75R16 would clear on the stock wheels without spacers.
What tire size is that? My 245/75R16 tires clear the arms but I don’t think 265/75R16 would clear on the stock wheels without spacers.
CheddarGau
Full Access Member
I didn't drive my Liberty today because my AC compressor clutch packed it in 2 weeks ago. Been too busy at work to discharge my AC and swap out the compressor. Good news is, I picked up a New Densor compressor for 100CAD. For out American cousins, subtract roughly 33% for the price get your price
CherokeeLiberty
Full Access Member
You must be registered for see images attach
duderz7
Full Access Member
Took that long to get an engine light? Impressive!
Well it wasn't anything I did on Giddyup, but for Fathers Day, I made myself a Makita 18v battery adapter for my HK Onyx 5 "jobsite" speaker.
Ive had the Onyx 5 for several years at least and while it always sounded pretty dam good for a portable speaker, at best it would only run for about 4 hours on its tiny, internal 3.7v rechargeable battery. Sadly, it would ALSO automatically reduce volume output by about half when not plugged into the wall … once again in order to save its tiny battery life.
So when I recently looked at the AC/DC adapter, and I saw that it outputted a steady 19 DVC when plugged in…well being a Makita fanboy, a :lightbulb: when off in my head.
I bought a $12 battery adapter from amazon that came prewired with12 awg copper pigtails, an on/off switch, as well as a 15a inline fuse. After checking the output polarity of the wall wart, I simply pushed and twisted the wires into and onto the end of the extra proper size plug that I had lying in the always useful "drawer o' defunct and outdated electrical parts, cords and devices."
Since there was no sense in trying to solder copper wires onto the chrome surfaces of the plug, after getting a tight physical connection and ensuring continuity, I simply added some quick dry epoxy and electrical tape, which fused EVERYTHING together to make the new plug "jobsite tough"
Literally 15 minutes later and I had this done … its been playing LOUD all day (it is Fathers Day after all) and the Makita battery is STILL showing all 4 LED status lights.
Ive had the Onyx 5 for several years at least and while it always sounded pretty dam good for a portable speaker, at best it would only run for about 4 hours on its tiny, internal 3.7v rechargeable battery. Sadly, it would ALSO automatically reduce volume output by about half when not plugged into the wall … once again in order to save its tiny battery life.
So when I recently looked at the AC/DC adapter, and I saw that it outputted a steady 19 DVC when plugged in…well being a Makita fanboy, a :lightbulb: when off in my head.
I bought a $12 battery adapter from amazon that came prewired with12 awg copper pigtails, an on/off switch, as well as a 15a inline fuse. After checking the output polarity of the wall wart, I simply pushed and twisted the wires into and onto the end of the extra proper size plug that I had lying in the always useful "drawer o' defunct and outdated electrical parts, cords and devices."
Since there was no sense in trying to solder copper wires onto the chrome surfaces of the plug, after getting a tight physical connection and ensuring continuity, I simply added some quick dry epoxy and electrical tape, which fused EVERYTHING together to make the new plug "jobsite tough"
Literally 15 minutes later and I had this done … its been playing LOUD all day (it is Fathers Day after all
) and the Makita battery is STILL showing all 4 LED status lights.
You must be registered for see images attach
You must be registered for see images attach
Last edited:
Very interested to hear your thoughts on ride quality on and off road for the 5100's compared to the old JBA setup.OME 2927 springs and Bilstein 5100 shocks on my 08 KK. Took these today.
Bilstein says that the height you set the 5100’s to would be like having a spacer lift. So if you went up 1/2 inch, you’d get an inch of lift at the wheel. I went back and reread lots of threads about the 5100’s when they came out and the consensus from the people who I trust most who had been around the longest (especially Tommudd) was to use the bottom setting with new OME lift springs. I suppose you could increase the height with sagged out stock springs but the ride would suffer. But it could be a stopgap if someone needed to order the shocks now and springs at a later time due to financial considerations.
I went out with a measuring tape and checked the lift height. (This is measured from the middle of the center cap to the bottom of the fender, so tire size is taken out of the equation.) A stock KK when it left the factory would have 18” in the front and 19” in the rear (and no stock one would have that now due to sagging springs). I am at 21-21.5” in front depending on where you measure at the fender. So 3-3.5” of lift. 1/2” comes from ATH’s top plates, 2.5” from the OME springs, and the rest from the 5100’s. I expect the brand new springs to settle a bit in the next few weeks so I may end up at around 3 inches of lift, which is fine with me.
Crikey— I didn’t know Makita made such a thing! Now I need to get one ‘just in case’.Well it wasn't anything I did on Giddyup, but for Fathers Day, I made myself a Makita 18v battery adapter for my HK Onyx 5 "jobsite" speaker.
Ive had the Onyx 5 for several years at least and while it always sounded pretty dam good for a portable speaker, at best it would only run for about 4 hours on its tiny, internal 3.7v rechargeable battery. Sadly, it would ALSO automatically reduce volume output by about half when not plugged into the wall … once again in order to save its tiny battery life.
So when I recently looked at the AC/DC adapter, and I saw that it outputted a steady 19 DVC when plugged in…well being a Makita fanboy, a :lightbulb: when off in my head.
I bought a $12 battery adapter from amazon that came prewired with12 awg copper pigtails, an on/off switch, as well as a 15a inline fuse. After checking the output polarity of the wall wart, I simply pushed and twisted the wires into and onto the end of the extra proper size plug that I had lying in the always useful "drawer o' defunct and outdated electrical parts, cords and devices."
Since there was no sense in trying to solder copper wires onto the chrome surfaces of the plug, after getting a tight physical connection and ensuring continuity, I simply added some quick dry epoxy and electrical tape, which fused EVERYTHING together to make the new plug "jobsite tough"
Literally 15 minutes later and I had this done … its been playing LOUD all day (it is Fathers Day after all
You must be registered for see images attachYou must be registered for see images attach
So IMPORTANT NOTE — Makita does NOT make these adapters and would NOT approve of them….NOT that I want or need their approval to use their batteries with my other tools!!!I didn’t know Makita made such a thing! Now I need to get one ‘just in case’.
In short (no pun intended but DO read on), battery adapters are a GREAT tool accessory simply because they let a person convert from their main tool manufacturer of choice (which in my case, and it also sounds like in your case, is the Makita XLT line) to just about ANY other manufacturers tools and THAT is a blessing in its own right!!!
I bought my first battery adapter when Ryobi, whose tools I generally despise (sorry to all the Ryobi fan boys) mostly due to BOTH their cheaper quality, but also their ugly color (LOL), came out with an 18v cordless glue gun which Makita didnt make … and even if they did, they would charge $150 for it instead of the $30 that Ryobi was asking!!!
A friend had told me about battery adapters, and I got a cheap one from eBay (of course theyre also now available on Amazon) and I ended up with a cordless "Makobi" glue gun for some of my, as well as some of my kids fun projects, for less then $50 …take THAT to the bank, Makita !!!
My "Makobi" glue gun is still working great after 6 years of both useful and stupid projects.
In fact, it worked so well, that eventually I bought and made a useful "Makobi" cordless caulking gun for about 1/3 the cost of Makitas really nice one…for an occasional use tool, it gets the job done just fine.
The IMPORTANT thing to realize is that MOST of the battery adapters are cheap and use only small gauge wires to transfer the power, sothey should be uysed ONLY for light duty load applications!!!
For more powerful tools, I have seen the adapter smoke a bit under load … NOT a good sign.
But THEN I heard about this guy on Etsy who 3D prints various battery adapters from quality polymers and uses 12 gauge wire for the HD load win… I'll include the link below, though be aware that his prices are closer to $30 each instead of $15. That said, I get to run a small Rigid portable air compressor off of 2 Makita XLT batteries, as well as a Milwaukee cordless table saw (think trim or deck work ONLY) on a single Makita XLT. I also run a Dewalt DC961 MOAIG (Mother Of All Impact Guns) on an XLT battery as well their tiny but powerful DCF923 impact on MAKITA batteries as well.
The possibilities are ALMOST endless, though of course the adapters do NOT support charging, but then you already have your Makita charger so that really doesn't matter…you get to buy "tool only" tools from other manufactures and do NOT have to support multiple battery makes or chargers.
IMHO, thats an honest win/win!!!
In short, buy the cheaper Amazon adapters for light duty use (like the 50w HK stereo oRyobu glue and caulking guns) but be sure to buy the HD ones for ANY tols that use bigger current loads.
Just my .02

View Metabo HPT/Hitachi 18v by 3DPrintedAdapters on Etsy
Shop items by 3DPrintedAdapters located in New Jersey, United States. Smooth shipping! Has a history of shipping on time with tracking. Rave reviews! Average review rating is 4.8 or higher.
 www.etsy.com
Last edited:
Cool, thanks. Definitely useful for running small stuff.So IMPORTANT NOTE — Makita does NOT make these adapters and would NOT approve of them….NOT that I want or need their approval to use their batteries with my other tools!!!
In short (no pun intended but DO read on), battery adapters are a GREAT tool accessory simply because they let a person convert from their main tool manufacturer of choice (which in my case, and it also sounds like in your case, is the Makita XLT line) to just about ANY other manufacturers tools and THAT is a blessing in its own right!!!
I bought my first battery adapter when Ryobi, whose tools I generally despise (sorry to all the Ryobi fan boys) mostly due to BOTH their cheaper quality, but also their ugly color (LOL), came out with an 18v cordless glue gun which Makita didnt make … and even if they did, they would charge $150 for it instead of the $30 that Ryobi was asking!!!
A friend had told me about battery adapters, and I got a cheap one from eBay (of course theyre also now available on Amazon) and I ended up with a cordless "Makobi" glue gun for some of my, as well as some of my kids fun projects, for less then $50 …take THAT to the bank, Makita !!!
My "Makobi" glue gun is still working great after 6 years of both useful and stupid projects.
In fact, it worked so well, that eventually I bought and made a useful "Makobi" cordless caulking gun for about 1/3 the cost of Makitas really nice one…for an occasional use tool, it gets the job done just fine.
The IMPORTANT thing to realize is that MOST of the battery adapters are cheap and use only small gauge wires to transfer the power, sothey should be uysed ONLY for light duty load applications!!!
For more powerful tools, I have seen the adapter smoke a bit under load … NOT a good sign.
But THEN I heard about this guy on Etsy who 3D prints various battery adapters from quality polymers and uses 12 gauge wire for the HD load win… I'll include the link below, though be aware that his prices are closer to $30 each instead of $15. That said, I get to run a small Rigid portable air compressor off of 2 Makita XLT batteries, as well as a Milwaukee cordless table saw (think trim or deck work ONLY) on a single Makita XLT. I also run a Dewalt DC961 MOAIG (Mother Of All Impact Guns) on an XLT battery as well their tiny but powerful DCF923 impact on MAKITA batteries as well.
The possibilities are ALMOST endless, though of course the adapters do NOT support charging, but then you already have your Makita charger so that really doesn't matter…you get to buy "tool only" tools from other manufactures and do NOT have to support multiple battery makes or chargers.
IMHO, thats an honest win/win!!!
In short, buy the cheaper Amazon adapters for light duty use (like the 50w HK stereo oRyobu glue and caulking guns) but be sure to buy the HD ones for ANY tols that use bigger current loads.
Just my .02
View Metabo HPT/Hitachi 18v by 3DPrintedAdapters on Etsy
Shop items by 3DPrintedAdapters located in New Jersey, United States. Smooth shipping! Has a history of shipping on time with tracking. Rave reviews! Average review rating is 4.8 or higher.
I think a quarter inch would do me.Wow that rubbing! I would NOT take a grinder to your JBA arms, as it would weaken them perhaps fatally and you would lose your lifetime warranty. Probably wheel spacers or wheels with more offset are a better option. What do you need, a quarter or half an inch of room?
What tire size is that? My 245/75R16 tires clear the arms but I don’t think 265/75R16 would clear on the stock wheels without spacers.
This is NOT the fault of JBA. I'm very happy with the product.
Not sure on the size of the tire. I know it's a 31" equivalent, in P-Metric size. Will look it up and get back to you. Of course every brand and line will have its peculiarities
EDIT-265/70/16 is what I am running
Last edited:
Where can I get one?I didn't drive my Liberty today because my AC compressor clutch packed it in 2 weeks ago. Been too busy at work to discharge my AC and swap out the compressor. Good news is, I picked up a New Densor compressor for 100CAD. For out American cousins, subtract roughly 33% for the price get your price
CheddarGau
Full Access Member
Mine was from world pac. Thats shop price. No shop will let it go that cheap unless you work at one.Where can I get one?
There's no reason you shouldn't be able to solder to that surface, assuming it's not plastic (in which case it wouldn't conduct electricity).Well it wasn't anything I did on Giddyup, but for Fathers Day, I made myself a Makita 18v battery adapter for my HK Onyx 5 "jobsite" speaker.
Ive had the Onyx 5 for several years at least and while it always sounded pretty dam good for a portable speaker, at best it would only run for about 4 hours on its tiny, internal 3.7v rechargeable battery. Sadly, it would ALSO automatically reduce volume output by about half when not plugged into the wall … once again in order to save its tiny battery life.
So when I recently looked at the AC/DC adapter, and I saw that it outputted a steady 19 DVC when plugged in…well being a Makita fanboy, a :lightbulb: when off in my head.
I bought a $12 battery adapter from amazon that came prewired with12 awg copper pigtails, an on/off switch, as well as a 15a inline fuse. After checking the output polarity of the wall wart, I simply pushed and twisted the wires into and onto the end of the extra proper size plug that I had lying in the always useful "drawer o' defunct and outdated electrical parts, cords and devices."
Since there was no sense in trying to solder copper wires onto the chrome surfaces of the plug, after getting a tight physical connection and ensuring continuity, I simply added some quick dry epoxy and electrical tape, which fused EVERYTHING together to make the new plug "jobsite tough"
Literally 15 minutes later and I had this done … its been playing LOUD all day (it is Fathers Day after all
You must be registered for see images attachYou must be registered for see images attach
A much cheaper and cleaner solution might be to use a laptop power supply. Most (pre USB-C plug days) put out about 19 volts. As long as the voltage is about the same and the amperage required doesn't exceed what the PSU is capable of supplying, it would be child's play to wire up an adapter with a male and a female barrel of appropriate size.
Seriously. 'glue it together' is NEVER the right move with electricity
Last edited:
mercdudecbr600
Full Access Member
- Joined
- Oct 3, 2018
- Messages
- 485
- Reaction score
- 177
On my 02 KJ with JBA uppers and stock wheels - it's CLOSE. Like 3/16" clearance with 245/75/16. I'm guessing you'll need to do spacers or yeah take a little off the edge of the JBAs for clearance. I too was surprised at how little room there was between the JBA uppers and tires.Replaced the MC. Brakes seem to be better. It's just going to take time to be sure the semi-random seizing doesn't return.
Found this while we were at it...
You must be registered for see images attach
Look closer...
You must be registered for see images attach
So that is the JBA (IIRC?) arm rubbing rhe tire. Options are to kiss it with a flap disk next time I have it in the air, or to install spacers. New wheels with more offset would work too, but that's just ridiculous.
Not sure if I'll dress it with a grinder or install spacers. If I go spacers, they will be bullet, as cast is for moron (literally, for engineering reasons).
Similar threads
- Replies
- 22
- Views
- 4K
- Replies
- 173
- Views
- 35K