tommudd
Moderator
remove the nut all the way off
then run it back up on a few threads so everything does not fly apart on ya
then run it back up on a few threads so everything does not fly apart on ya


Disclaimer: Links on this page pointing to Amazon, eBay and other sites may include affiliate code. If you click them and make a purchase, we may earn a small commission.
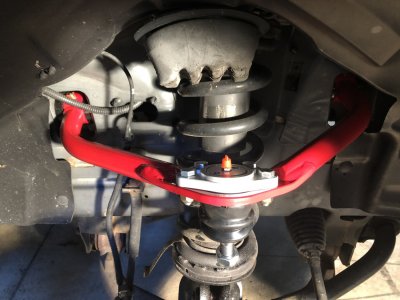
Not necessary or advisable. Don’t do any cutting to the UCA pockets.
JBA UCA Installation: I'm looking over the directions and it mentions "opening up the UCA pockets". Is this needed with the 2.5" lift I am doing?
Yes, feel free to employ the cutoff wheel. Just make sure the knuckle is protected, along with your eyeballs.Gentleman, If worse comes to worse. Can I cut right above the knuckle to cut the ball joint off...since I'm putting the JBA UCAs on?
Sorry, no cutting to the pockets, cutting the ball joint off. Disregard...just saw your messageYou must be registered for see images attach
You can see even at full droop my UCA’s don’t contact the bottom of the pocket very much if at all. No cutting/ clearancing needed there. Rounding them with a ball peen hammer so the lower surface becomes a cradle for the UCA is a good idea from Tom, but I never needed to do that. Unless I am running with no front sway bar (which I never do), the UCA’s will never get that far down.
Go with what Tom says. He has more experience at this than me.Shold not have to cut
Never had to do that
If a PRY BAR in spring does not work a socket on bottom stem will hold it, then tighten back up and go again
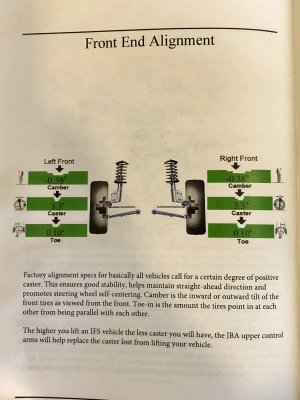
Camber and toe set to OE specsIs the correct alignment I’m shooting for after UCAs and lift?
No on the pickle fork, devils toolsSo the other side...I was able to get the nut off the ball joint but the ball joint won't come loose. Hammer on it, anti-seize, used the jack on it, but nada. Is this the proper tool?
16 in. Ball Joint Separator
Amazing deals on this Ball Joint Separator at Harbor Freight. Quality tools & low prices.www.harborfreight.com
Really? I whacked that thing has hard as I could with a dead-**** hammer from every angle I could. I know a regular 3 lb hammer would be more impact but do you think it’ll do that much better thank the dead ****? ThxNo on the pickle fork, devils tools
Just a 3 lb hammer and think of an exwife if ya have one
Just have to give them a good whack, no tap tap taps
Lol. Okay. I’ll grab that and give it a hit.Yes I do, never had one I could not do that way
Dead blows won't do it
Seen em tried with dead blows and with one whack with 3 lb I knocked them loose
so yes ,...really
")
Well, 5 hits later and it is loose. I wish I would've asked a long time ago. Wasted a lot of time. Ugh. Thanks TomYes I do, never had one I could not do that way
Dead blows won't do it
Seen em tried with dead blows and with one whack with 3 lb I knocked them loose
so yes ,...really