2006 Liberty Sport 4x4 - Total Parking Brake Rebuild For $68

Disclaimer: Links on this page pointing to Amazon, eBay and other sites may include affiliate code. If you click them and make a purchase, we may earn a small commission.

ron.dittmer

Member
Joined
Dec 21, 2009
Messages
59
Reaction score
22
Location
Dundee, IL
Read through this post with many pictures, how for $68.00 I went from.........

THESE Non-working parking brakes, to
You must be registered for see images attach

to THESE fully functional parking brakes that are assembled better than new ones.
You must be registered for see images attach


-----------------------Beginning Of Post---------------------------------

Hi All, I am facing a project that I have never handled before.

My wife loves her precious 2006 Liberty Sport 4x4 with 87,000 miles. It is in really nice condition, both inside and outside.

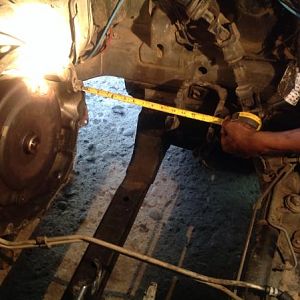
Backing out of the garage made some strange noises in back which initiated my inspection to find the parking brake pad material on the right rear have separated from their steel shoes. One pad on the left rear came off with just a touch. I also found the large round supporting backing plates are no longer attached to the caliper brackets. They were attached with 3 small screws (later learned 3 rivets) that the heads rusted off so now the backing plates flop around, hence the parking brakes just flop around within the mini-drums of the rear brake rotors. I see that I have to pull the axle shafts from the differential to address this properly of which I am willing to do. I was surprised to see the parking brake system so badly rusted, including the backing plates.

I looked on-line for new backing plates but they are not sold individually, sold only as part of a full assembly that costs nearly $400 per side.

Not only because of the $800 expense, but the caliper bracket mounting nuts (4 per side) are very badly rusted. Heating them red hot to break them loose would surely damage the wheel bearings being in such close proximity.

I considered removing everything and live without a parking brake, but we rely on it during our travels out west in wilderness areas, so I am determined to rebuild the parking brake system.

How have other people on this forum, handled this type of parking brake failure?
 
Last edited:

Rough

New Member
Joined
Sep 20, 2017
Messages
17
Reaction score
14
Location
PA
Hi All, I could sure use some help here.

My wife loves her 2006 Liberty 4x4 with 84,000 miles and it is in really nice condition. The parking brake pads suddenly fell off the shoes on the RR corner so I bought new shoes only to learn that rust did serious damage to both parking brake assemblies, most especially to the backing plates. They were originally attached with two tiny screws favoring the bottom but are rusted so badly that they are no longer attached. I realize I have to pull the axle from the differential and am willing to do that, but I need new parking brake backing plates for both sides.

I looked on-line with no success for new ones. Does anyone have a source for these rare backing plates, partial PB assemblies, or complete PB assemblies?

The attached picture shows the new shoes installed but it isn't going to work with the backing plate flopping around. Here you can see the PB tipped badly at an angle.


Aftermarket two piece so you don't have to remove the axle. DORMAN 924657.
 

ron.dittmer

Member
Joined
Dec 21, 2009
Messages
59
Reaction score
22
Location
Dundee, IL
Thanks Rough for your response.

I seen that option but heating the 4 badly rusted caliper bracket mounting nuts to mount the split backing plate, will damage the wheel bearing.

I decided that I am going to remove the axle shafts, remove and sandblast the original rusted backing plates in an attempt to restore them. Sandblasting them clean should reveal if they can be reused.
 
Last edited:

Rough

New Member
Joined
Sep 20, 2017
Messages
17
Reaction score
14
Location
PA
Thanks Rough for your response.

I seen that.

One thing that worries me about any replacement is that the 4 mounting stems with nuts are so badly rusted swollen that the hex-nuts look round. The only way to loosen them would be to first heat them red hot to break them loose, but then I worry about damaging the axle seal and wheel bearing.

I looked at my particular situation more closely tonight. There were actually 3 small bolts mounting the backing plate, all missing their heads now. If I remove the axle shaft, the backing plate should come right off exposing the 3 small headless bolts. I am thinking I could drill them out bigger and tap new holes to remount the backing plate with bigger stronger bolts. I think the two backing plates are not so badly rusted that I could sandblast them having enough steel left for sound structural integrity, then paint them.


Original plates are riveted and were part of an assembly which included the caliper bracket. Some have drilled access hole through axle flange then drilled rivets out and either tapped or used machine screws and nuts to remount plate.
 

ron.dittmer

Member
Joined
Dec 21, 2009
Messages
59
Reaction score
22
Location
Dundee, IL
Now being deep in this project, I see that you are correct. I noted the backing plates were riveted on, not screwed on. I am shocked Chrysler got away using thin flimsy rivets for this important application.

I disassembled everything for proper restoration....per various internet videos, this went exactly as explained.

- I cracked open the differential cover and drained the 2.5 quarts of 70W-90 gear oil
- Once drained, I completely removed the cover
- I put the transfer case in neutral
- I pivoted the diff-internals for easy access.
- I unscrewed and removed the 8mm bolt
- I removed the heavy pin
- I pushed the axles inward
- I removed the two "C" shaped retainers
- I pulled out the 2 axles

With the axle shafts removed, I now can address this project properly. I plan to drill out the rivets making the holes bigger and deeper, tap threads and mount the backing plates using small bolts.
You must be registered for see images attach


I sandblasted the two backing plates, the differential cover and a few other miscellaneous pieces for reuse. The two backing plates cleaned up well with plenty of solid metal remaining for reuse, happy that I don't need new ones after all. I then primed and painted them, one coat so far here.
You must be registered for see images attach


I bought the following new parts that totaled $68
1) parking brake shoes (AutoZone)
2) parking brake hardware kit (Rock Auto)
3) differential gasket (Rock Auto) (later decided to use gasket-maker in a tube)
4) two axle seals (Rock Auto)
You must be registered for see images attach


I have been reading elsewhere that shops are charging a wild $2800 which includes new assemblies at $800 in parts, the rest being labor. I shopped around and got everything needed for a modest $68.

Though the axles seals did not leak, I anticipate they will after disturbing them. Also, the metal portion of the seals were badly rusted, another good reason to replace them.

Pulling the axle shafts was not challenging and has provided an opportunity to clean the inside of the differential. I never did such a thing before, a bit worried I couldn't handle it technically, but it was no big deal at all.
 
Last edited:

ron.dittmer

Member
Joined
Dec 21, 2009
Messages
59
Reaction score
22
Location
Dundee, IL
I am dragging this project out.....not yet done painting....second coat required.
 
Last edited:

65Corvair

Full Access Member
Joined
Sep 1, 2015
Messages
149
Reaction score
272
Location
Iowa
Excellent write up. You are doing beyond a professional job.
What brand and part number are the backing plates?
 

ron.dittmer

Member
Joined
Dec 21, 2009
Messages
59
Reaction score
22
Location
Dundee, IL
What brand and part number are the backing plates?
Hi 65Corvair, I am reusing the original backing plates because sandblasting them revealed they were good for reuse. The picture higher up are the original backing plates being painted a gray color along with the differential cover.

Tonight I finished the painting process, then attempted to drill out one rivet remnant on one caliper bracket mounted on the vehicle but it WAS A BUST. I went through so many drill bits and barely made progress so I simply gave up.

So I went to plan "B", a plan I was very concerned of doing but turned out fine. I removed the 4 badly rusted nuts that mount each of the caliper brackets to the axle by wrenching them off. The nuts were in horrible condition as seen in my first picture, but heat was not required after all. So with the caliper brackets removed, I banged off all loose rust and punched out the rivet left-overs. Next-up is sandblasting them clean.
You must be registered for see images attach


I also removed the old rusted axle seals, cleaned up the axle, and pounded in new seals, the orange colored ones.
You must be registered for see images attach


More to come.
 
Last edited:

ron.dittmer

Member
Joined
Dec 21, 2009
Messages
59
Reaction score
22
Location
Dundee, IL
Caliper brackets are sandblasted.
You must be registered for see images attach


Next is tapping the 3 rivet holes per caliper bracket. I got short length 5/16" fine-threaded hardened bolts, seemly ideal for mounting the backing plates to the caliper brackets. I will still need to grind down the excess bolt-ends, but not much.

Then comes another round of painting....this time for the caliper brackets.
 
Last edited:

ron.dittmer

Member
Joined
Dec 21, 2009
Messages
59
Reaction score
22
Location
Dundee, IL
Today I tapped all the original rivet holes (6 in all) to accept 5/16-24 bolts.
You must be registered for see images attach


I then wrenched-in one bolt at a time in the same hole and ground them flush using my electric hand-held angle grinder.
You must be registered for see images attach


I then increased the holes in the backing plates to accommodate the larger bolts.
You must be registered for see images attach


I quickly assembled one for your review.
You must be registered for see images attach

Here is the backside. Note the 3 bolts are now a bit shy of the surface of the caliper bracket surface, intentionally done to assure the bracket will mount flush to the axle plate.
You must be registered for see images attach


Next up is painting the caliper brackets and touch-up painting of the backing plates.
You must be registered for see images attach
 
Last edited:

ron.dittmer

Member
Joined
Dec 21, 2009
Messages
59
Reaction score
22
Location
Dundee, IL
The caliper brackets are now painted. After all this messing around for so many days, I am finally ready for final assembly.
You must be registered for see images attach


You must be registered for see images attach
 
Last edited:

ron.dittmer

Member
Joined
Dec 21, 2009
Messages
59
Reaction score
22
Location
Dundee, IL
Since the paint was handy, I painted the hubs & raw metal axle seals, mounted the caliper brackets, painted the related nuts and stems, mounted the backing plates, then painted those bolts, then touched up anything I scraped during handling and assembly. Now I wait until Monday (tomorrow is Mother's Day) giving the paint time to harden nicely.

The rest is "text book" assembly from here on.
You must be registered for see images attach

I had one minor challenge mounting the backing plates to the calipers that I had just bolted on the axle. The top-center 1/2" headed bolt is so close to the hub that a thin-wall socket would not work. There is no room to work an open-ended wrench either....at least not conventionally. I used an open-ended wrench 90 degrees to the bolt, and turned it with an adjustable wrench. It worked out fine but I recommend to preassemble them, then bolt the caliper bracket to the axle. It is also easier to assure the PB cable lever's rubber boot is in proper position.
 
Last edited:

ron.dittmer

Member
Joined
Dec 21, 2009
Messages
59
Reaction score
22
Location
Dundee, IL
I just wanted to take a moment to thank you guys for your kind words and encouragement. I hope to finish up in a day or two, of coarse with more pictures.
 

ron.dittmer

Member
Joined
Dec 21, 2009
Messages
59
Reaction score
22
Location
Dundee, IL
Today I assembled the parking brake itself (both sides) which went as expected with no issues.
You must be registered for see images attach


You must be registered for see images attach

Then I lubricated the two axle shafts (with wheel hubs) with gear oil where they contact the seals and bearings and assembled the differential.
You must be registered for see images attach

Then I mounted the two rotors with a couple of lugs each and proceeded to adjust the parking brake which took a number of adjusting cycles to get the parking brake lever up front at the right sensitivity without excessive drag when spinning the hubs. Once done, I mounted the calipers and tires.

Wrapping up today's effort, I decided to use a gasket-maker instead of the paper gasket I bought from RockAuto. The gasket maker requires hand-tightening of the 10 bolts, then wait one hour before torqueing them. Then allow 24 hours to cure before filling with gear oil. So now I wait until tomorrow.
You must be registered for see images attach

My plan is to fill the differential until overflowing and plug, then while still in the air, start the engine and put the transmission in 1st gear and spin everything slowly without a load on anything while the gear oil circulates throughout the rear axle. I want to make sure the fluid makes it's way to the ends where the wheel bearings are, done without a load. The same principle also for the gears inside the differential. Everything was drained dry for some days. I want to make sure nothing is initially starved of lubrication under load.

I can smell "Victory".
 
Last edited:

JeepJeepster

Full Access Member
Joined
Dec 15, 2004
Messages
8,904
Reaction score
292
Location
Dem hollers in Ky
Does the RTV really say 24hrs? I recall mine saying to wait an hour for the RTV to skin then torque them. You and I are the .01% that actually does that though.

After using the parking brakes for a week or so, you may want to readjust them. I normally apply them a bit while cruising down the road then readjust. Not sure if that helps or hurts...

Looks like a job well done! I would have a hard time not painting that entire axle.
 

ron.dittmer

Member
Joined
Dec 21, 2009
Messages
59
Reaction score
22
Location
Dundee, IL
Does the RTV really say 24hrs? I recall mine saying to wait an hour for the RTV to skin then torque them. You and I are the .01% that actually does that though.
You are correct. I torqued them an hour after hand-tightening. I had to wait 24 hours before filling with oil of which I did. I went back and corrected my mistyping.

About painting the entire rear axle.....I just didn't have it in me to do it.
 

ron.dittmer

Member
Joined
Dec 21, 2009
Messages
59
Reaction score
22
Location
Dundee, IL
TaDa! All done.
You must be registered for see images attach

I followed my own advise. After I filled the differential with gear oil, while still on jack stands, I started the engine, put the trans in "D" and ran the drivetrain while in the air to get the fresh gear oil out to the wheel bearings and throughout the upper diff. Then I repeated in "R". While the right rear tire was spinning slowly (left side not much due to limited-slip), I exercised the parking brake and could feel the pads self-centering nicely. Once I had everything just right, I took the Liberty out for a test drive and all is "Perfect"! The parking brake lever pulls up the right amount and it stops the vehicle.

I am extremely happy with the results.
 
Last edited:

DadOSix

Full Access Member
Joined
May 20, 2020
Messages
671
Reaction score
358
Location
Cumberland, MD.
That project is a work of art!

I am getting into the parking brake on my 04 kj this weekend.

Son took her to the beach and I ended up doing rear brake rotor, pads and caliper at the rental house with very few tools.

He lives away now and told him she needs to be in my garage this weekend - no exceptions. Did what we had to do to get him home.

Interesting, I was going to coach him on how to use the e-brake just in case. When I popped the rotor off, i quickly saw no lining on the shoes for the ebrake!
 

Latest posts

Members online

Top