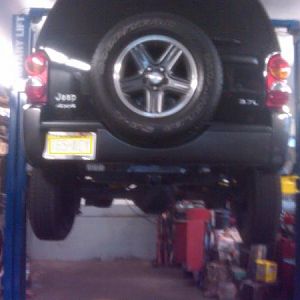
I swear sometimes the easiest maintenance and repair can take 4x as long as it should. It's so frustrating when that happens but glad you got it on. I'm tempted to buy one of those covers because changing the rear diff fluid is a pain.Never in my life did I think that changing the rear diff oil would turn into an all-afternoon experience.
I had no trouble getting the old oil out. It actually looked beautiful, a fact that would come to haunt me as the day wore on. Got everything cleaned up and went to install my new ARB heavy duty cover. Almost forgot the new LubeLocker gasket but caught my mistake as I was starting to put the first bolt in. This is easy, I thought! You always make one little mistake and I had mine out of the way early and at no cost in any do-overs.
Then I had all sorts of trouble with the bolts that came with the ARB. They are hex head (which was no problem) and are designed to be recessed inside the cover so you can't rip them off if you hit something on the trail. Out of the ten bolts I was only able to get five of them in to any degree. I ended up taking them all out and actually running a test nut up and down the threads of all ten to make sure they were OK. This took a long time as many of them were tough going. Then I took one of the old bolts and ran it all the way into the housing in all ten holes. Got the cover and gasket back in place. Dang, that ARB cover was heavy when I started and it kept getting heavier as the day wore on.
This time around I had eight bolts that decided to play nice and two stinkers. They are the ones at approximately 11 o'clock and 1 o'clock. I just could not get them all the way in. So out they came and I did my test nut process all over again. I also used what seemed like a whole can of PB Blaster to make sure the threads in the housing were OK. I really don't know what to do next, though one idea is to put a few washers on the two stinker bolts and be done with it.
Then it came time to fill it. This is going to be great, I thought! Nice dipstick built into the ARB and even had some bagged oil that made filling the diff mess-free. Good grief - how I long for the day when you just squirted with wild abandon and when it started to run out the fill hole you popped the fill plug in and called it good. The ARB fill hole is way higher than the old cover, so if you did that you'd have way too much oil in there. So for the next half hour it was squirt oil, then check with the dipstick. Over and over again. To complicate matters the dipstick is barely long enough to reach the oil once you have it filled properly (keep your dirty jokes to yourself!), so there was no way to see if you were getting close or not until you had too much in there.
I am going to get some rest and check things tomorrow. Maybe I will have a brilliant idea between now and then, or die in my sleep. (Either would be acceptable at this point. Flip a coin.)


You are using an out of date browser. It may not display this or other websites correctly.
You should upgrade or use an alternative browser.
You should upgrade or use an alternative browser.
What did you do to your jeep today?
- Thread starter TheQ
- Start date
Disclaimer: Links on this page pointing to Amazon, eBay and other sites may include affiliate code. If you click them and make a purchase, we may earn a small commission.
profdlp
Circling The Drain
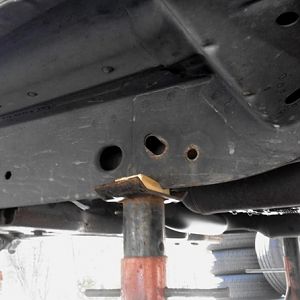
Went out with fresh eyes today. Tried cleaning the housing threads and the bolts but this did not get me very far. I have a tap & die set coming tomorrow.
In the meanwhile, I added a few washers to the two stubborn holdout bolts and was able to snug them up nicely. Frankly, that really is good enough to count as a permanent fix in my view. Nothing is going to hit those bolt heads anyway, at least not until after they rip the gas tank skid and gas tank off, so good enough is good enough. I will try the tap and die tomorrow since this would make me feel less OCD about it.
And I am going to give ARB a pass on this. I was cleaning up my shop from yesterday's festivities and noticed that all the old bolts had gasket material residue from one end to the other. I bet that over the 16.5 years the Jeep has been around it may have accumulated a fair amount of that crap in there and that may well be the cause of the entire problem. When I hit the housing with the tap tomorrow I am going to use a small dental pick and see if I can yank anything out of there.
Right now I am waiting for the front gear oil to finish draining. At the rate it is still dripping it may take a while. (But at least I am not crawling around on concrete while that happens.)
Thanks for all the support!
Today’s Jeep task was to replace the handbrake assembly. The old one was marginal at best at keeping the Jeep from rolling when parked.
Removing the center console was not a hard job. There are only 4 screws holding it in place.
The parking brake assembly is only held on by 4 bolts also, except the front ones are below the airbag module. Caution! Unhook the battery, put the + and - cables together for 30 mins to make sure there is no power to the airbags. You don’t want them blowing up.
If you unscrew the 4 bolts holding the black box down, you’ll see that it is attached to a metal bracket, and the metal bracket is still in the way.
Time for 4 bracket bolts. The black box can stay attached to its metal bracket because the bracket bolts are actually accessible.
I locked out the spring with an old IKEA hex key. The spring was so weak it did not put up much resistance.
Locking the mechanism out makes it easy to disconnect the brake mechanism from the two cables.
Here is a comparison of new vs. old:
The new one has a good spring on it, and a cable that is not stretched out. Although you can’t see a difference here, the new unit makes all the difference in stopping the Jeep from rolling backwards on a hill. It works great.
Also, no adjustment of the star wheels at the brake drums was necessary at all.
Removing the center console was not a hard job. There are only 4 screws holding it in place.
The parking brake assembly is only held on by 4 bolts also, except the front ones are below the airbag module. Caution! Unhook the battery, put the + and - cables together for 30 mins to make sure there is no power to the airbags. You don’t want them blowing up.
You must be registered for see images attach
If you unscrew the 4 bolts holding the black box down, you’ll see that it is attached to a metal bracket, and the metal bracket is still in the way.
You must be registered for see images attach
Time for 4 bracket bolts. The black box can stay attached to its metal bracket because the bracket bolts are actually accessible.
I locked out the spring with an old IKEA hex key. The spring was so weak it did not put up much resistance.
You must be registered for see images attach
Locking the mechanism out makes it easy to disconnect the brake mechanism from the two cables.
You must be registered for see images attach
Here is a comparison of new vs. old:
You must be registered for see images attach
You must be registered for see images attach
The new one has a good spring on it, and a cable that is not stretched out. Although you can’t see a difference here, the new unit makes all the difference in stopping the Jeep from rolling backwards on a hill. It works great.
Also, no adjustment of the star wheels at the brake drums was necessary at all.
Deb'nKJ
Full Access Member
- Joined
- Jun 3, 2022
- Messages
- 634
- Reaction score
- 543
Doesn't the ARB cover increase the capacity? I thought most of these aftermarket ones did, it's supposed to be one of their benefits.The rear takes 2.19 quarts.
As for the problems experienced, I recall just checking & topping off the rear diff was a pain (apparently I should've jacked up the body) Just another example of the underlying design brief for the KJ, to make everything more difficult/time consuming/expensive than any previous model - with the singular exception of rear shox (at least compared with an XJ)
profdlp
Circling The Drain
Got the front diff done and for good measure did the transfer case fluid. The engine oil was done about two weeks ago. Going to do a power steering flush and I think I will be OK.
I am taking it to the dealer in a couple weeks for the radiator flush.
I think I am running out of fluids to change. The brake fluid looks OK and I do not plan to mess with that.
I am taking it to the dealer in a couple weeks for the radiator flush.
I think I am running out of fluids to change. The brake fluid looks OK and I do not plan to mess with that.
Prof, Call ahead to local dealer to ensure they have what is called a Hoat coolant pressurized re-circulating machine.
How many miles are on your Jeep now?I got the transmission serviced today.
profdlp
Circling The Drain
Took the day off and decided to have some fun. Went out to the range and when I came outside the Jeep would not even crank. Pretty sure my six year old starter has bitten the big one.
Had it towed to the garage where it will sit until Monday when they come back to work and let me know the "good" news.
Had it towed to the garage where it will sit until Monday when they come back to work and let me know the "good" news.
Last edited:
209,800-and something.How many miles are on your Jeep now?
duderz7
Full Access Member
You must be registered for see images attach
I checked on my recent diy pcv to find that the original rubber tubes I used split. So I cobbled this together with what was available at the parts store. The challenge is the valve takes 5/8inch id while the intake fits 1/2inch id. When I first put it together that hose was not collapsed, not surprisingly it was after a couple if heat cycles.
You must be registered for see images attach
found a spring that fits snuggly inside.
You must be registered for see images attach
cut to length and bent tip in to protect hose.
You must be registered for see images attach
all buttoned up! This should work me thinks.sleazy rider
Retired moto tech and gearhead
Put the GMRS system in for group rides. Hated the handi-talkie, so it’s relegated to backup and loaner.
profdlp
Circling The Drain
I have a separate thread about my starter issue here:
Starting A Thread About...Starters
Any kind souls who wish to opine would be welcome.
Starting A Thread About...Starters
Any kind souls who wish to opine would be welcome.
Johnny O
Just hangin' out.
It is a royal pain. Same system on KJs and VW Bugs and god knows how many other drum systems.Has any KK owner had any luck adjusting the parking brake tension with the star wheels when the brake calipers and tires were ON?
Trick I use:
I annualy dissasemble and clean the parking brake on both vehicles. Once any rust is dissolved with Kroil or FreeAll, I clean all the parts with acetone or 95% isopropanol and let them dry. Then every part(springs too!) gets two coats of dry film lubricant. I use Hoppe's #9 Dri-Lube available from the firearms supply aisle most everywhere. Dry film lubricant prevents hygroscopic dirt and mud from hilding water that leads to corrosion. Also seals against salt.
Once dry, I reassemble the star wheel tube assembly and set it at its shortest. Then using white enamel paint I (white nail polish from the dollar store) I paint one tooth of the star and a dot on the barrel where they line up.
This makes it much easier to adjust, wheels on or off. I find it is always better to "zero it in " wheels off then set final tension wheels on.
The white makes it easier to see and keep track of turns.
Johnny O
Just hangin' out.
paraphrasing the service manual chart: "up to 2.19 LITERS...for a complete tear-down and drain" though it varies a liitle.The rear takes 2.19 quarts.
For the 8.25 the "standard" is to fill it on a level surface until the oil is about the first joint of your index finger below the fill hole. (allowing settling time or a quick spin around the block to get any bubbles out of the axel tubes). There is enough of an air gap in the pumpkin ball it is pretty much impossible to over fill.
Note: the standard gear small gear oil bottles hold 0.987 Liters on the label, but actually hold about 0.895 liters according to my trusty graduated cylinder.
Last edited:
Walked outside the garage on Saturday morning to find coolant slowly leaking out of the bottom of the Jeep. I checked underneath, and there was a slow leak from the radiator. Me and the wife were headed out of town that morning, so I ran the car over to the local mechanic. They're going to have to replace the radiator along with the thermostat. I wish I could've changed it myself, but couldn't since I was leaving town, so now I gotta pay a pretty penny and I'll be getting the car back today.
I'm so tired of pouring money into my Liberty, so I can't wait to save up some money for the next 6 to 12 months and get a truck. Been looking at the 2015 and newer Nissan Frontiers.
I'm so tired of pouring money into my Liberty, so I can't wait to save up some money for the next 6 to 12 months and get a truck. Been looking at the 2015 and newer Nissan Frontiers.
Btownpreacher
Full Access Member
- Joined
- Nov 13, 2022
- Messages
- 132
- Reaction score
- 105
I changed to an ARB diff cover and its about three quarts capacity with the new cover; I also have the trac-lok lsd so that may effect it slightly
Wired up some switches for some extra lights and such that will be getting installed down the road. I had a box full of extra parts that I got when I bought my truck, including an extra fuse box. So my thinking was why don't I use the empty relay spots in my current fuse box for the new switches and keep the engine bay looking stock and also keeps the relays dry. I took the old fuse box apart and pulled the wiring out of the relay blocks to use in mine. I had one empty J case fuse spot so that is the battery power source for the circuits. Switches went just to the left of the steering column - I did have to trim out some plastic behind to make room for the wires though. One switch runs off the high beam circuit and the other 2 will be constant battery power for things I want on all the time. All connections crimped, soldered, and heat shrinked for longevity.
You must be registered for see images attach
You must be registered for see images attach
You must be registered for see images attach
You must be registered for see images attach
You must be registered for see images attach
You must be registered for see images attach
You must be registered for see images attach
Similar threads
- Replies
- 22
- Views
- 4K
- Replies
- 173
- Views
- 35K