Hi All, would like to ask if anyone has had this problem. My side view mirrors will not work. When i push the power buttons to adjust the angle I can hear the motor inside the mirror operating, but the glass does not move. this is happening on both of them. I have checked the fues and they are ok. Any ideas? thanks.


You are using an out of date browser. It may not display this or other websites correctly.
You should upgrade or use an alternative browser.
You should upgrade or use an alternative browser.
Side view mirror not moving.
- Thread starter RedJolt
- Start date
Disclaimer: Links on this page pointing to Amazon, eBay and other sites may include affiliate code. If you click them and make a purchase, we may earn a small commission.
Hi All, would like to ask if anyone has had this problem. My side view mirrors will not work. When i push the power buttons to adjust the angle I can hear the motor inside the mirror operating, but the glass does not move. this is happening on both of them. I have checked the fues and they are ok. Any ideas? thanks.
If you hear the motors, then whatever links the motor to the glass is probably broken/disconnected. I know that sounds ridiculously obvious, but if you can find a way into the mirror housing without breaking anything, it might be something you could easily repair yourself.
theroofable
Full Access Member
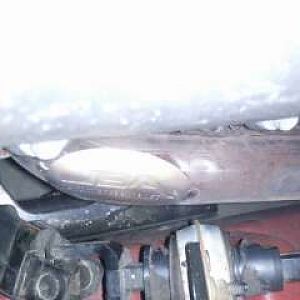
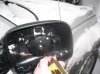
Remove the door cover, then there are two or three bolts on the inside of the door for the mirror. A control harness is also on the inside of the door. Remove the bolts/ harness, then the mirror will wiggle out.
There are two screws, one in the door handle, and one in the armrest. There are also two control harnesses and a handle linkage which all need to be disconnected.(Simple)
This comes off, dont pull at the armrest by itself.
Dont pay attention to the gray wire, that will not be there when you take yours off, its something I installed myself.
You must be registered for see images attach
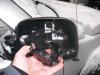
There are two screws, one in the door handle, and one in the armrest. There are also two control harnesses and a handle linkage which all need to be disconnected.(Simple)
You must be registered for see images attach
This comes off, dont pull at the armrest by itself.
You must be registered for see images attach
Dont pay attention to the gray wire, that will not be there when you take yours off, its something I installed myself.
Do you have any idea how to remove the mirrors?
SIDE VIEW MIRROR
REMOVAL
(1) Remove the trim panel.
(2) Disconnect the electrical connector. (Fig. 17)
(3) Remove the three nuts and remove the mirror
assembly.
INSTALLATION
(1) Install the mirror assembly.
(2) Install the three nuts and tighten to 7 N·m (65
in. lbs.).
(3) Connect the electrical connector.
(4) Install the trim panel.
GLASS-OUTSIDE REARVIEW
MIRROR
REMOVAL
WARNING: ALWAYS WEAR EYE AND HAND PROTECTION
WHEN SERVICING THE MIRROR ASSEMBLY.
FAILURE TO OBSERVE THESE WARNINGS
MAY RESULT IN PERSONAL INJURY FROM BROKEN
GLASS.
(1) Carefully pull/pry the broken glass holder from
the mirror assembly.
(2) Disconnect the heated mirror electrical connectors
from the terminals on the mirror glass holder, if
equipped.
INSTALLATION
CAUTION: It is important to make sure the motor is
square to the glass holder (attaching fingers) prior
to glass holder attachment, otherwise the glass
holder could be installed incorrectly causing poor
retention and possible repeat failure.
(1) Position the new mirror glass holder to the
mirror assembly.
NOTE: Position the mirror glass holder so that the
moisture drain hole on the mirror glass holder
assembly is facing downward.
(2) Align the mirror glass holder’s attaching fingers
to the mirror motor housing.
NOTE: Ensure that the protective rubber cover of
the mirror motor housing is positioned correctly
around the bottom of the fingers area.
(3) Using one hand, firmly press the mirror glass
holder assembly into place while at the same time
supporting the housing assembly from the backside
with the other hand.
NOTE: Pressure must be applied equally over the
center portion of the mirror to engage the mirror
glass holder’s attaching fingers to the corresponding
fingers on the housing assembly. One or more
clicks may be heard when finger engagement takes
place.
(4) Verify retention of the mirror glass holder
assembly by gently pulling outward on the mirror
glass holder.
theroofable
Full Access Member
I knew you could remove the glass, just didnt know how. Which way would you pry, how much force? Do you have a video of this perhaps?
theroofable
Full Access Member
Yup, I knew I should have taken them  glad I remembered!
glad I remembered!theroofable
Full Access Member
I reccommend getting the door pannel removal tool. Its like 10 bucks at autozone. Use force when removing the panel, it will not break if you pull on it.
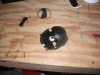
Mirror removal 1.
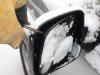
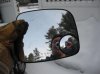
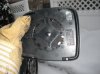
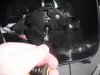
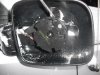
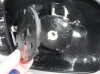
Well here is what I have found. There is a cup shaped bracket that holds the mirror and is also part of the positioning mechanism. One side of this cup there are 2 thin parts that broke. See attached photos of removal and the broken part. There is a 5 photo upload limit and I have 10 photos, so I will upload the second 5 in a separate post. I did attempt a Krazy Glue repair to get me through until I can order new mirrors, but it did not hold. Any ideas whose got the best prices for new ones? Thanks.
Well here is what I have found. There is a cup shaped bracket that holds the mirror and is also part of the positioning mechanism. One side of this cup there are 2 thin parts that broke. See attached photos of removal and the broken part. There is a 5 photo upload limit and I have 10 photos, so I will upload the second 5 in a separate post. I did attempt a Krazy Glue repair to get me through until I can order new mirrors, but it did not hold. Any ideas whose got the best prices for new ones? Thanks.
Attachments
For mirrors try www.rockauto.com
Under Jeep-Year-Liberty-Model-Body-Exterior- $25 and up.
Now is the chance to also install the heated one.
You can also search for mirrors using google. Example- "Jeep Liberty heated mirror ebay"
Under Jeep-Year-Liberty-Model-Body-Exterior- $25 and up.
Now is the chance to also install the heated one.
You can also search for mirrors using google. Example- "Jeep Liberty heated mirror ebay"
What year Kj you have?
Wiring generally included inside door panel for heated mirror, activated by rear defroster switch.
Wiring generally included inside door panel for heated mirror, activated by rear defroster switch.
KJJosh
Full Access Member
Billwill
Full Access Member
Most "superglue" products do not work on plastic.
The best way to repair broken plastic parts is to use a small soldering iron and melt the two parts into each other...assuming the plastic is not a "thermoset" type which can not melt.!
You can also reinforce the joint by melting some metal into the joint; I use small sewing needles, cut to size with sidecutters, melted into the joint with the hot tip of the soldering iron then melt some extra plastic over the whole area.
Or you can get the heated mirrors as suggested!:shrug:
Last edited:
Similar threads
- Replies
- 4
- Views
- 2K
- Replies
- 6
- Views
- 876
- Replies
- 0
- Views
- 1K
- Replies
- 14
- Views
- 2K