
profdlp
Circling The Drain
Here is a simple project you can do in an hour or two which turns your gummy feeling plastic and rubber handles into a nice textured surface which adds some colorful accents to the interior of your Jeep Liberty.
First off, this was my first attempt at wrapping cord around anything, unless you count that one time me and my girlfriend decided to...uh...let's just say this was my first attempt.")
I purposely chose the simplest wrap I could find and this one fit the bill:
[YT]_2zpzbccBnY[/YT]
I used a pair of vise grips instead of needlenose pliers at the end, but this one was dead simple. The only real mistake I made was cinching down the wraps so tight I had trouble pulling the inside double-up cord though them for the final tightening-down. If you don't have the feel of it at first it's a simple matter of loosening things up again and redoing it. The first one took me twenty-five minutes of trial-and-error, then the rest took only a few minutes each.
I used some paracord I ordered online: Titan™ Genuine Military 550 Paracord - Authentic "Mil-Spec" (MIL-C-5040-H)
As you can see, there are lots of colors available. I'd estimate that I used about 80' of the 100' roll I bought. If you decide to go with a more elaborate wrap you will likely need two rolls if you do all five handles like I did. I liked this enough that I'm already contemplating redoing it with a fancier and more complex wrap, perhaps with a two-tone look. If you Google Paracord Wrap Images you'll see some examples of very creative projects you can try which will truly make your Liberty one-of-a-kind.
Getting the handles off will make things easier. Technically, you'll need a 5.5mm deep-well socket for the front pair of A-Pillar handles. I couldn't find one anywhere local and didn't want to pay $10 for such an oddball size so I went with a 7/32" deep-well socket which worked fantastically. You get at them by sliding the rubber covers out with a fingernail. The covers are marked "A" and "B" so you don't have to guess when it's time to put them back in. The handle itself has a different sized mount at each end, so don't worry about putting them back in upside down.
The rear handles just need to have the inserts slid out. Use a small screwdriver and be careful. Unlike the front, the rear handles are held in solely by the push-in inserts, kind of like the plastic rivets on your bumper but with a long rectangular head. Slip here and you might tear the headliner, so go slow. Once they are out just a teensy bit you can slide a pair of needlenose pliers under each side and gently pull. Once they're sticking out as far as possible (don't try and remove them all the way!) a good tug on the handle will pop it loose. Make sure you pull it straight out. If you damage the interior clip you'll be buying a whole new handle. It's not as difficult as I am probably making it sound, just take your time and be deliberate. Fortunately, I managed to avoid making any of the mistakes I'm cautioning you about, so don't let this scare you off. Like the front pair, the rear handles are marked so you can't put them back on the wrong sides. Just remember that the clothes rod hooks go down and to the rear of the Jeep.
I did not even attempt to remove the passenger side panic bar. For all I know, it may be easy, but there is enough clearance here that it wasn't necessary. As a general rule for all of the handles, don't let your coil of paracord get twists in it. Spin the loose hank periodically to remove any kinks before they make their way into your work.
This was fun, fast, functional, and I like the look. If I change my mind down the road it will take ten minutes to unwrap it all with no permanent changes left behind. I'm thinking about doing the door handle pulls as well and will update this if I decide to go ahead and do it.
On to the pictures:
Exterior View:
Inside View:
Inside View, Different Angle:
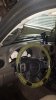
Both Front Handles and Passenger Grab Bar:
Closeup of Passenger Grab Bar:
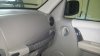
Both Rear Handles:
Closeup of Rear Handle:
First off, this was my first attempt at wrapping cord around anything, unless you count that one time me and my girlfriend decided to...uh...let's just say this was my first attempt.
I purposely chose the simplest wrap I could find and this one fit the bill:
[YT]_2zpzbccBnY[/YT]
I used a pair of vise grips instead of needlenose pliers at the end, but this one was dead simple. The only real mistake I made was cinching down the wraps so tight I had trouble pulling the inside double-up cord though them for the final tightening-down. If you don't have the feel of it at first it's a simple matter of loosening things up again and redoing it. The first one took me twenty-five minutes of trial-and-error, then the rest took only a few minutes each.
I used some paracord I ordered online: Titan™ Genuine Military 550 Paracord - Authentic "Mil-Spec" (MIL-C-5040-H)
As you can see, there are lots of colors available. I'd estimate that I used about 80' of the 100' roll I bought. If you decide to go with a more elaborate wrap you will likely need two rolls if you do all five handles like I did. I liked this enough that I'm already contemplating redoing it with a fancier and more complex wrap, perhaps with a two-tone look. If you Google Paracord Wrap Images you'll see some examples of very creative projects you can try which will truly make your Liberty one-of-a-kind.
Getting the handles off will make things easier. Technically, you'll need a 5.5mm deep-well socket for the front pair of A-Pillar handles. I couldn't find one anywhere local and didn't want to pay $10 for such an oddball size so I went with a 7/32" deep-well socket which worked fantastically. You get at them by sliding the rubber covers out with a fingernail. The covers are marked "A" and "B" so you don't have to guess when it's time to put them back in. The handle itself has a different sized mount at each end, so don't worry about putting them back in upside down.
The rear handles just need to have the inserts slid out. Use a small screwdriver and be careful. Unlike the front, the rear handles are held in solely by the push-in inserts, kind of like the plastic rivets on your bumper but with a long rectangular head. Slip here and you might tear the headliner, so go slow. Once they are out just a teensy bit you can slide a pair of needlenose pliers under each side and gently pull. Once they're sticking out as far as possible (don't try and remove them all the way!) a good tug on the handle will pop it loose. Make sure you pull it straight out. If you damage the interior clip you'll be buying a whole new handle. It's not as difficult as I am probably making it sound, just take your time and be deliberate. Fortunately, I managed to avoid making any of the mistakes I'm cautioning you about, so don't let this scare you off. Like the front pair, the rear handles are marked so you can't put them back on the wrong sides. Just remember that the clothes rod hooks go down and to the rear of the Jeep.
I did not even attempt to remove the passenger side panic bar. For all I know, it may be easy, but there is enough clearance here that it wasn't necessary. As a general rule for all of the handles, don't let your coil of paracord get twists in it. Spin the loose hank periodically to remove any kinks before they make their way into your work.
This was fun, fast, functional, and I like the look. If I change my mind down the road it will take ten minutes to unwrap it all with no permanent changes left behind. I'm thinking about doing the door handle pulls as well and will update this if I decide to go ahead and do it.
On to the pictures:
Exterior View:
You must be registered for see images attach
Inside View:
You must be registered for see images attach
Inside View, Different Angle:
You must be registered for see images attach
Both Front Handles and Passenger Grab Bar:
You must be registered for see images attach
Closeup of Passenger Grab Bar:
You must be registered for see images attach
Both Rear Handles:
You must be registered for see images attach
Closeup of Rear Handle:
You must be registered for see images attach
Last edited:
As an Amazon Associate we earn from qualifying purchases.