My Blue KJ

Disclaimer: Links on this page pointing to Amazon, eBay and other sites may include affiliate code. If you click them and make a purchase, we may earn a small commission.

TheBlueKJ

Full Access Member
Joined
Oct 29, 2012
Messages
1,617
Reaction score
9
Location
South Jersey
true true. but its not bad to the point where im going to lose sleep over it. i can deal with how it is as of right now
 

dude1116

Full Access Member
Joined
May 31, 2011
Messages
3,373
Reaction score
13
Location
Pompton Plains, NJ
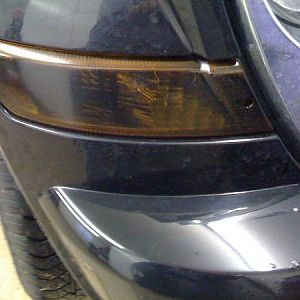
Finally got around to repairing my rocker rust, only got one side done but you'd never be able to tell what was done.

You must be registered for see images

You must be registered for see images

You must be registered for see images

You must be registered for see images


Pictures speak for themselves


Sent from my iPhone using the power of children's laughter

Hey man - what did you use to fix this? My rocker just sprouted it's first hole...
 

TheBlueKJ

Full Access Member
Joined
Oct 29, 2012
Messages
1,617
Reaction score
9
Location
South Jersey
I cut out the old cancer wire wheeled and ground away as much rust as i could, and welded new sheet metal in there
 

RenKJ

Full Access Member
Joined
Feb 19, 2015
Messages
326
Reaction score
15
Location
Canada
How do you like the cherry bomb? Trying to decide between it and a super 44, i like the clearance
 

TheBlueKJ

Full Access Member
Joined
Oct 29, 2012
Messages
1,617
Reaction score
9
Location
South Jersey
It can be a bit drony but overall I like it. I was actually thinking of replacing it with a super 44 but i really don't feel like doing the work to do it
 

teeje

Full Access Member
Joined
May 5, 2014
Messages
733
Reaction score
2
Location
Toledo
It can be a bit drony but overall I like it. I was actually thinking of replacing it with a super 44 but i really don't feel like doing the work to do it


I love mine too ;) sounds great. Especially when you cold start it!


Sent from my iPhone using Tapatalk
 

TheBlueKJ

Full Access Member
Joined
Oct 29, 2012
Messages
1,617
Reaction score
9
Location
South Jersey
Changed the d/s valve cover the other night due to some serious seepage.

Besides the varnish it was damn near spotless in there no sludge to see
You must be registered for see images attach

You must be registered for see images attach


Also ordered up the JBA 4 link for the rear since my rear uca is bad again


Sent from my iPhone using the power of children's laughter
 

TheBlueKJ

Full Access Member
Joined
Oct 29, 2012
Messages
1,617
Reaction score
9
Location
South Jersey
4 link came in today cant wait to install it thursday
You must be registered for see images attach


Sent from my iPhone using the power of children's laughter
 

TheBlueKJ

Full Access Member
Joined
Oct 29, 2012
Messages
1,617
Reaction score
9
Location
South Jersey
I had to redo my wheel bearings and axle seals since the seals I used the first time were SKF and not Timken and were leaking like a sieve.
You must be registered for see images attach

You must be registered for see images attach

You must be registered for see images attach

You must be registered for see images attach

You must be registered for see images attach

You must be registered for see images attach


It was relatively clean in here but the oil was pretty milky, idk if the water got in from the bad seals or breather so I extended the breather up to the gas filler neck just to be safe.
You must be registered for see images attach

You must be registered for see images attach


As for the 4 link. I have to cut down the threads on the arms as they also use it in their 6 in kit. So when I went to install it after work my pinion angle was so extreme my springs were about to fall out. Besides fitting the joints in the bracket which was a pain it's a very easy install.

Here it is with that extreme angle
You must be registered for see images attach

You must be registered for see images attach

There you can see all the exposed thread which shouldn't be visible


Sent from my iPhone using the power of children's laughter
 

dude1116

Full Access Member
Joined
May 31, 2011
Messages
3,373
Reaction score
13
Location
Pompton Plains, NJ
I had to redo my wheel bearings and axle seals since the seals I used the first time were SKF and not Timken and were leaking like a sieve.
You must be registered for see images attach

You must be registered for see images attach

You must be registered for see images attach

You must be registered for see images attach

You must be registered for see images attach

You must be registered for see images attach


It was relatively clean in here but the oil was pretty milky, idk if the water got in from the bad seals or breather so I extended the breather up to the gas filler neck just to be safe.
You must be registered for see images attach

You must be registered for see images attach


As for the 4 link. I have to cut down the threads on the arms as they also use it in their 6 in kit. So when I went to install it after work my pinion angle was so extreme my springs were about to fall out. Besides fitting the joints in the bracket which was a pain it's a very easy install.

Here it is with that extreme angle
You must be registered for see images attach

You must be registered for see images attach

There you can see all the exposed thread which shouldn't be visible


Sent from my iPhone using the power of children's laughter

I thought the idea was that it should be adjustable. Wouldn't adjusting it out in theory expose some threads?

I guess I just don't understand what you mean by "cut down" the threads. Could have sworn they were meant to be there like that.
 

TheBlueKJ

Full Access Member
Joined
Oct 29, 2012
Messages
1,617
Reaction score
9
Location
South Jersey
I thought the idea was that it should be adjustable. Wouldn't adjusting it out in theory expose some threads?


I guess I just don't understand what you mean by "cut down" the threads. Could have sworn they were meant to be there like that.


The way it is, is that when you adjust it in all the way the pinion angle is very extreme to the point where the springs were falling out of the spring perch. I need to cut some of the threaded rod off to be able to adjust it into spec. I emailed marlin about it and told me thats what needed to be done


Sent from my iPhone using the power of children's laughter
 

boboborino

Full Access Member
Joined
Nov 23, 2014
Messages
587
Reaction score
20
Location
Lorette, Manitoba, Canada
Oops sorry, I didn't read the last page before asking my question, and didn't realize dude116 was wondering the same thing I was. But I guess my question still stands, or more so how do you know how much to cut?

Bert
 

TheBlueKJ

Full Access Member
Joined
Oct 29, 2012
Messages
1,617
Reaction score
9
Location
South Jersey
Well the pic on JBA's website has practically no thread showing as does Tom's pic in his thread. I've got about 1" of thread showing on each side so yea about 2" total
 

dude1116

Full Access Member
Joined
May 31, 2011
Messages
3,373
Reaction score
13
Location
Pompton Plains, NJ
Well the pic on JBA's website has practically no thread showing as does Tom's pic in his thread. I've got about 1" of thread showing on each side so yea about 2" total

Personally I wouldn't cut the threads just because some are exposed. It's meant to be adjustable and that's just that. I would probably shoot a coat of paint over them though. I just can't really imagine the issue you're having. Is the pinion tilted too far down? If that's the case, shouldn't you just be able to adjust it in, thus causing threads to NOT be exposed?

Wonder if I'll have any issues with my 3.5 inches of lift in the rear.
 
Last edited:

TheBlueKJ

Full Access Member
Joined
Oct 29, 2012
Messages
1,617
Reaction score
9
Location
South Jersey
Dude the springs were going to fall out of their perches if i lowered the axle to full droop. My brake line was the only thing keeping it from spinning so the diff cover was facing the ground. The pinion angle was way off. You couldn't possibly drive it the way it was sitting. Even Marlin said if you're not using it with the 6 inch kit the threads need to be cut

EDIT: It's not a simple matter of the threads showing, it's the fact there's too much thread to adjust the pinion angle to spec and they bottom out in the joint.

I'm also sitting at about 3 inches in the rear


Sent from my iPhone using the power of children's laughter
 

dude1116

Full Access Member
Joined
May 31, 2011
Messages
3,373
Reaction score
13
Location
Pompton Plains, NJ
Dude the springs were going to fall out of their perches if i lowered the axle to full droop. My brake line was the only thing keeping it from spinning so the diff cover was facing the ground. The pinion angle was way off. You couldn't possibly drive it the way it was sitting. Even Marlin said if you're not using it with the 6 inch kit the threads need to be cut

EDIT: It's not a simple matter of the threads showing, it's the fact there's too much thread to adjust the pinion angle to spec and they bottom out in the joint.

I'm also sitting at about 3 inches in the rear


Sent from my iPhone using the power of children's laughter

Got it got it. I didn't realize that the threads were bottoming out. I thought it could be brought in more. You would think that there would be enough tube for the threads to make it fully adjustable for stock to lifted range. I can think of two different ways to do that but whether it's possible to build like that or not is beyond me.

This has me leaning towards the IRO arm and custom bracket.
 

John3seventeen

Full Access Member
Joined
Jul 20, 2013
Messages
1,323
Reaction score
1
Location
WV Panhandle
Its because JBA is using the same rods for the welded 4 link, It would be nice if they would make a shorter version with a little more threads. I know Tom has suggested this.
 

dude1116

Full Access Member
Joined
May 31, 2011
Messages
3,373
Reaction score
13
Location
Pompton Plains, NJ
Its because JBA is using the same rods for the welded 4 link, It would be nice if they would make a shorter version with a little more threads. I know Tom has suggested this.

Problem would probably be manufacturing cost.

Anyway I'm definitely not willing to cut a $600 part for my Jeep. I can save myself $100 and everything will be bolt on with the IRO arm. A shame too because I was looking to have beefier joints as opposed to bushings.

Sorry for thread-jacking. Thanks for putting this info out there man. It's much appreciated.
 
Top