jpsutich
New Member
I just replaced the condenser on my Liberty and damn that was easy. I had it tested for a leak so I knew that it was the condenser. I had called around to my local used parts sellers and they couldn't find a good one. I was told last year that the part from the dealer was aroud $390 (pretty darn expensive) so I held off on the repair. Along with the labor the job was going to cost around $600. Luckily I waited. Jeep I found out from my local dealer just started sending out new "updated" condensers at a dealer cost of $215...sweet.
So if you are planning on purchasing a condenser look at the prices and dates of manufacture.
Here goes with the steps, some from the manual and some updated by me.
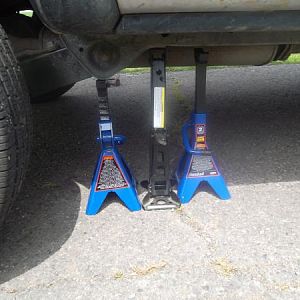
1. Make sure the system is discharged. My system was so I knew that I was good to go. The AC is under high pressure so be careful. Also disconnect the negative cable from the battery. (I didn't but that's what the manual says)
2. The condenser sits right in front of the radiator and looks like one. It is about 2ft by 2ft and has a metal "air-conditioner" like metal strips running through it. It is about 2inches deep.
3. To get it out you have to remove the front grill (very simple) remove the four star screws that connect it to the top. Two on each side. When you pull it forward it is hooked on the bottom. Just unhook and it is off. Place to side. Be careful not to lose the rubber that sits along the lights.
4 . Next you will see a metal cover that sits above the radiator and condenser that is held on by 7 screws. There are 4 screws on top-two left and two right. There are also two at the bottom of the cover near the lower part of the condenser attached to a long support. The last one is in the middle near the hood latch. They all come off with the same socket.
5. Detach the plastic connector from the window washer bottle ( you won't be able to get the metal cover off if you don't do this simple step). Mine is yellow.
6. Next the trickiest part. Slowly lift the metal cover from over the radiator/condensor. It will take a little "jimmying" to get it out. Not too difficult if all the screws are removed. Slowly place it on top of the engine. Your engine should not be hot if at all possible. The manual says to remove the radiator(which I think is a typo). It is just the metal cover.
7. Now you will have access to the condenser. Unbolt and disconnect the refrigerant lines. The top two nuts are all that need to be removed. The bolts that are in the condenser are replaced with new ones with the new condenser. Once the nuts are off just tug on the refrgerant lines one at a time and they will come off. Becareful of any dripping liquids.
7. Next remove the two bolts that hold the condenser to the radiator..easy. Carefully lift the condenser out of the two condenser brackets at the bottom.
8. Add .75 oz of R134a refrigerant oil to the condenser. Replace with the new condenser. Reverse your steps to secure the condenser.
9. Once the part is installed start your Jeep turn on the AC to high and connect a pressure gauge for R-134a systems and add refrigerant until full.
10. The manual says to have the system evacuated, recharged, and leak-tested. Since my system was already evacuated and leak-tested I just recharged. I was told by my autoparts store to add 4 cans of R-134a but I couldn't get more than 1 before the gauge said it was full.
I ran water through the old condenser and saw where my leak was. The metal connector that connects the condenser to the radiator was cracked. Not sure if the new one is designed the same way.
Just a heads-up..make sure you are getting the updated condenser ($215)not the old $390 one.
Hope this helps.
So if you are planning on purchasing a condenser look at the prices and dates of manufacture.
Here goes with the steps, some from the manual and some updated by me.
1. Make sure the system is discharged. My system was so I knew that I was good to go. The AC is under high pressure so be careful. Also disconnect the negative cable from the battery. (I didn't but that's what the manual says)
2. The condenser sits right in front of the radiator and looks like one. It is about 2ft by 2ft and has a metal "air-conditioner" like metal strips running through it. It is about 2inches deep.
3. To get it out you have to remove the front grill (very simple) remove the four star screws that connect it to the top. Two on each side. When you pull it forward it is hooked on the bottom. Just unhook and it is off. Place to side. Be careful not to lose the rubber that sits along the lights.
4 . Next you will see a metal cover that sits above the radiator and condenser that is held on by 7 screws. There are 4 screws on top-two left and two right. There are also two at the bottom of the cover near the lower part of the condenser attached to a long support. The last one is in the middle near the hood latch. They all come off with the same socket.
5. Detach the plastic connector from the window washer bottle ( you won't be able to get the metal cover off if you don't do this simple step). Mine is yellow.
6. Next the trickiest part. Slowly lift the metal cover from over the radiator/condensor. It will take a little "jimmying" to get it out. Not too difficult if all the screws are removed. Slowly place it on top of the engine. Your engine should not be hot if at all possible. The manual says to remove the radiator(which I think is a typo). It is just the metal cover.
7. Now you will have access to the condenser. Unbolt and disconnect the refrigerant lines. The top two nuts are all that need to be removed. The bolts that are in the condenser are replaced with new ones with the new condenser. Once the nuts are off just tug on the refrgerant lines one at a time and they will come off. Becareful of any dripping liquids.
7. Next remove the two bolts that hold the condenser to the radiator..easy. Carefully lift the condenser out of the two condenser brackets at the bottom.
8. Add .75 oz of R134a refrigerant oil to the condenser. Replace with the new condenser. Reverse your steps to secure the condenser.
9. Once the part is installed start your Jeep turn on the AC to high and connect a pressure gauge for R-134a systems and add refrigerant until full.
10. The manual says to have the system evacuated, recharged, and leak-tested. Since my system was already evacuated and leak-tested I just recharged. I was told by my autoparts store to add 4 cans of R-134a but I couldn't get more than 1 before the gauge said it was full.
I ran water through the old condenser and saw where my leak was. The metal connector that connects the condenser to the radiator was cracked. Not sure if the new one is designed the same way.
Just a heads-up..make sure you are getting the updated condenser ($215)not the old $390 one.
Hope this helps.
 and I'm in business, cold as it ever was