You are using an out of date browser. It may not display this or other websites correctly.
You should upgrade or use an alternative browser.
You should upgrade or use an alternative browser.
Engine Swap Overview
- Thread starter TwoBobsKJ
- Start date
Disclaimer: Links on this page pointing to Amazon, eBay and other sites may include affiliate code. If you click them and make a purchase, we may earn a small commission.
KidsKJ02
Member
- Joined
- Sep 15, 2023
- Messages
- 30
- Reaction score
- 22
Hello! Wondering if you or anyone else is still monitoring this thread as it was a great write up! I in fact used it to do my engine swap as well however, I have no happy ending yet. I dropped an 04 3.7 into my 02 KJ AFTER changing out all the internal timing parts mentioned above, so I replaced the reluctor ring and the right side camshaft sprocket/note. Among other things listed and some not listed in order to make this happen. Now I have a crank, no start, no spark situation, It failed the first diagonisric test which was the compression test, my compression is all over the place; 0 psi in #1 115 in #2 and 90 in #3. So naturally one would think my timing is off right!? Not so much… all my marks and links are right on the moeny where they should be? The only one in quesion is the counter balance shaft gear, I couldn’t find anything that states where the mark should be at the 12 or 6 o'clock. The manual just says lined up with idler gear dot, so that’s what I did idler dot is at the 12 and counter balance shaft gear is at 6 so there in a line now however, that’s not gonna cause a no spark no compression? It would run just poorly. I Litterly drove the 04 donor vehicle up until I pulled the motor so I can verify the donor ran well. Does anyone have any ideas or suggestions here as I have a real Scooby-Doo mystery on my hands. Thanks!So my '03 started with a very mild internal tapping noise last summer that would come and go. But just before Christmas it transitioned to a definite knock that only got worse. Three weeks ago it got so bad that listening to the radio was a waste and my neighbors could hear me coming. Since I'd already found a donor engine, and I had very important customer visits that required I get this done, I decided I'd do the swap even though it was COLD around here at the time. Thankfully the garage has a heater that came in very handy.
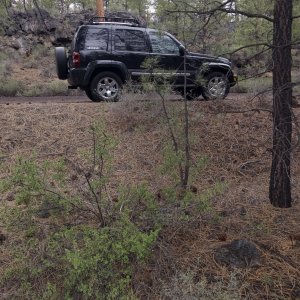
Here's why it was past time to replace my original engine:
You must be registered for see images
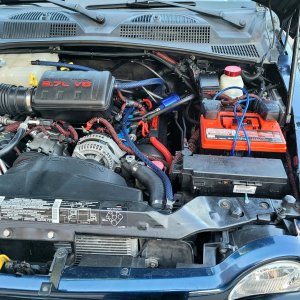
Found an '07 engine from a Dodge Dakota with only 9700 miles. Some topside damage - broken upper radiator neck, power steering pump and the plastic valve cover was broken. Other than those broken parts though, it is exceptionally clean and mechanically sound. With the exception of the valve cover and the timing cover the broken parts had to be swapped out for those on the original engine.
You must be registered for see images attach
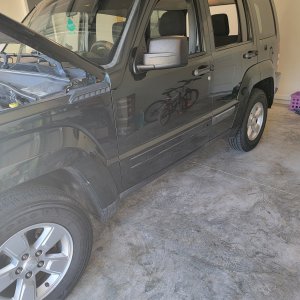
Side view:
You must be registered for see images attach
So if you have an '03 or '04 Liberty and you want to swap in an engine from an '05 or newer (even up to a 2012) here are external components you'll need from your original engine (same components from new engine will likely be different):
- Intake manifold
- Oil pan
- AC compressor, alternator, power steering pump, water pump
- Original motor mounts (or new; more on that later)
- Exhaust manifolds
- Oil filler neck
- Oil drip pan (under the oil filter)
Internally, the right side cam sprocket and crankshaft reluctor ring must match your computer. The '02 through '04 use the JTEC computer; '05 and later use the NGC computer, so you have two options. One, pull the cam sprocket and reluctor ring from your original engine and then break down the donor and install the originals in the donor. That means you're tearing down two engines- that's a lot of work. So I purchased a cam sprocket, reluctor ring and EGR blocking plate from Engine-Guru.com so that I only needed to break down the new engine instead of both of them.
Here's the reluctor ring for the crankshaft (1st pic) and the cam sprocket in the 2nd pic. You'll probably need to get three new T-27 screws for the reluctor ring (I did) and they're dealer-only (about $1.25 each); the screws were installed at the factory with thread lock so it's easy to strip out the screw heads. I didn't take a pic of the EGR blocking plate (new engines have an external EGR valve that your older engine doesn't have) but it's a simple 1/4" steel plate in the shape of the valve:
You must be registered for see images
You must be registered for see images attach
If we only needed to swap out the cam sprocket we'd just take off the timing cover to remove the timing chains. But we also need to swap out the reluctor ring which is attached to the rear portion of the crankshaft - so the crank has to be removed. The 3.7 has a two-piece block, so the lower section - the bedplate - must be taken off to remove the crank. So that means the main bearings and bearing caps for each of the connecting rods is taken off to get the crank out. Get a copy of the Factory Service Manual for detailed instructions, torque specs, etc. to learn how to do both procedures. It looks intimidating at first but take it step-by-step and you'll be fine. One note: Some folks on other forums have had to remove the pilot bearing on the end of the crank so the nose of the torque converter will fit. I did NOT have to do that but compare the size of the opening in the end if your original crank with the donor motor's crank. If the pilot bearing has to be removed so your torque converter will fit you may need to take the crank to a machine shop. That bearing is pressed in very tightly and won't come out with a pilot bearing puller.
Timing chains (new engine - nice and clean):
You must be registered for see images attach
Bedplate and crankshaft removed:
You must be registered for see images attach
IMPORTANT!! The connecting rods use "torque to yield" (TTY) bolts and MUST NOT be reused. They are not easy to find (not available at standard parts stores) and have to be ordered through the dealership. They cost me $1.20 each plus $4 shipping from a dealership in central Ohio - plan ahead on that one.
The timing cover is the same on 3.7 blocks through at least 2010 so you don't have to replace that (I used the cover from my original engine due to the accident damage to the donor motor) but when you remove it you will have to install new gaskets. Besides the gaskets for the timing cover, you'll also need gaskets for the water pump, valve covers, intake manifold, exhaust manifolds and oil pan. The front crank main seal gasket comes with the timing cover gasket set so you're good there. But you'll certainly want to replace the rear main seal too if you have to remove the crankshaft to swap the reluctor ring so order one before you get started. The oil pan gasket is also the windage tray. Here's what it looks like:
You must be registered for see images attach
Once I got the old engine out it was obvious the original motor mounts were shot:
You must be registered for see images
NAPA carries them so I replaced the pair for $80.
One frustration I ran into as I was wrapping things up - the power steering pump wouldn't bolt into the cylinder head! The '07 pump uses different bolt locations than the '03 - however, the bosses are in the correct place to put the '03 pump on the '07 cylinder head. Just have to run a tap into the bosses that are cast on the head. The pic below shows the bosses that need tapped; the other 3 are for the '07 pump bolts. Use an 8M X 1.25 tap; casting sand is all that is in the hole locations in the head so it's an easy 10 minute job.
You must be registered for see images
After using lots of Lucas Assembly Lube on the internal parts - main bearings, all connecting rod bearings and the crankshaft journals - I assembled everything being very careful of torque specs and bolt tightening order. I put on the timing cover, exhaust manifolds and cats and the new engine was ready to go back in.
You must be registered for see images attach
Filled the engine with all fluids, put on the intake manifold and the accessory components, reattached the wiring, said a quick prayer (!) and turned the key and Bingo! it started right up. Put 1200 miles on it the next five days and it drove like night and day. Obviously the banging/knocking is gone but the old Liberty purrs like a kitten and has a definite power improvement.
The project isn't technically hard but having a comprehensive tool selection is necessary. The most handy tool I used was a 36" ratchet extension I borrowed to get to the transmission bolts at the top of the bellhousing. Would have been a struggle to get to those bolts off and on otherwise. I had a bit of a challenge lining up the flex plate and torque converter bolts but finally got it.
Hope this helps others considering an engine swap. Drop me a PM if you have any questions. :favorites13:
Bob
ltd02
Comfortably numb
Did you put the sensors from the 02 in the newly installed 04?
KidsKJ02
Member
- Joined
- Sep 15, 2023
- Messages
- 30
- Reaction score
- 22
No, I didn’t swap them out as they had the same part number and plug pins. I suppose I could try there pretty easy to get to however, I believe I found my latest issue, after coming to terms with the thought of breaking it down again, I went to remove the right side cam shaft sprocket and discover that although it was TDC, we’re it should be the lobe or pin behind it wasn’t. It appears that the key sank back into the cam where as it was almost flush with it, so it wasn’t engaging the sprocket, never seen anything like it. Although I was glad to find it, as now I’m back in the game, should have wrapped it up tonight and fired it but, I broke the plastic primary timing chain tensioner, so job stoppage till I get a new one.
Brownjasonr
New Member
- Joined
- Jan 14, 2024
- Messages
- 2
- Reaction score
- 0
You still around nowadays? I’m working in a 2011 liberty 3.7. I’m about to put a 3.7 from an 09 compass. I’m thinking that’s a direct plug and play correct? I’m asking if I need to seal the regulator ring and cam sprocket?So my '03 started with a very mild internal tapping noise last summer that would come and go. But just before Christmas it transitioned to a definite knock that only got worse. Three weeks ago it got so bad that listening to the radio was a waste and my neighbors could hear me coming. Since I'd already found a donor engine, and I had very important customer visits that required I get this done, I decided I'd do the swap even though it was COLD around here at the time. Thankfully the garage has a heater that came in very handy.
Here's why it was past time to replace my original engine:
You must be registered for see images
Found an '07 engine from a Dodge Dakota with only 9700 miles. Some topside damage - broken upper radiator neck, power steering pump and the plastic valve cover was broken. Other than those broken parts though, it is exceptionally clean and mechanically sound. With the exception of the valve cover and the timing cover the broken parts had to be swapped out for those on the original engine.
You must be registered for see images attach
Side view:
You must be registered for see images attach
So if you have an '03 or '04 Liberty and you want to swap in an engine from an '05 or newer (even up to a 2012) here are external components you'll need from your original engine (same components from new engine will likely be different):
- Intake manifold
- Oil pan
- AC compressor, alternator, power steering pump, water pump
- Original motor mounts (or new; more on that later)
- Exhaust manifolds
- Oil filler neck
- Oil drip pan (under the oil filter)
Internally, the right side cam sprocket and crankshaft reluctor ring must match your computer. The '02 through '04 use the JTEC computer; '05 and later use the NGC computer, so you have two options. One, pull the cam sprocket and reluctor ring from your original engine and then break down the donor and install the originals in the donor. That means you're tearing down two engines- that's a lot of work. So I purchased a cam sprocket, reluctor ring and EGR blocking plate from Engine-Guru.com so that I only needed to break down the new engine instead of both of them.
Here's the reluctor ring for the crankshaft (1st pic) and the cam sprocket in the 2nd pic. You'll probably need to get three new T-27 screws for the reluctor ring (I did) and they're dealer-only (about $1.25 each); the screws were installed at the factory with thread lock so it's easy to strip out the screw heads. I didn't take a pic of the EGR blocking plate (new engines have an external EGR valve that your older engine doesn't have) but it's a simple 1/4" steel plate in the shape of the valve:
You must be registered for see images
You must be registered for see images attach
If we only needed to swap out the cam sprocket we'd just take off the timing cover to remove the timing chains. But we also need to swap out the reluctor ring which is attached to the rear portion of the crankshaft - so the crank has to be removed. The 3.7 has a two-piece block, so the lower section - the bedplate - must be taken off to remove the crank. So that means the main bearings and bearing caps for each of the connecting rods is taken off to get the crank out. Get a copy of the Factory Service Manual for detailed instructions, torque specs, etc. to learn how to do both procedures. It looks intimidating at first but take it step-by-step and you'll be fine. One note: Some folks on other forums have had to remove the pilot bearing on the end of the crank so the nose of the torque converter will fit. I did NOT have to do that but compare the size of the opening in the end if your original crank with the donor motor's crank. If the pilot bearing has to be removed so your torque converter will fit you may need to take the crank to a machine shop. That bearing is pressed in very tightly and won't come out with a pilot bearing puller.
Timing chains (new engine - nice and clean):
You must be registered for see images attach
Bedplate and crankshaft removed:
You must be registered for see images attach
IMPORTANT!! The connecting rods use "torque to yield" (TTY) bolts and MUST NOT be reused. They are not easy to find (not available at standard parts stores) and have to be ordered through the dealership. They cost me $1.20 each plus $4 shipping from a dealership in central Ohio - plan ahead on that one.
The timing cover is the same on 3.7 blocks through at least 2010 so you don't have to replace that (I used the cover from my original engine due to the accident damage to the donor motor) but when you remove it you will have to install new gaskets. Besides the gaskets for the timing cover, you'll also need gaskets for the water pump, valve covers, intake manifold, exhaust manifolds and oil pan. The front crank main seal gasket comes with the timing cover gasket set so you're good there. But you'll certainly want to replace the rear main seal too if you have to remove the crankshaft to swap the reluctor ring so order one before you get started. The oil pan gasket is also the windage tray. Here's what it looks like:
You must be registered for see images attach
Once I got the old engine out it was obvious the original motor mounts were shot:
You must be registered for see images
NAPA carries them so I replaced the pair for $80.
One frustration I ran into as I was wrapping things up - the power steering pump wouldn't bolt into the cylinder head! The '07 pump uses different bolt locations than the '03 - however, the bosses are in the correct place to put the '03 pump on the '07 cylinder head. Just have to run a tap into the bosses that are cast on the head. The pic below shows the bosses that need tapped; the other 3 are for the '07 pump bolts. Use an 8M X 1.25 tap; casting sand is all that is in the hole locations in the head so it's an easy 10 minute job.
You must be registered for see images
After using lots of Lucas Assembly Lube on the internal parts - main bearings, all connecting rod bearings and the crankshaft journals - I assembled everything being very careful of torque specs and bolt tightening order. I put on the timing cover, exhaust manifolds and cats and the new engine was ready to go back in.
You must be registered for see images attach
Filled the engine with all fluids, put on the intake manifold and the accessory components, reattached the wiring, said a quick prayer (!) and turned the key and Bingo! it started right up. Put 1200 miles on it the next five days and it drove like night and day. Obviously the banging/knocking is gone but the old Liberty purrs like a kitten and has a definite power improvement.
The project isn't technically hard but having a comprehensive tool selection is necessary. The most handy tool I used was a 36" ratchet extension I borrowed to get to the transmission bolts at the top of the bellhousing. Would have been a struggle to get to those bolts off and on otherwise. I had a bit of a challenge lining up the flex plate and torque converter bolts but finally got it.
Hope this helps others considering an engine swap. Drop me a PM if you have any questions. :favorites13:
Bob
Brownjasonr
New Member
- Joined
- Jan 14, 2024
- Messages
- 2
- Reaction score
- 0
Swap is what I meant. Not seal.You still around nowadays? I’m working in a 2011 liberty 3.7. I’m about to put a 3.7 from an 09 compass. I’m thinking that’s a direct plug and play correct? I’m asking if I need to seal the regulator ring and cam sprocket?
I’m sure that is a typo— the Compass doesn’t have the 3.7. But an 09 Lib into an 11 Lib is probably a good bet. The only thing different is that between ‘10 and ‘11 Jeep changed the computer system. So definitely keep your original electrical bits.
So can I swap a 2003 Jeep liberty 3.7 engine into a 2012 jeep liberty body with a blown 3.7 engine?For those doing the above swap, up to and including 2012 will work in 02-03 models. 02 and 03 Liberty's with the 45RFE transmission will need the pilot bearing or insert removed in end of crankshaft to accept torque converter. Check fitment of torque converter before mating transmission to engine
Honestly, I wish advanced adapters made an adapter for the trans to a older GM V6, power could be the same working on it would be a bit easier, and heck probably much cheaper over all , or even the small block chevy, or ford motor. 289 or 327. Gas mileage would be about the same, unless you got the diesel probably not getting the best mpg. What would kill me is I live in one of the only like 6 or 7 counties in the state of ohio that still does echeck. ug.
Not easily - the computers are different because the earlier engines had the reluctors built into the crankshaft. 3 plug vs 4 plug computers. There is a bunch of stuff on here but the forum search leaves much to be desired. Google site:jeepkj and engine swap - you will find more than you want to know.So can I swap a 2003 Jeep liberty 3.7 engine into a 2012 jeep liberty body with a blown 3.7 engine?
Thankyou for your valuable info!Not easily - the computers are different because the earlier engines had the reluctors built into the crankshaft. 3 plug vs 4 plug computers. There is a bunch of stuff on here but the forum search leaves much to be desired. Google site:jeepkj and engine swap - you will find more than you want to know.
Similar threads
- Replies
- 5
- Views
- 882
- Replies
- 1
- Views
- 983