Custom spring compressor/ llift install aid

Disclaimer: Links on this page pointing to Amazon, eBay and other sites may include affiliate code. If you click them and make a purchase, we may earn a small commission.

Selwyn

Full Access Member
Joined
Jun 14, 2009
Messages
34
Reaction score
1
Location
South Africa
Hi Boiler
A suggestion: Add 2 ears to the shim; make provision for a spring compressor, the attached photos are a prototype, weld the ears onto the shim.
You must be registered for see images attach


You must be registered for see images attach


I have more detail if you are interested.

Regards

Selwyn
Johannesburg
South Africa
 

tommudd

Moderator
Staff member
Moderator
Joined
Jul 14, 2005
Messages
22,456
Reaction score
3,643
Location
Southeastern Ohio
Hi Boiler
A suggestion: Add 2 ears to the shim; make provision for a spring compressor, the attached photos are a prototype, weld the ears onto the shim.
You must be registered for see images attach


You must be registered for see images attach


I have more detail if you are interested.

Regards

Selwyn
Johannesburg
South Africa

Very scary setup !!!!!!
 

Boiler

New Member
Joined
Feb 18, 2009
Messages
506
Reaction score
1
Location
Muncie Indiana
Very scary setup !!!!!!

Beat me to it. I'll not be doing that...I don't even like borrowing / renting real ones, let alone making my own out of crap laying around the house. Truly a good way to hurt someone, do collateral damage, etc.
 

Selwyn

Full Access Member
Joined
Jun 14, 2009
Messages
34
Reaction score
1
Location
South Africa
Strange!

I'd love to know how you lift an engine out of a vehicle - a block and tackle with the same piece of chain and a high tensile bolt or 2 holding a bracket. A computer programme simulating stress indicates that the tension on the thread goes red first! After 1500kg - way beyond the tension developed compressing the spring. As I said the photos were a prototype. The actual link to the spacer is welded by a coded welder making an excellent anchor.
For now I have welded 2 stainless steel ears to the base of the stainless steel daystar top-plate - the ears will not snap, never! Once the frankenlift is bolted to the Jeep I attach the puller, compress the spring, fit the clevis, bolt it to the frankenlift, bolt the clevis to the LCA and release the tension. A simple one man operation without the use of ratchet strap or any other devices. Where exactly is the Danger or Problem? I will post photos for comment as soon as the frankenlift is installed.
Just a comment in closing - I have read a number of post where certain UCA's have torn loose or snapped, in my mind this is serious, a UCA giving way at high speed has life threatening consequences.
 

Selwyn

Full Access Member
Joined
Jun 14, 2009
Messages
34
Reaction score
1
Location
South Africa
Spring Compresser

You must be registered for see images attach


Hi
I suggest that we start a new post on methods to compress the front coils in order to make fitting the coil overs an easy task.

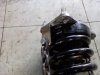
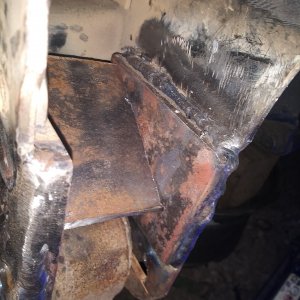
After all the good wishes, the final product for comment!
None of the puller components are loaded to anywhere near their breaking strain or capacity!

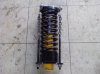
Welded 2 lips stainless steel lips onto the stainless steel Frankenlift top plate (in a stainless steel fabrication workshop!).
Manufactured; 2 chain &12mm high tensile threaded rods “pullers”.
Manufactured; 8mm loose plate to fit on the base of the coil assembly.

Assembly & Operation
Suspension at full droop with only the sway bar disconnected.
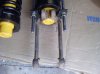
Attach the puller chains to the top plate.
Bolt the coil over assembly into the tower.
Attach the puller base.
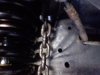
Tighten until there is enough free space to hook the clevis over the side shaft (No excessive force was applied to the ratchet).
Attach the clevis to the shock absorber base.
Lift the hub assembly & insert the clevis bottom bolt.
Tension the assembly by jacking under the LCA.
Remove the puller.
Fitting completed in 20 min.

I have a similar puller - made specifically to remove any coil over from a KJ without disconnecting the UCA or LCA.
 

Attachments

  • 1 Weld the Lip.jpg
    1 Weld the Lip.jpg
    93.8 KB · Views: 35
  • 2 The Puller.jpg
    2 The Puller.jpg
    39.7 KB · Views: 37
  • 3 The Fit.jpg
    3 The Fit.jpg
    35.6 KB · Views: 36
  • 4 Installed Top.jpg
    4 Installed Top.jpg
    71.2 KB · Views: 33
Last edited by a moderator:

tommudd

Moderator
Staff member
Moderator
Joined
Jul 14, 2005
Messages
22,456
Reaction score
3,643
Location
Southeastern Ohio
Yes I can see getting that part way up in and popping loose, and then snapping all of your fingers off.
I have seen springs pop out of a well designed spring compressor and slam into a wall 10 foot away
I watched as a spring compressor broke and took off part of my buddies face, even as an aid I would not use it
Sorry just being truthful chain does not look strong enough or any part of it
 

Selwyn

Full Access Member
Joined
Jun 14, 2009
Messages
34
Reaction score
1
Location
South Africa
Hi Tony
The first post shows the 2 hook system, loosen the upper mount clip the hooks between the upper mount and the body, fasten the upper mount clamping the hooks, compress the spring, remove the clevis, release the spring and remove. This also works 100%. The third option is to weld the ears to a spacer plate such as the one designed by Boiler (this is what I will do on my CRD one day when I have time on hand)
Regards
Selwyn
 

Selwyn

Full Access Member
Joined
Jun 14, 2009
Messages
34
Reaction score
1
Location
South Africa
Hi Tony
Sorry I missed the comment on the coil release. I agree, do not use the puller to release the coil! I am building a 3 stud puller for the purpose, top & bottom plate with appropriate holes and 3 long high tensile rods 120 deg apart, This will keep everything in a straight line.
Selwyn
 

ThunderbirdJunkie

Bronze Supporter
Joined
Oct 31, 2005
Messages
9,427
Reaction score
20
Location
Newport, KY
Very scary setup !!!!!!

Beat me to it. I'll not be doing that...I don't even like borrowing / renting real ones, let alone making my own out of crap laying around the house. Truly a good way to hurt someone, do collateral damage, etc.

C'mon, guys: Death can't be all bad...everyone does it...

Yeah, it has to be absolutely fantastic...but that's why ThunderbirdJunkie is making it the last thing he does...
Strange!

I'd love to know how you lift an engine out of a vehicle

Not with a 400lb/in or more spring with a couple little tabs that are the only thing keeping it compressed, that's for damn sure
 

Selwyn

Full Access Member
Joined
Jun 14, 2009
Messages
34
Reaction score
1
Location
South Africa
Thanks for the comments. I can defend each one with the results of the stress tests, the puller will not give way while compressed, the bolts will not shear, the chain is guaranteed to hold at 1500Kg(one side) the ears - 30*5 stainless steel, I will tow any KJ anywhere with a length of the stainless steel flatbar (pulling in a straight line).
I'v been around for 60 years, I'v built and modified too many vehicles to list. I do not have the slightest inclination to damage any of my bodyparts using a under-spec puller.
I am totally confident!
Lets move forward, how do you guys put a frankenlift together? With the LBJ removed from the hub asembly the clevis cannot be attached to the LCA - the mounting point on the LCA has pivoted too far towards the centre of the KJ. Something must be done! Boiler indicates that he does not want to use any type of spring compressor.
Which/what is the best and safest method?

Selwyn
 

TAHOE

Full Access Member
Joined
Aug 15, 2009
Messages
508
Reaction score
0
Location
Cincinnati, Ohio
I think the issue everyone is having is using your setup as a dis-aasembly tool of the shock/strut assembly like a set of strut compressors. I too would not even think of using your set up for that. Like Tom stated, even the corrected built set of compressors are a scary set up once that spring is compressed. I compressed a set of 6-700# coil springs for my Astro van using an inside compressor and that was one of the scariest things I've ever done, would've killed someone in a heartbeat.
Now, if you are using your setup solely to take some spring pressure off the assembly so you can get lower clevis up in there and bolted back in, then maybe it would work. Personally, I'll use the correct strut spring compressor tool for assembling the set up ( or pay a shop to do it), then use a set of ratchet straps to get clevis in place and go sit on my couch nice while still having all my extremities in tact. (biggthumpup)
Even the proper strength chain, bolts, welds can break without warning.
 

Selwyn

Full Access Member
Joined
Jun 14, 2009
Messages
34
Reaction score
1
Location
South Africa
Hi Tahoe
Like Tom stated the propper tool let go. Nothing is 100% safe.

Ratchet Straps. Where are they connected? what do they pull? What size of strap?(they are available up to 5000KG) What quality ratchet? Can the ratchet slip? Can the tension created remove human body parts if used incorrectly? The clevis must be liftes at least 40mm before the bolt will fit.
Is this the best and safest method?
Selwyn
 

Selwyn

Full Access Member
Joined
Jun 14, 2009
Messages
34
Reaction score
1
Location
South Africa
Thanks Tony
The frankenlift brocure is very vague on this subject.
The process; disconnect the UBJ, droop, attach the ratchet strap (to what under the KJ?), (pull & jack & pull?) are any other tools such as a short crowbar required? Is there any reason why the caliper is removed?
In terms of safety, the coil is forced backwards against the body by the strap, the clevis must be forced upwards over the LCA bush, the lips on the clevis must move round the steel bushing section. Whatever you do do not get any human body parts caught in the process. Beware do not damage the inner CV Joint boot.
Please add or delete to make the instruction clear for a first time fitment.

Thanks
Selwyn
 

tommudd

Moderator
Staff member
Moderator
Joined
Jul 14, 2005
Messages
22,456
Reaction score
3,643
Location
Southeastern Ohio
Plus we do not remove the lower ball joint as i think I read somewhere that you wrote , nor do we loosen the lower control arms up any.
Very simple procedure
lift the spring assembly up and start one or two nuts on top ( loosely)
slide the clevis up on the bottom of the spring assembly
thread in bolt on clevis
IF NEEDED now you
attach rachet straps from the front arm of the fork over to a part of the suspension OR to the skid plate (The picture submitted by Tony only shows one strap, two work way better)
attach another one to the rear fork arm, this allows you to pull / (Tighten) one or the other in some more or less. The straps even if they broke would just fall to the floor doing nothing to any body parts
now just pull the arms into where you can get the lower clevis bolt in
slide a jack under the arm and raise the lower control arm, push down on the UCA and install nut, install tie rod end, caliper, tighten everything install tires, take off the jack stands and then install the sway bar ends after the weight is on the tires, way easier
OH and I wrap the CVs with a heavy cloth or something to protect them
But then what do I know I have only been around 55 years (dunno):eek::D:D:D
 
Last edited:

Ry' N Jen

Banned
Joined
Dec 26, 2006
Messages
9,242
Reaction score
12
Location
Slightly North of the 49° th. Parallel... In HongC
To be honest?

I removed the lower control arms to install our Frankenlift!

It was a total PITA to get that damn clevis back in place!

Spring compressors?

Don't waste your time!

Ratchet straps?

Sure, if you have done a few lifts on a KJ!

Installing the Frankenlift wasn't difficult overall...
Just new to me!
But the clevis was a PITA to say the least!

I hate to say it... but it is easier to lift my Mini to get more
ground clearance!

All I have to do on that car is loosen 3 counter sunk set screws, loosen a threaded collar down 6 inches, insert a 3/8 Allen key under the hood where the suspension dampner is mounted to (Underneath the bulkhead) insert the Allen key (Which is attached to a cordless drill) and spin it to either raise or lower the vehicle...)*

I've got over 9 inches of ground clearance on a Classic Mini!


*I gave a brief explanation as to what I did on my hobby car!
 

Latest posts

Staff online

Members online

Top