2007 Jeep Liberty

Disclaimer: Links on this page pointing to Amazon, eBay and other sites may include affiliate code. If you click them and make a purchase, we may earn a small commission.

featherlight

Full Access Member
Joined
May 29, 2015
Messages
45
Reaction score
1
Location
USA
Greetings KJ forum, :party52:

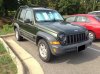
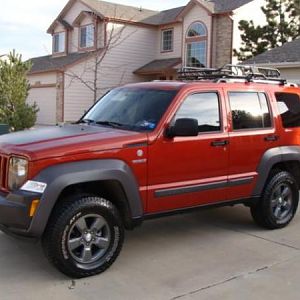
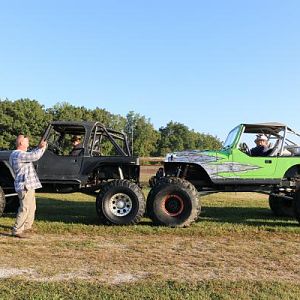
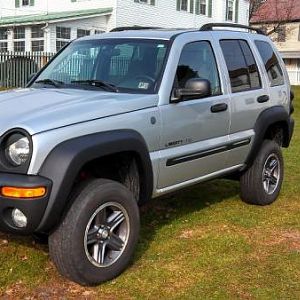
I just recently joined the KJ community when I purchased a green 2007 Liberty 3.7 Sport 4x4. Ever since I bought a KK Liberty for my mom in 2010, and had it exported to the Caribbean where she lives, I was hooked on Jeeps. So when the time came to buy something I could use for work and in the winter I was pleased to stumble across a Liberty for a great price. It's got a few small dents here and there, but everything mechanical and electrical was in order.

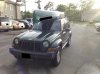
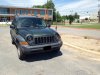
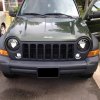
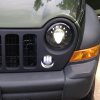
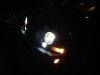
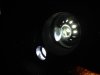
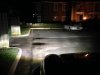
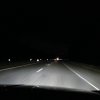
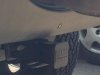
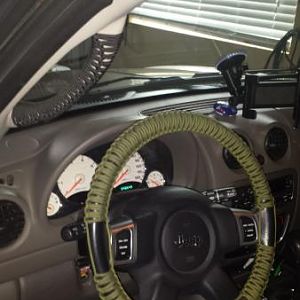
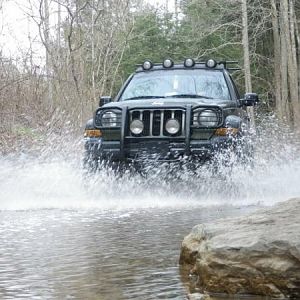
My only gripe is that the headlamps were terrible and very clouded/scratched. So my first project was to "fix" that issue. I may have gone a bit overboard with that..... instead of just restoring them I went ahead and did a full projector retrofit. :happy107: I also got a good deal on some Cree LED fog lights, TRS sells a Morimoto set for $170, the JW Speakers are $300+, I managed to get mine for $85 shipped. They were actually for a Wrangler, but I got creative and came up with a mounting solution that allows me to still use the stock adjustment mechanism. So after many hours of wiring, sanding, gluing, hacking :killer:, 2 bottles of spray paint, and a little bit of desperation..... it was done. To match the lights I also sanded and covered the front grille with 4 coats of matte black. Now I'm looking into replacing the suspension with something a little bit better, because at 100,000 miles the stock setup is somewhat... well... it's tired, to put it gently.

I've learned a lot in the last couple of weeks reading through this forum, and I'm sure I'll have many wonderfully annoying questions that you have all answered 100 times before :gr_grin: as I continue to tinker and try to improve on the Jeep.

If anyone has any questions about the retrofit, just let me know. I didn't do a great job of taking pictures as I went about doing it, but I can certainly give some rough instructions and advice about how I did things.

Anyway, happy to be here and to learn more and share what little I know.
Cheers everyone. :party52:
 

Attachments

  • IMG_2266.jpg
    IMG_2266.jpg
    95.2 KB · Views: 135
  • IMG_2323.jpg
    IMG_2323.jpg
    97.1 KB · Views: 142
  • IMG_2319.jpg
    IMG_2319.jpg
    91 KB · Views: 85
  • IMG_2343.jpg
    IMG_2343.jpg
    90.4 KB · Views: 142
  • IMG_2342.jpg
    IMG_2342.jpg
    83.5 KB · Views: 87

Dave

Administrator
KJ Supporting Member
KK Supporting Member
Joined
Feb 22, 2006
Messages
15,567
Reaction score
15
Location
on here
Looks good. Nice Jeep.


Dave
 

featherlight

Full Access Member
Joined
May 29, 2015
Messages
45
Reaction score
1
Location
USA
Thanks for the comments guys.

Snapped some more pictures last night when it was actually dark. Unfortunately, we don't have a large white wall nearby for me to take a good picture of the cutoff. (I actually drove 10+ miles to the nearest Staples to use the side of their building when I was aiming the projectors. Haha) The cutoff is very sharp and has a nice blue/purple line right along the edge. Factory style high beam/low beam functionality remains, as does the factory height adjustment. I may do a write up for the TRS forum to get a discount coupon for my next purchase there. If I do, I'll make sure to paste a link of it here on the forum. These are all with the low beam and LED foglights on, no high beam in any of these.

Cheers.
 

Attachments

  • IMG_2351.jpg
    IMG_2351.jpg
    104 KB · Views: 55
  • IMG_2352.jpg
    IMG_2352.jpg
    76.4 KB · Views: 52
  • IMG_2353.jpg
    IMG_2353.jpg
    91.4 KB · Views: 54
  • IMG_2349.jpg
    IMG_2349.jpg
    87.6 KB · Views: 113

sota

Full Access Member
Joined
Apr 6, 2011
Messages
2,330
Reaction score
1,132
Location
NJ
Best year. Best color. :waytogo:

eh.... 07 sucked for us manual guys. damn drive by wire makes me look like a ******** 10 year old sometimes.
 

nocTurNalX

Full Access Member
Joined
Mar 19, 2015
Messages
122
Reaction score
0
Location
GA
Those looks decently bright! Good job on headlights.
 

featherlight

Full Access Member
Joined
May 29, 2015
Messages
45
Reaction score
1
Location
USA
It's good to be home..... just completed a 7,000 mile roadtrip in the KJ that took me through 13 states. Not one issue or hiccup with the Jeep along the way.
Suspension upgrades are definitely on my radar to do this month, just ordered the Ironman 1.5" HD kit... and I've got an idea brewing for us 06-07 guys who get no clear indicator love. I'm in the process of designing a 3d model of our indicators with a channel cut out to mount a switch-back LED strip that lights up white and flashes yellow. It's still a work in progress, and I don't have a 3d printer; which means I have to find someone who will let me use theirs or outsource via Shapeways or Sculpteo or something of that nature. I'll post up a picture of the model when I get it rendered. The idea is to have it mimic the factory mounting system (clip on one end, screw in the other) and have the same shape as the factory. Hopefully I can pull it off.

Edit:
Adding the renders. I have to check the measurements on the elevated molding above the screw to make sure it lines up with the fender. I also need to finish the mounting tab on the outside end. I just put a square pattern for the channel in it for now; I'm going to get the dimensions and shape right, then I'll cut out the channel for the led tube. Might go beyond just a rectangular shape...maybe I'll cut out a little mountain range or something; since the led tube is flexible it doesn't have to be all straight lines. Also left an open space in the back for wiring and mounting the led resistor.

You must be registered for see images

You must be registered for see images

You must be registered for see images
 

Attachments

  • Jeep Indicator Concept 1.jpg
    Jeep Indicator Concept 1.jpg
    43.5 KB · Views: 15
  • Jeep Indicator Concept 2.jpg
    Jeep Indicator Concept 2.jpg
    47.6 KB · Views: 13
  • Jeep Indicator Concept 3.jpg
    Jeep Indicator Concept 3.jpg
    44 KB · Views: 12
Last edited:

RATX5

Full Access Member
Joined
Feb 11, 2015
Messages
52
Reaction score
0
Location
Central Nebraska
Wow, the new lights look absolutely stunning in there, especially coupled with the matte black grille.
 

featherlight

Full Access Member
Joined
May 29, 2015
Messages
45
Reaction score
1
Location
USA
I have access to a 3D printer.
Let me know what you had in mind.

:shocked::roflbow:
Seriously? That is awesome!

Well I was just looking into the advantages of ABS vs PLA. I guess since the indicators are exposed to the elements and the occasional stone strike, ABS is probably going to hold up better than PLA in the long run. But maybe just testing it out first with PLA is not a bad idea? Apparently that prints easier than ABS (from what I've read). Any tips on this?

What type of file does it need to be for you to be able to print it on the printer you have access to? I've been using Sketchup so far; since its free and I have experience using it from some fish culture system design work I've done in the past. Are there limitations to the dimensions for the printer?

Thanks.
 

featherlight

Full Access Member
Joined
May 29, 2015
Messages
45
Reaction score
1
Location
USA
I just finished pushing in the front Teraflex bumpstops with some soap and a 2x4. The old ones were a pain to get out, there was some brown gunk on them when they finally did break free. Had the last owner glued them in there? Dunno :shrug:. The Ironman springs and shocks are on and I decided to go with 2 inch longer SS brake lines anyway, even though I had already built and painted the two lowering brackets. Also decided to replace rotors and pads while I was at it. Centric Premium rotors "with e-coating" all around and decided to give EBC Green Stuff a try for pads. Last but not least, some cross bars from Thule... and no way in hell did I pay $500 for them :ROFLJest:. Managed to find the front bar on Ebay for $90, and got the rear bar for $125. The rear one was brand new, the front one had been lightly used but had barely a scratch on it (literally only found one, the size of a penny). I've also put together the wiring harness for the aftermarket radio I was given for my birthday :party52:, looking forward to having it up and working this weekend. If anyone has any tips on the best way to route the wiring for a backup camera into the dashboard I'd love to hear them.
Update with pics soon.

Update 9/5/2015:
The Appradio 4 is in and everything works. I ran the wiring for the backup camera but didn't mount it yet; started raining just as I was about to crawl under the car and do that. I ran the two usb connections, hdmi, and aux input from the back of the radio under the center console into the storage cubby between the seats. Then I used some flush mount connectors, that way when Ipod/phone/usb are plugged in everything is nicely hidden away and out of sight. Very pleased with the setup so far. Carplay is awesome!

Update 9/6/2015:
Backup camera works and automatically engages when shifting into reverse. Pictures! :happy175:
 

Attachments

  • IMG_2887.jpg
    IMG_2887.jpg
    98.3 KB · Views: 33
  • IMG_2936.jpg
    IMG_2936.jpg
    77.7 KB · Views: 37
  • IMG_2939.jpg
    IMG_2939.jpg
    85.9 KB · Views: 42
Last edited:

profdlp

Counting My Blessings
Staff member
Moderator
Joined
May 21, 2013
Messages
5,817
Reaction score
1,766
Location
Westlake, Ohio
...Backup camera works and automatically engages when shifting into reverse. Pictures! :happy175:

Which wire did you tap into, and where is it? That's been on my list to finish up all summer long.
 

Cpt Marvel

Full Access Member
Joined
Sep 1, 2015
Messages
152
Reaction score
1
Location
Clarksville, Tn
I'd love to see how you did the HID retrofit. I have that in my RSX and love them. HID plug and play came in Liberty and the SUCK!
 

TwoBobsKJ

Full Access Member
Joined
Jan 28, 2011
Messages
2,637
Reaction score
17
Location
Northern Ohio
Which wire did you tap into, and where is it? That's been on my list to finish up all summer long.

I'm with you, Prof. Still need to get the camera (preferably a flush-mount style) and run the backup wire.

After backing into a stump last Fall that I couldn't see cuz it was below the rear window level I want a working backup camera :favorites68:

Bob
 

featherlight

Full Access Member
Joined
May 29, 2015
Messages
45
Reaction score
1
Location
USA
I'm with you, Prof. Still need to get the camera (preferably a flush-mount style) and run the backup wire.

After backing into a stump last Fall that I couldn't see cuz it was below the rear window level I want a working backup camera :favorites68:

Bob
This is the camera that I used : 1/4" CCD Flush Mount Camera

It came with a drill to make the hole in the bumper, but be warned this is pretty much a one time use item. The teeth wore out a good bit after I made the hole. The wiring was all long enough to make the connections with ease and no need for any extensions. I also like that there is a disconnect close to the camera, that way if it does break or need replacing you can just unplug it and plug a new one in without having to run a wire from inside the car again.

This camera does have guidelines built in, and there is no way to turn them off, so just keep that in mind.

Also test aim the camera before you push it into the bumper, because there is no "this side up" marker on the body of the unit.
 

featherlight

Full Access Member
Joined
May 29, 2015
Messages
45
Reaction score
1
Location
USA
Which wire did you tap into, and where is it? That's been on my list to finish up all summer long.

Hi Prof,

I used the white wire with a grey stripe from the passenger side tail light to power the camera (reverse power wire), and the black wire from the tail light as the ground. I'm not sure if those are the standard factory colors, since my Jeep appears to have had some splicing done in this area by the previous owner. I found some aftermarket connections on both taillights, which I traced to the 4 pin hitch connector.

The Appradio 4, unlike some other units, comes with a trigger wire on the unit itself that must be connected to the reverse signal for it to switch automatically. The RCA cable for the camera I ordered came with two small power wires attached to the yellow plugs themselves. I hooked the one on the camera end up to the camera's power wire (that is hooked up to the white/grey wire from the taillight), and then I hooked the one on the head unit end up to the purple Pioneer trigger wire.

I've read that some head units don't have or require that head unit trigger wire, and will automatically switch to the reverse signal input when the camera is turned on. So depending on your head unit you may or may not need to make the second trigger connection directly to the head unit.

Btw if anyone is curious, I ran the RCA cable to the camera through the firewall with all the factory cables/wires. In the driver side footwell, remove the plastic cover where the hood release is located by pulling straight back towards the transmission tunnel. To the left of the steering column there is a rubber plug that all the factory wiring runs through to get through the firewall. I cut a small hole through this rubber plug and pushed the RCA wire through with a metal guide wire (clothes hanger). I later taped over the hole I made in the plug with electrical tape (just like the factory wiring bundle does). The biggest pain was reaching the RCA cable on the other side of the firewall, as it comes out behind the battery and below the steering column. But once you grab a hold of it, you can run it down behind the heat shield and along the frame rail with the other factory wires all the way to the back of the car.
 

featherlight

Full Access Member
Joined
May 29, 2015
Messages
45
Reaction score
1
Location
USA
I'd love to see how you did the HID retrofit. I have that in my RSX and love them. HID plug and play came in Liberty and the SUCK!

I need to do a write up on this still. Haha. Unfortunately I didn't take pictures as I went along doing it, but I will do my best to describe exactly how I did it.
I'll try to put something in writing and post it as a reply.
 

uss2defiant

Full Access Member
Joined
Jun 25, 2014
Messages
3,597
Reaction score
152
Location
Tucson, Arizona
:shocked::roflbow:
Seriously? That is awesome!

Well I was just looking into the advantages of ABS vs PLA. I guess since the indicators are exposed to the elements and the occasional stone strike, ABS is probably going to hold up better than PLA in the long run. But maybe just testing it out first with PLA is not a bad idea? Apparently that prints easier than ABS (from what I've read). Any tips on this?

What type of file does it need to be for you to be able to print it on the printer you have access to? I've been using Sketchup so far; since its free and I have experience using it from some fish culture system design work I've done in the past. Are there limitations to the dimensions for the printer?

Thanks.

well it's a work thing. not a personal one.

I haven't used PLA before since we don't have a FDM printer. Have a polyjet eden350 which is analogous to an inkjet printer. ABS would hold better in the element IMHO.

I don't like using 3D printed parts as a final product even though they can be functional. The way the EDEN350 fabs parts is layer by layer in Z which to me is their weakest point as they shear easily at the layer if dropped.

I want to say almost all 3D printers require STL or SLC formats. Most likely our CAD can output it. I have Solidworks if you need me to convert the file format depending on what file format you have.

Max size is 350 x 350 x 200 mm xyz.

I'll have to see what material is available for personal use so that would also limit what I can print out.
 

TwoBobsKJ

Full Access Member
Joined
Jan 28, 2011
Messages
2,637
Reaction score
17
Location
Northern Ohio
This is the camera that I used : 1/4" CCD Flush Mount Camera

It came with a drill to make the hole in the bumper, but be warned this is pretty much a one time use item. The teeth wore out a good bit after I made the hole. The wiring was all long enough to make the connections with ease and no need for any extensions. I also like that there is a disconnect close to the camera, that way if it does break or need replacing you can just unplug it and plug a new one in without having to run a wire from inside the car again.

This camera does have guidelines built in, and there is no way to turn them off, so just keep that in mind.

Also test aim the camera before you push it into the bumper, because there is no "this side up" marker on the body of the unit.

So $10 for the camera??? That's crazy cheap - but you had to buy the RCA cables to extend behind the dash, correct?

I'll just follow the trailer wire harness up through the cargo floor since there's a grommet there - then up the passenger side to the head unit.

Thanks for the tips! :waytogo:

Bob
 
Top