KK Rock Sliders

Disclaimer: Links on this page pointing to Amazon, eBay and other sites may include affiliate code. If you click them and make a purchase, we may earn a small commission.

lfhoward

Well-Known Member
KJ Supporting Member
Joined
Dec 9, 2012
Messages
2,265
Reaction score
2,441
Location
Philadelphia, PA
Drilled the square tubes, matching the holes to the old steel, and test fitted them on the Jeep today.
(Drilling these holes would not be easy later on after everything is welded together!)

You must be registered for see images attach


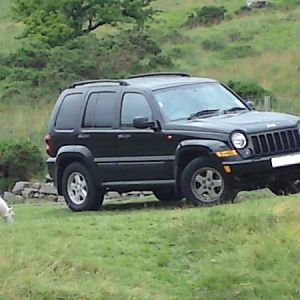
The pictures look like the holes are not in the same places, but it is the perspective of the photo. Everything is measured as precisely as possible. I had to modify one hole on each side by 1/16" to get them to bolt up.

You must be registered for see images attach


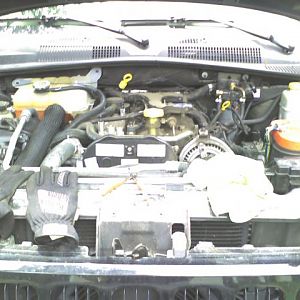
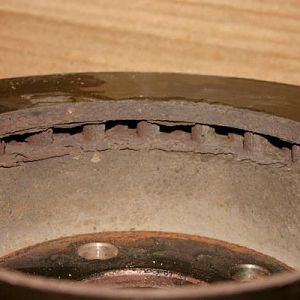
You can really see in this photo just how far gone the old steel is.

You must be registered for see images attach


Drilling and test fitting took me about an hour today, which is all I had. Removing the old metal and grinding the surfaces flat will be the next step for another day.

For reference:
https://www.protoolreviews.com/how-to-use-an-angle-grinder/
 
Last edited:

lfhoward

Well-Known Member
KJ Supporting Member
Joined
Dec 9, 2012
Messages
2,265
Reaction score
2,441
Location
Philadelphia, PA
Went at them with my grinder, using a cutting wheel. This is an intermediate step. I want to use a hammer and chisel to see if I can get more metal off, then grind the rest down flush.

You must be registered for see images attach


There’s not much left of the rusty square tube.

You must be registered for see images attach
 

lfhoward

Well-Known Member
KJ Supporting Member
Joined
Dec 9, 2012
Messages
2,265
Reaction score
2,441
Location
Philadelphia, PA
Got a little more progress on the rock slider repair today. Both sliders are now “prepped” with the rusty square tube removed and the surface ground flat.

Today’s project. The square tube mostly disintegrated!
You must be registered for see images attach


Closeup of the carnage:
You must be registered for see images attach


First pass was to remove most of the square tube. You can see some metal remains. It is mostly the old welds and the bottom tube surface.
You must be registered for see images attach


The second pass was to carefully slice off what I could with the cutting wheel, then using a hammer and chisel, remove as much as possible of the unwanted material.

You must be registered for see images attach


Last pass was with the grinder. I ground down what was left of the old welds, as well as removed any remaining square tube metal. I also ground off the powder coating in a patch around where I will be welding the new tube. I wanted to make sure there was no rust under the powder coating, and I zapped that in a few areas. All of this will be primed and painted when I’m done.


You must be registered for see images attach


Both sliders are ready for welding now. I need to practice with some scrap steel before I attempt this! I have never welded before. Should be fun!
You must be registered for see images attach
 

profdlp

Counting My Blessings
Staff member
Moderator
Joined
May 21, 2013
Messages
5,817
Reaction score
1,766
Location
Westlake, Ohio
Wow - that was impressive work by the rust! I'm sure your welds will be fine. If they are not I am even more sure they would be better than mine were I to try it. :D
 

lfhoward

Well-Known Member
KJ Supporting Member
Joined
Dec 9, 2012
Messages
2,265
Reaction score
2,441
Location
Philadelphia, PA
Well, here is my process for today. I started by using the settings for voltage and wire feed on the welder, and joining some scrap 1/8 angle iron.

You must be registered for see images attach


Putting that in a vise and hammering on it bent it, not broke it, so it was a good weld!

After that, I went to work on the rock sliders. I began by measuring multiple times and tacking the metal tube into place.

You must be registered for see images attach


After that, I checked fitment on the Jeep and it fits!

You must be registered for see images attach


Then I welded all the places.

You must be registered for see images attach


My first welds and some of the later ones were pretty ugly!

You must be registered for see images attach


But some welds were not that bad!

You must be registered for see images attach

You must be registered for see images attach


Tomorrow I’ll grind down those ugly welds and make them pretty. Then it’s time to paint!
 
Top