92fox
Full Access Member
Well nevermind then...lol


Disclaimer: Links on this page pointing to Amazon, eBay and other sites may include affiliate code. If you click them and make a purchase, we may earn a small commission.
I just changed out my T-case position sensor. The part was $64 shipped from MoparOnlineParts.com
It was very easy to change out from underneath the vehicle. The Jeep was already on stands because I changed brake rotors/pads, so I figured it was a good time to swap out the sensor. It took 1min to remove the sensor once I figured out where it was. Putting the new one back in took 10min because it was difficult to line the threads up just right without being able to see it. I found that placing the T-case in 4Lo made installation easier since it depressed the switch the least. It was difficult to thread the sensor in when the button was depressed and resisting my effort to install.
A vice grip was all I used.
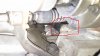
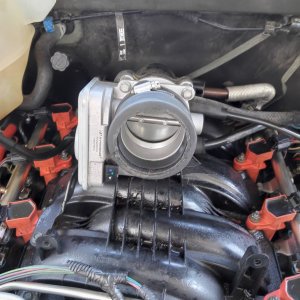
You must be registered for see images attach
Location of sensor.
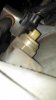
You must be registered for see images attach
Reuse the O-ring.
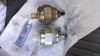
You must be registered for see images attach
The old sensor was flaky and often went open (no resistance) throughout the range of motion. Here are the resistance values it had:
2WD-------------------------1183 (very inconsistent)
4WD PART TIME --------------684
NEUTRAL(Full Time,242)--------410
NEUTRAL----------------------220
4WD LOW ---------------------open (malfunctioning)
The new sensor had the following resistance values with no fluctuation:
2WD-------------------------1182
4WD PART TIME --------------684
NEUTRAL(Full Time,242)--------410
NEUTRAL----------------------210
4WD LOW ---------------------60
The post by tjkj was extremely useful for troubleshooting my old sensor, so I'm hyping it below.
Ya I went in from the top and used the large socket. I Just couldn't access it from the bottom and when I opened the top I had no room for a wrench!
I can see how a socket would work.
Anyone have an explanation how to get the plug off of it? I can't really tell.
Here is what it looks like. On the side there is a little clip you have to push or spread. I can't remember which. But it was had for me.
You must be registered for see images attach
You must be registered for see images attach
Funny because I took the same pictures to see what's up there and STILL can't tell. I tried pushing, pulling, scraping. O_O Can't manage it.
") Once I took off the connector (had to squeeze the tab towards the top of the flat side), I shoved on a 38mm socket, shoved a socket wrench up there, managed to get it on and cranked it off. Then got the new switch in...then realized i forgot the O-ring and did it all over again. Took 5 minutes the second time after knowing what to do!!
Once I took off the connector (had to squeeze the tab towards the top of the flat side), I shoved on a 38mm socket, shoved a socket wrench up there, managed to get it on and cranked it off. Then got the new switch in...then realized i forgot the O-ring and did it all over again. Took 5 minutes the second time after knowing what to do!!I just finished putting a transfer case switch in my 06 Lib and I'm happy to say that I was able to access my switch by reaching over the top of the back of the transfer case with a 1/2 drive ratchet and a regular 1-1/2" socket. Fortunately for me it was only a 10 minute job. I was having the same issue that so many others have reported with the part time light coming on in 2wd and going out when switched to 4wd. I used and ohm meter to compare the resistance difference between the old switch and the new one. The old switch measured near infinite resistance throughout the whole movement of the plunger on the switch. My new switch read from 60 ohms to 1200 ohms throughout its plunger movement. After installing the new switch my part time light works perfectly as does my 4wd low light. I found my new switch on EBAY for $40.00. It is a brand new OEM mopar part. It's the best $40.00 I ever spent. Hope this helps others with the same issue.