i live in jonesboro, ar and i bought the tommudd lift 3.5 life and was wonder what should i expect to have this installed. Ive checked around and found one shady tree mechanic on craigslist that will do it for 150 which i feel is kinda on the cheap side and then one shop here in jonesboro, ar that wants 600 plus 60 for the alignment? is that to much. any suggestions from people in north arkansas?


You are using an out of date browser. It may not display this or other websites correctly.
You should upgrade or use an alternative browser.
You should upgrade or use an alternative browser.
Cost of lift install?
- Thread starter ckorch
- Start date
Disclaimer: Links on this page pointing to Amazon, eBay and other sites may include affiliate code. If you click them and make a purchase, we may earn a small commission.
I have purchased the same lift still waiting on the struts and springs. The upper “A” arms require some modification to the mounting area. So whomever you have install it make certain they read the instructions.
$600.00 is not a bad price. But if you are at all mechanically inclined at all you can do it yourself. And save the money… Like me.
$600.00 is not a bad price. But if you are at all mechanically inclined at all you can do it yourself. And save the money… Like me.
WickedBruce
Full Access Member
All i had ever done before were brakes and rotors and i did mine myself. You just take off the old and put on the new
Yep not hard to do,
and answered over on LOST so I'll stop there
and answered over on LOST so I'll stop there
thanks for all the offers of help and suggestions. Im going to think about it i don't really thing i have the location or tools to pull this job off TBO. im not completely stupid when it comes to mechanic work i did in stall a supercharger on my cobra but when it comes to suspension work i really don't' feel confident and isn't something i want to do while laying out in my driveway.
Hedsic
Full Access Member
Do it yourself. I'll say that is my only regret.
Snail Farmer
Full Access Member
I'm going to be parking my Jeep in an abandoned K-Mart parking lot to install my lift if ever gets here. I refuse to let any of the shops around here touch my Jeep.
VAhlene
Full Access Member
Man I wish I had the confidence you guys had. Im always scared of messing with suspension parts
Sent from my SPH-L900 using Tapatalk 2
You will never build up your confidence if you never try. I'm 25 not to mechanically inclined but i know my way around, I grew up on a ranch around peterbuilts, panel wagons and tractors. I installed my lift by myself with a shops help of compressing my front springs. There are a couple good write ups that could help an also the jeep liberty book that you get at auto stores has great pics and detailed info on how to take everything out and put it back together. And this forum is here to help too.
spideyrdr
Full Access Member
Having JUST done OME all around & the JBA UCA's myself, I will advise this way - do the rear and see how you feel after. The front is a lot more difficult compared to the rear if you don't have a pretty good array of tools. Some large sockets (18mm, 21mm for most connections, 25mm or 26mm for the UCA ball joint, etc.) and deep sockets in large sizes are required to do the front, whereas the rear is much more straight forward. If you do the rear and feel that was difficult, then talk to a shop about doing the front. Having done the rear yourself you'll still save some money and earn some punches on your man card. Given the front take more tools, many of which may not be in your tool box right now, see how you feel after doing the rear.
Again, just my advice. I learned a TON doing it myself, but if I didn't have a pretty decent set of tools to start with, I would have been screwed. If you DO do the rear yourself and decide to take it to your mechanic to do the front, drive carefully on that raised rear.")
Cheers,
Jamie
Again, just my advice. I learned a TON doing it myself, but if I didn't have a pretty decent set of tools to start with, I would have been screwed. If you DO do the rear yourself and decide to take it to your mechanic to do the front, drive carefully on that raised rear.
Cheers,
Jamie
Here is a posting to give you an idea what you’re getting in to.
http://www.jeepkj.com/forum/f202/how-install-frankenlift-*lots-pictures*-complete-29193/
The 2 things I would tell anyone who is going to do any type of work on their auto is take your time and torque everything to specifications!
This is a tool list I found. I don't know how accurate it is yet but it is a go by.
Tool List:
5/16 nutdriver air box tube clamp
10 mm deep socket 1/4"drive cruse control mod
13 mm socket 1/4" drive battery tray nuts (3)
3/4 deep socket 1/2" drive wheels
15mm socket 1/2" drive top rear shocks
18 mm deep 1/2" drive sway bar end links and top plate nuts
21 mm deep 1/2" drive upper ball joint nut, upper and lower clevis bolt
15 mm and 18 mm wrench lower rear shock mount
BIG pry barhammer
long pointed punch or pry bar with punch end
torque wrench
Do I use the supplied bumpstops, or make the 2-hockeypuck system?
And speaking of torque wrench, no one has every said what the torque specs are for each part...? Found them on allj's...
It is very important to make sure you tighten all bolts back down to factory torque specifications. Here is a small breakdown of all suspension bolts and their corresponding
torque settings.
FRONT SUSPENSION
Four upper shock mounting nuts: 80 lb-ft
Clevis bracket bolt at bottom of shock: 65 lb-ft
Lower ball joint nut: 60 lb-ft
Clevis bracket at lower control arm: 110 lb-ft
Lower stabilizer link at lower control arm: 100lb-ft
Axle nut: 100 lb-ft
Rotor bracket bolts:100 lb-ft
Bearing hub bolts: 96 lb-ft
Tie-rod ends nuts: 80 lb-ft
REAR SUSPENSION
Shocks (upper): 80 lb-ft
Shocks (lower): 85 lb-ft
Rear stabilizer bolts at lower suspension arm:73 lb-ft
Upper control arm: 90 lb-ft
Lower control arm: 125 lb-ft
Pinch bolt on top of differential: 70 lb-ft
1/2" drive torque wrench
1/2" drive 36mm deep socket
metric 1/2" drive sockets and wrenches(10mm,13mm,18mm,21mm,24mm)
electric drill with 3/8" drill bit
pry bar
wire cutters
Need to take time someday to do a new write up, that one is so full of old info and much easier ways
Also need (2) rachet straps to pull the clevis in
Also need (2) rachet straps to pull the clevis in
yellocoyote
Administrator
- Joined
- May 14, 2008
- Messages
- 7,187
- Reaction score
- 11
Or a prybar and a long screwdriver.
VAhlene
Full Access Member
I didnt need any ratchet straps when I did it, mine went back together just as easy as it came apart.
spideyrdr
Full Access Member
Here is a posting to give you an idea what you’re getting in to.
http://www.jeepkj.com/forum/f202/how-install-frankenlift-*lots-pictures*-complete-29193/
The 2 things I would tell anyone who is going to do any type of work on their auto is take your time and torque everything to specifications!
This is a tool list I found. I don't know how accurate it is yet but it is a go by.
Tool List:
5/16 nutdriver air box tube clamp
10 mm deep socket 1/4"drive cruse control mod
13 mm socket 1/4" drive battery tray nuts (3)
3/4 deep socket 1/2" drive wheels
15mm socket 1/2" drive top rear shocks
18 mm deep 1/2" drive sway bar end links and top plate nuts
21 mm deep 1/2" drive upper ball joint nut, upper and lower clevis bolt
15 mm and 18 mm wrench lower rear shock mount
BIG pry barhammer
long pointed punch or pry bar with punch end
torque wrench
Do I use the supplied bumpstops, or make the 2-hockeypuck system?
And speaking of torque wrench, no one has every said what the torque specs are for each part...? Found them on allj's...
It is very important to make sure you tighten all bolts back down to factory torque specifications. Here is a small breakdown of all suspension bolts and their corresponding
torque settings.
FRONT SUSPENSION
Four upper shock mounting nuts: 80 lb-ft
Clevis bracket bolt at bottom of shock: 65 lb-ft
Lower ball joint nut: 60 lb-ft
Clevis bracket at lower control arm: 110 lb-ft
Lower stabilizer link at lower control arm: 100lb-ft
Axle nut: 100 lb-ft
Rotor bracket bolts:100 lb-ft
Bearing hub bolts: 96 lb-ft
Tie-rod ends nuts: 80 lb-ft
REAR SUSPENSION
Shocks (upper): 80 lb-ft
Shocks (lower): 85 lb-ft
Rear stabilizer bolts at lower suspension arm:73 lb-ft
Upper control arm: 90 lb-ft
Lower control arm: 125 lb-ft
Pinch bolt on top of differential: 70 lb-ft
1/2" drive torque wrench
1/2" drive 36mm deep socket
metric 1/2" drive sockets and wrenches(10mm,13mm,18mm,21mm,24mm)
electric drill with 3/8" drill bit
pry bar
wire cutters
Good list here! A couple of additions / suggestions.
Tools:
At least two heavy duty floor stands, preferably 4 in case you need to change floor stand placement at some point, need to hold up something temporarily, need it for a leverage point, etc.
Torque wrench: since some are 60 up to 110+ lbs-ft, make sure you have a large torque wrench, likely a 1/2 inch drive. And for lower torques a smaller one, likely a 3/8 inch drive.
Drill bit: Used to create a hole to mount the lower rear bump stop. I had GREAT success using an IRWIN HSS Cobalt bit with some lapping oil. It only took maybe 3 minutes to drill the hole on each side using medium-slow speed on the drill with that bit. Get a good drill bit! Spend some bucks, save your sanity. I used a 9/32" bit for my hockey puck bump stop. For the hardware, I used 3" long 1/4" carriage bolts with I think a 3/8" fender washer on top of the pucks and a 1/4" fender washer on the bottom with a lock wash and nut.
Addition to Torque specs:
Caliper to caliper adapter bolts: 132 lbs-in / 11 lbs-ft
Not a tool, per se, but check with your local parts dealer for some of the bolts involved to see if they have them in stock. Both my clevis-to-LCA bolts were apparently over torqued and damaged. I was lucky they could get them in a few hours otherwise I would have been waiting for days to get the bolts. That particular bolt is part 06507275AA. I needed (2) and the (2) nuts to go on there, I believe that was part 06102251AA. Set me back about $30. Here is a list of parts you may want to check on to see if they have on hand in case you have a damaged one. This isn't a complete list of parts involved, but IMHO reflects those that may require replacement due to rust, etc. Where there is more than one part number listed, it just means there are multiple numbers listed online for that item.
Clevis-to-LCA bolt (mentioned above):
06507275AA ; 06506713AA
Clevis-to-LCA nut (mentioned above):
06102251AA ; 06503672; 06503841; 06505011AA; 11502814; 52001825
Upper sway bar link bolt
06503712 ; 06504923AA
Upper sway bar link nut
06502835 ; 06101697; 06502195; 06502697; 11500756; 11501039; 11502813; 34202309; 68002701AA
Clevis-to-shock bolt:
06507325AA
Rear shock upper bolt:
06506147AA ; 06503982
Rear shock lower bolt:
06505935AA ; 55075135AB; 55075135AC; 55075135AD
Rear shock lower nut:
06502835 ; 06101697; 06502195; 06502697; 11500756; 11501039; 11502813; 34202309; 68002701AA
Last note I would add is if you're replacing an existing spacer lift, bear in mind you'll likely need new lower spring isolators for the rear. The spacer in the rear likely replaces the iso completely, so order lower iso's if you have a spacer lift like that. Additionally, in a spacer lift, the front spacer also would replace (1) of the iso's so if you're planning to have the towers rebuilt using the old mount and isolator, you'll probably need (2) new isolators to replace the outgoing spacer. This isn't applicable if you're ordering pre-built towers obviously, and I personally decided to pre-build my towers with (4) new iso's and new shock mounts, but this could apply to someone out there.
Oh, right, one final item. Read the first two panels on this comic, as it contains important advice for the job. Just replace "HOME-PLUMBING REPAIR" with "JEEP LIBERTY LIFT KIT INSTALLATION". :icon_cool:
You must be registered for see images
If you're gonna do it, do it with style!
Cheers,
Jamie
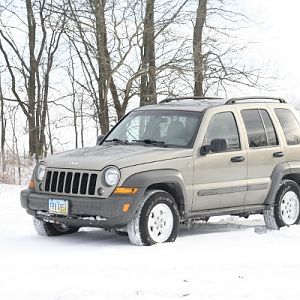
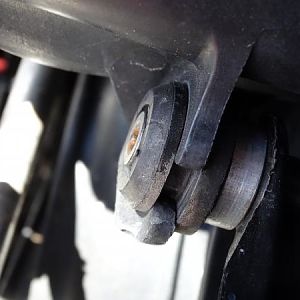
okay so now that the lift is done what is the difference between 245/70/16 and 245/75/16's i found a good deal on kumho venture at's and i read really good all around reviews on them i just don't know what the real difference is in them. i think the middle number means the hieght of the tire but wouldn't the 75's look better then the 70's? I ended up doing half the lift kit and couldn't get the axle loose on the front end so i took it somewhere to get it done. End measurements this morning are 23.5 rear 21.5 front.. tommudd 3.5 lift kit
Sent from my SPH-L900 using Tapatalk 2
You must be registered for see images attach
Sent from my SPH-L900 using Tapatalk 2
Last edited:
spideyrdr
Full Access Member
okay so now that the lift is done what is the difference between 245/70/16 and 245/75/16's
You must be registered for see images attach
Sent from my SPH-L900 using Tapatalk 2
About 5% different
Actually, the 245/75 is going to get you about 1/2" taller / 1" more in the diameter if I am not mistaken.
A 245/70 is going to about 245mm*.70=171.5mm tall in the sidewall
A 245/75 is going to about 245mm*.75=183.75mm tall in the sidewall
That's a 12.25mm difference or right about 1/2" taller on the 245/75. Since the tire is really the only way you gain height at the rear diff / axle, I personally would go for the 245/75's.
Cheers,
Jamie
spideyrdr
Full Access Member
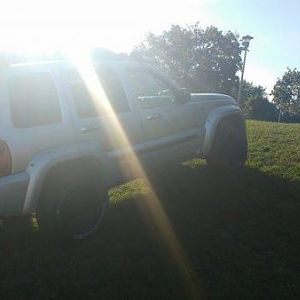
I ended up doing half the lift kit and couldn't get the axle loose on the front end so i took it somewhere to get it done. End measurements this morning are 23.5 rear 21.5 front.. tommudd 3.5 lift kit
You must be registered for see images attach
Sent from my SPH-L900 using Tapatalk 2
Strange the the front didn't end up taller in front. I would have thought you'd be closer to 23" on the front from what I understand. Did they not install the top plate or the clevis spacer or something?
Similar threads
- Replies
- 21
- Views
- 2K
- Replies
- 19
- Views
- 2K