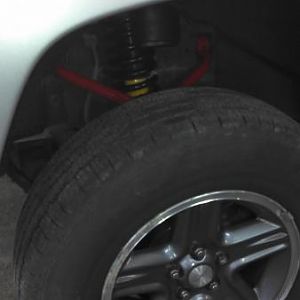
Rebuilding JBA Adjust a Struts - part numbers

Disclaimer: Links on this page pointing to Amazon, eBay and other sites may include affiliate code. If you click them and make a purchase, we may earn a small commission.

Johnny O

Just hangin' out.
Joined
Apr 29, 2021
Messages
2,404
Reaction score
3,246
Location
Bellevue NE
Bert has a mystery noise. Is a metallic rotational sound that only appears over 12-15mph. Noise is consistent- does not increase in frequency or pitch with increase in speed. Only noticed it when driving through a Jersey-barrier construction zone with window down. According to coworker, has sounded like that for months (thanks for lettin' me know, bruh). No other symptoms.

All wheel bearings check out ok (they should as they are moogs with barely 12k on them), both diffs check out, front prop checks out. Brakes check out fine.

Suspect driveshaft(?) U-joints?(?).

Stumped.

Suggestions?
 

DadOSix

Full Access Member
Joined
May 20, 2020
Messages
672
Reaction score
360
Location
Cumberland, MD.
Bert has a mystery noise. Is a metallic rotational sound that only appears over 12-15mph. Noise is consistent- does not increase in frequency or pitch with increase in speed. Only noticed it when driving through a Jersey-barrier construction zone with window down. According to coworker, has sounded like that for months (thanks for lettin' me know, bruh). No other symptoms.

All wheel bearings check out ok (they should as they are moogs with barely 12k on them), both diffs check out, front prop checks out. Brakes check out fine.

Suspect driveshaft(?) U-joints?(?).

Stumped.

Suggestions?
Transfer case chain?
 

lfhoward

Well-Known Member
KJ Supporting Member
Joined
Dec 9, 2012
Messages
2,268
Reaction score
2,447
Location
Philadelphia, PA
Removing the JBA Adjust-A Struts from the KK was a big job. Everything else in the front suspension had to be removed first, with the exception of the upper and lower control arms.

You must be registered for see images attach


Prior to surgery, but bump stops removed.
You must be registered for see images attach


Drivers side. Some parts loosely put back together after strut removal.
You must be registered for see images attach


Passengers side:
You must be registered for see images attach


The clevis bolt on the passengers side was seized in the control arm bushing. After trying a bfh, a c clamp, breaker bar, etc., I used a cutting wheel to remove the bolt, which didn't turn out to be the best idea. I recommend a sawzall and lots of blades for the next person, because you can be more precise. You can see the cuts I made in the lower control arm by mistake. I will be getting another lower control arm from a junkyard, because this one is no longer safe or usable.
You must be registered for see images attach


At the end of the day though, I had the shock towers removed. The CV axles had to come out with them, because the clevis on the JBA adjust a strut is not removable like it is on the stock unit.
You must be registered for see images attach


Also, some things under the hood had to be removed to access the shock tower bolts. On the passengers side, the airbox came out. This was pretty easy.
You must be registered for see images attach


On the drivers side, the battery, TIPM, and battery tray had to come out. This was a difficult job. I only partially broke one electrical connector, but hopefully not a big deal since the part I broke was external. The electrical connectors are in ziplock bags to protect them from dirt and sweat.
You must be registered for see images attach


I took a picture of how the connectors were arranged, so that I can put them back later (front is to the left). I am also storing the TIPM indoors instead of in the garage, so that humidity and corrosion are not going to happen while the Jeep sits fot the next few weeks.
You must be registered for see images attach


It's important to keep everything organized that you remove, and put nuts back on bolts so you know where they go later.
You must be registered for see images attach


You must be registered for see images attach


The shocks will be shipped to the rebuilder this afternoon. Meanwhile, I will find a new LCA for the passengers side, a new shock/clevis bolt and nut, and new bump stops. I also need new lower ball joints, as mine were trashed even before this job. Moogs are on the menu.

Nobody said this was cheap. But all the labor above was free.
 

lfhoward

Well-Known Member
KJ Supporting Member
Joined
Dec 9, 2012
Messages
2,268
Reaction score
2,447
Location
Philadelphia, PA
In my last post I noted that I accidentally cut into the lower control arm on the passengers side while trying to remove a seized bolt with an angle grinder. I found a replacement LCA on ebay from another 08 KK that had only 69,000 miles on it for only $60 shipped. Today that arrived. I am a little underwhelmed.

You must be registered for see images attach


The part number is correct, but this thing is a little crusty. It's just surface rust I think, so I will wire-wheel it off and then paint with Rustoleum before installing. I like that they left the sway bar link installed for the last 12 (or however many) years. That will protect the threads for the sway bar bolt inside the LCA from rust. The ball joint will be going away and be replaced with a greasable MOOG.

I am a bit worried about the LCA bushings though. Let me know what you think. Is this dry rot only going to be only external, or are these things trashed throughout? I was hoping to not have to replace the bushings, as I do not have a hydraulic press. I suppose I could take it to a local shop to have them press out the old and press in new.

You must be registered for see images attach


Would you run that?

If I do get all new bushings, I should probably do the other side as well. Mine on the other side are original too (2007 vintage), but maybe in not as bad shape as these. Also, my JBA UCA's have 12 year old bushings too, and those could be pressed out and upgraded. JBA sells a bushing replacement kit for that:


It is a PITA to remove the front UCA's though, particularly the one on the drivers side. Is this mission creep? What would you do?

Cheers,
Lauren
 
Last edited:

lfhoward

Well-Known Member
KJ Supporting Member
Joined
Dec 9, 2012
Messages
2,268
Reaction score
2,447
Location
Philadelphia, PA
I went ahead and bought new lower control arm bushings for both sides, including the connections with the frame and with the strut fork/clevis. I threw new sway bar bushings into the cart while I was at it.

I also ordered a new set of JBA upper control arm bushings as well.

Better to put safety first.
 
Last edited:

KJowner

Full Access Member
Joined
Oct 20, 2022
Messages
907
Reaction score
534
Location
Uk
That looks shot to me, mine are 20 years old and due for replacement too.
 

lfhoward

Well-Known Member
KJ Supporting Member
Joined
Dec 9, 2012
Messages
2,268
Reaction score
2,447
Location
Philadelphia, PA
Note to self: KK Spring Rates

Front:
Stock: 310 lbs
OME:
925 Light Load: 350 lbs
926 Medium Load: 375 lbs
927 Heavy Load / CRD Medium: 400 lbs
790 CRD Heavy Load: 500 lbs
Replacement coilover springs should be somewhere in the 375-400 range of the 926/927's.

Rear
Stock: 210 lbs
OME 731: 280 lbs
Replacement 4" lift springs? Guessing 280-300.
 

lfhoward

Well-Known Member
KJ Supporting Member
Joined
Dec 9, 2012
Messages
2,268
Reaction score
2,447
Location
Philadelphia, PA
More info on my JBA 4” rear springs:

I went out and measured.
14.75 coil diameter mm (0.58 in)
5 or 6 coils? (Depending on whether counting spacing or metal)
95 mm id (3.75 in)
About 12 in tall with the Jeep on them
14 in new height calculated from an old picture (355.6 mm) [spring sitting next to JBA upper control arm of a known measurement]
You must be registered for see images attach


Using this spring calculator…
https://eibach.com/spring-rate-calculator
… the spring rate could be 450-600# per inch. That’s like double the OME rate in the previous post, so the estimate may not be right (too high). I would check out some other spring rate calculators online and compare.

Edit: if my coil diameter is actually 0.5 in instead of 0.58 in, the spring rate comes down to 267-345# per inch. Using 0.5 would account for rust and paint thickness. The result is also more in line with OME’s spring rates.
 
Last edited:

lfhoward

Well-Known Member
KJ Supporting Member
Joined
Dec 9, 2012
Messages
2,268
Reaction score
2,447
Location
Philadelphia, PA
Info on using Land Rover Discovery springs as a JBA 4” replacement:


lfhoward

Well-Known Member
KJ Supporting Member
Joined
Dec 9, 2012
Messages
2,268
Reaction score
2,447
Location
Philadelphia, PA

lfhoward

Well-Known Member
KJ Supporting Member
Joined
Dec 9, 2012
Messages
2,268
Reaction score
2,447
Location
Philadelphia, PA
I realized I never posted pics on this thread of my front suspension rebuild, so here you go.

You must be registered for see images attach


LCA’s refurbished by me with Moog bushings & ball joints. (I bought a used shop press!)
You must be registered for see images attach


New UCA’s by JBA with brand new bushings and ball joints.
You must be registered for see images attach


Back together.
You must be registered for see images attach


You must be registered for see images attach


I am very happy with how it turned out.
You must be registered for see images attach


Dialed in at 21.5” from center of the wheel to the bottom of the fender (3.5” lift in front). I could go a little higher but the electronic stability control is happier at this height than at 4” when taking slow bumpy 90° corners.
 
Last edited:

derekj

Full Access Member
Joined
Jul 4, 2013
Messages
207
Reaction score
300
Location
Powell River, BC
I realized I never posted pics on this thread of my front suspension rebuild, so here you go.

You must be registered for see images attach


LCA’s refurbished by me with Moog bushings & ball joints. (I bought a used shop press!)
You must be registered for see images attach


New UCA’s by JBA with brand new bushings and ball joints.
You must be registered for see images attach


Back together.
You must be registered for see images attach


You must be registered for see images attach


I am very happy with how it turned out.
You must be registered for see images attach


Dialed in at 21.5” from center of the wheel to the bottom of the fender (3.5” lift in front). I could go a little higher but the electronic stability control is happier at this height than at 4” when taking slow bumpy 90° corners.
Does the bump stop just miss the grease fitting on the ball joint?
 

lfhoward

Well-Known Member
KJ Supporting Member
Joined
Dec 9, 2012
Messages
2,268
Reaction score
2,447
Location
Philadelphia, PA
Does the bump stop just miss the grease fitting on the ball joint?
I believe so. The bottom is curved and I think it goes around the outside of the grease fitting. However, I rarely if ever hit the front bump stops as long as the front sway bar is attached. I don’t know if it would hit more often with other springs but my JBA adjust a struts plus the sway bar are stiff enough to prevent it.
 

lfhoward

Well-Known Member
KJ Supporting Member
Joined
Dec 9, 2012
Messages
2,268
Reaction score
2,447
Location
Philadelphia, PA
Part of my lift rebuild that had me stumped for a while was how to replace the JBA 4” extended rear sway bar links that have been on Jeep since 2014. They were custom made by JBA back in the day.

A good solution looks like the Teraflex 3-4” lift rear sway bar links for JK’s. They are nearly the same length as the JBA links, which have long since lost their JBA red paint.

You must be registered for see images attach


Here is the info about the Teraflex extended links:

You must be registered for see images attach


Part number 1754500.
JK 3”-4” Rear Swivel Stud Swaybar Link Kit (Pair)

I’ll let you know how the install goes. I also got Moog rear sway bar bushings as well to replace the 15-year-old bushings on my Jeep.
 

lfhoward

Well-Known Member
KJ Supporting Member
Joined
Dec 9, 2012
Messages
2,268
Reaction score
2,447
Location
Philadelphia, PA
Rear shocks for my 4” lift are Bilstein B8-5125’s, part number 33-185552. These match what was originally in my JBA lift kit.

You must be registered for see images attach


Close up of the part number:
You must be registered for see images attach


And the sleeves that go inside the shock bushings came with the shock too. Their part number is in the photo in case anyone needs to order them separately.
You must be registered for see images attach


I have started soaking the shock and sway bar bolts in Aerokroil to begin to loosen them up. I will install the shocks and sway bar links & bushings in a week or two if the weather cooperates.
 

lfhoward

Well-Known Member
KJ Supporting Member
Joined
Dec 9, 2012
Messages
2,268
Reaction score
2,447
Location
Philadelphia, PA
In case anyone is interested, here is a how-to on how to refurbish your Bilstein M 7100 shocks, by Ian at Wheel Every Weekend. It doesn’t look like too bad of a job, although some specialized tools are required.

xc_hide_links_from_guests_guests_error_hide_media
 
Top