
You are using an out of date browser. It may not display this or other websites correctly.
You should upgrade or use an alternative browser.
You should upgrade or use an alternative browser.
Project 2004 Liberty pickup
- Thread starter CrazyDrei
- Start date
Disclaimer: Links on this page pointing to Amazon, eBay and other sites may include affiliate code. If you click them and make a purchase, we may earn a small commission.
I had a video of the pickup be creation, here are the pictures.
Back is gutted and top of the truck is chopped off. I am ready for a pick up bed.
Found this Sierra bed liner at the dump, it was free so I will make it work!
Sides are cut off. This will be the middle section. I still need to trim it to fit into the back of the Liberty.
I realized that the flimsy plastic liner does not provide enough support to have a substantial load, so I trimmed a couple milk crates to fill the void and provide the support I need for the front of the pickup bed. Plywood was just used as a reference to gauge how high to make the crates.
Liner resting on the milk crates and now provides adequate support for a load.
Trimmed the passenger side of the liner to neatly fit over the wheel well.
Last touch was trimming the corner to fit in properly.
Drivers side was not going to be as easy because of the extra metal where the fuel fill neck is. For now I will work around it however I might have to gently massage the extra metal over the wheel well out of the way at a later date.
Drivers side of the bed liner will need a lot more work and I will wait until it warms up above freezing to get the ehat gun out and re-shape the plastic to fit the contours of the Liberty better.
I had some extra 3/4" plywood laying around and decided that it does need to go in the bed to provide the rigidity for the floor.
Bed liner is assembled outside the Jeep, initially held together with drywall screws then changed over to 1/4" bolts and nuts for the final fit and finish.
Final fit with the OEM lip. Passenger side is in there perfectly, will need minor heat gun reshaping and a couple bolts to hold it to sheet metal. Drivers side will need a lot more time with a heat gun to reshape the liner above the wheel well and about half a dozen bolts to attach it to sheet metal.
Maiden voyage with the new functional pick up bed (liner). Have about 1,000 lbs of firewood in there and it handled it effortlessly.
Stay tuned for more shenanigans!
You must be registered for see images attach
Back is gutted and top of the truck is chopped off. I am ready for a pick up bed.
You must be registered for see images attach
Found this Sierra bed liner at the dump, it was free so I will make it work!
You must be registered for see images attach
Sides are cut off. This will be the middle section. I still need to trim it to fit into the back of the Liberty.
You must be registered for see images attach
I realized that the flimsy plastic liner does not provide enough support to have a substantial load, so I trimmed a couple milk crates to fill the void and provide the support I need for the front of the pickup bed. Plywood was just used as a reference to gauge how high to make the crates.
You must be registered for see images attach
Liner resting on the milk crates and now provides adequate support for a load.
You must be registered for see images attach
Trimmed the passenger side of the liner to neatly fit over the wheel well.
You must be registered for see images attach
Last touch was trimming the corner to fit in properly.
You must be registered for see images attach
Drivers side was not going to be as easy because of the extra metal where the fuel fill neck is. For now I will work around it however I might have to gently massage the extra metal over the wheel well out of the way at a later date.
You must be registered for see images attach
Drivers side of the bed liner will need a lot more work and I will wait until it warms up above freezing to get the ehat gun out and re-shape the plastic to fit the contours of the Liberty better.
You must be registered for see images attach
I had some extra 3/4" plywood laying around and decided that it does need to go in the bed to provide the rigidity for the floor.
You must be registered for see images attach
Bed liner is assembled outside the Jeep, initially held together with drywall screws then changed over to 1/4" bolts and nuts for the final fit and finish.
You must be registered for see images attach
Final fit with the OEM lip. Passenger side is in there perfectly, will need minor heat gun reshaping and a couple bolts to hold it to sheet metal. Drivers side will need a lot more time with a heat gun to reshape the liner above the wheel well and about half a dozen bolts to attach it to sheet metal.
You must be registered for see images attach
Maiden voyage with the new functional pick up bed (liner). Have about 1,000 lbs of firewood in there and it handled it effortlessly.
Stay tuned for more shenanigans!
This has been a fun build thread to follow! Keep it coming! ")
I wonder if the rear footwell space could be converted to useful storage area? Open the back door and reach in for your chains, come-along, off road tool kit, etc.
I wonder if the rear footwell space could be converted to useful storage area? Open the back door and reach in for your chains, come-along, off road tool kit, etc.
profdlp
Circling The Drain
That's what I was thinking. Little cubbyholes are quite handy.I wonder if the rear footwell space could be converted to useful storage area?
This has been a fun build thread to follow! Keep it coming!
I wonder if the rear footwell space could be converted to useful storage area? Open the back door and reach in for your chains, come-along, off road tool kit, etc.
lfhoward,
Thank you, I am having a blast building this thing.
As far as the rear footwell area goes. I initially wanted to weld the doors shut fearing that the unibody is not structurally sound enough without the doors but i was wrong and keep on using the doors and the storage area behind them every time I use the Jeep.
back to the drawing board so i can figure out how to keep the clean look of a pickup but still have the cubbies in the back for storage and not make it look like a door.
Stay tuned for more shenanigans!
jp7794
Full Access Member
- Joined
- Jun 15, 2009
- Messages
- 64
- Reaction score
- 11
I'm just waiting for when you put the swimming pool in it this summer.
Painting has officially begun!
Started with grill and front fenders, got carried away with drivers door, rear drivers side door and hood.
Door sanded, removed and masked.
Decided to give primer a shot to see how much of a difference it will make.
2nd coat of green
3rd coat
4th coat
5th and final coat, tape removed after 10 minutes.
Indoor pictures with 6,000K LED lights do not do the paint justice, it will look much better on the Jeep in the sunlight!
This is what I used. Rustoleum Custom Premium Lacquer Gloss Neon Green.
I am very happy with the results so far.
Stay tuned form more shenanigans!
Started with grill and front fenders, got carried away with drivers door, rear drivers side door and hood.
You must be registered for see images attach
Door sanded, removed and masked.
You must be registered for see images attach
Decided to give primer a shot to see how much of a difference it will make.
You must be registered for see images attach
2nd coat of green
You must be registered for see images attach
3rd coat
You must be registered for see images attach
4th coat
You must be registered for see images attach
5th and final coat, tape removed after 10 minutes.
Indoor pictures with 6,000K LED lights do not do the paint justice, it will look much better on the Jeep in the sunlight!
You must be registered for see images attach
This is what I used. Rustoleum Custom Premium Lacquer Gloss Neon Green.
I am very happy with the results so far.
Stay tuned form more shenanigans!
That looks good! Rattle can paint jobs can be sketchy but you did a nice job.
That looks good! Rattle can paint jobs can be sketchy but you did a nice job.
lfhoward,
Thank you. I am kinda surprised with this Neon Green lacquer, no orange peel whats so ever and the few runs I had got covered up with subsequent coats.
I should be bolting up the panels in the morning once the paint cures a little better. So far I like it a lot more than the classic enamel black rustoleum.
Stay tuned for more shenanigans!
I'm just waiting for when you put the swimming pool in it this summer.
jp7794,
I don't think I'll be putting a swimming pool into this one this summer, but I have another fantastic Jeep Liberty project lined up once this one is complete, that one might get a hot tub in the back.
Stay tuned for more shenanigans!
sleazy rider
Retired moto tech and gearhead
That’s really GREEN!
Got a couple more body panels painted.
Just started snowing, had to take it out for a spin around the yard.
It's really gloomy out and snowing, lighting doesn't do this paint justice.
Here is what it looks like in the garage with 6,000K LED lights. I can not wait until it's finished and see how it sparkles outside in the sunlight!
Stay tuned for more shenanigans!
You must be registered for see images attach
Just started snowing, had to take it out for a spin around the yard.
You must be registered for see images attach
It's really gloomy out and snowing, lighting doesn't do this paint justice.
You must be registered for see images attach
Here is what it looks like in the garage with 6,000K LED lights. I can not wait until it's finished and see how it sparkles outside in the sunlight!
Stay tuned for more shenanigans!
Awesome!
I almost think you should make the diamond plate at the base of the doors the same color green.
I almost think you should make the diamond plate at the base of the doors the same color green.
duderz7
Full Access Member
Not bad!, especially for a rattle can.
turblediesel
memberable
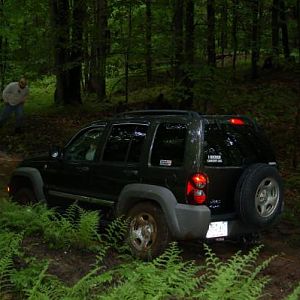
You'll never lose it in the forest.
Awesome!
I almost think you should make the diamond plate at the base of the doors the same color green.
lfhoward,
I am going to finish the other side, then onto plastic trim. Once it's back together I will see how it looks and might just have to do the diamond plate in green also.
Stay tuned for more shenanigans!
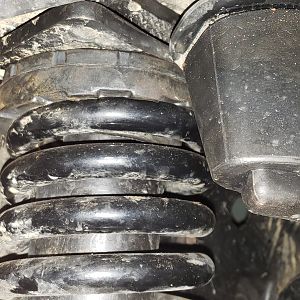
Front and rear pinch welds folded.
Since my 33" tires are really closer to 34" tall they rub just slightly front and rear under full compression. I need approximately 1" of extra clearance.
Front pinch weld cut with angle grinder and gently folded with a 3# sledge hammer. This sheet metal is so thin that I didn't actually have to make the cuts with the grinder and could have just whacked it a few extra times to get the same effect.
Don't mind the New England rust. Here is the the pinch weld before I folded it.
Rear Drivers side pinch weld folded.
Side view, approximately 1" clearance gained. Exactly what I needed to prevent rubbing.
Fender flare that's attached to the door had to be trimmed a little also.
Fender flare is trimmed.
Trimming 1" does not seem like much but it completely eliminated all my front and rear tire rub.
And this is what it looks like with the tire on.
Stay tuned for more shenanigans!
Since my 33" tires are really closer to 34" tall they rub just slightly front and rear under full compression. I need approximately 1" of extra clearance.
You must be registered for see images attach
Front pinch weld cut with angle grinder and gently folded with a 3# sledge hammer. This sheet metal is so thin that I didn't actually have to make the cuts with the grinder and could have just whacked it a few extra times to get the same effect.
You must be registered for see images attach
Don't mind the New England rust. Here is the the pinch weld before I folded it.
You must be registered for see images attach
Rear Drivers side pinch weld folded.
You must be registered for see images attach
Side view, approximately 1" clearance gained. Exactly what I needed to prevent rubbing.
You must be registered for see images attach
Fender flare that's attached to the door had to be trimmed a little also.
You must be registered for see images attach
Fender flare is trimmed.
You must be registered for see images attach
Trimming 1" does not seem like much but it completely eliminated all my front and rear tire rub.
You must be registered for see images attach
And this is what it looks like with the tire on.
Stay tuned for more shenanigans!
Got stuck again today but doing things that a stock Liberty would not even come close to.
Comparison of Liberty in 22" of fresh snow on HT stock tires in first video and then again with 33" tractor tires, 2.5" lift and locked rear diff.
Stock tires, no lift, no lockers but a Trail Rated sticker.
Couple upgrades but still gets stuck. Enjoy!
Stay tuned for more shenanigans!
Comparison of Liberty in 22" of fresh snow on HT stock tires in first video and then again with 33" tractor tires, 2.5" lift and locked rear diff.
xc_hide_links_from_guests_guests_error_hide_media
Stock tires, no lift, no lockers but a Trail Rated sticker.
xc_hide_links_from_guests_guests_error_hide_media
Couple upgrades but still gets stuck. Enjoy!
Stay tuned for more shenanigans!
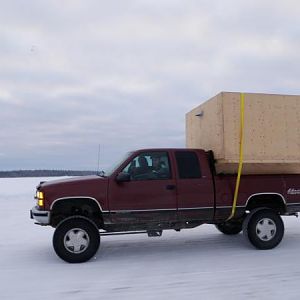
It's been a while but my KJ pickup is still up and running just about every day.
33.5" tractor tires are pretty much unstoppable in deep mud and the rear lincoln locker has not disappointed.
Fell an approximately 60ft tall pine tree, chopper it up and loaded most of in int he back.
So this is what a Liberty pickup looks like with a little over 2,000 lbs in the back.
I still want to finish painting the rest of the body panels and restoring plastic bumpers and fenders, but that will have to wait a couple more weeks.
Stay tuned for more shenanigans!
33.5" tractor tires are pretty much unstoppable in deep mud and the rear lincoln locker has not disappointed.
You must be registered for see images attach
Fell an approximately 60ft tall pine tree, chopper it up and loaded most of in int he back.
You must be registered for see images attach
So this is what a Liberty pickup looks like with a little over 2,000 lbs in the back.
I still want to finish painting the rest of the body panels and restoring plastic bumpers and fenders, but that will have to wait a couple more weeks.
Stay tuned for more shenanigans!
Similar threads
- Replies
- 1
- Views
- 467