

featherlight
Full Access Member
So, I've been meaning to write this up for quite some time now... better late than never I suppose. Unfortunately, I didn't really take many pictures as I went along doing it. So I'll use stock photos to fill in as best I as can to help explain things.
Let me start by saying that there are two ways of doing something.... the cheap way, and the right way. When it comes to headlamps, don't be cheap. Buy quality parts and take your time to do things right. Better headlights are important for safety, but you also want to make sure you aren't endangering others (and yourself) on the road by blinding them. I recommend TRS (The Retrofit Source) for a lot of information and good parts to do a retrofit. You can find parts cheaper on Ebay, but good luck getting that seller to stand behind their product and help you troubleshoot along the way. Some parts are obviously more critical than others. I'm not advocating that you throw your money out the window (who am I kidding... you're doing a retrofit :happy175") , but pick and choose wisely which parts you want to pinch pennies on.
, but pick and choose wisely which parts you want to pinch pennies on.
This was my first retrofit and TRS made it very straightforward with very clear instructions and support just a phone call or email away. They also have a good warranty on all the parts and will work with you to trouble shoot any problems you may have down the road.
1) Remove the headlamps from the vehicle. (or order new ones online)
Since you are probably going to spend some money on the retrofit parts, may as well start with a brand new pair of headlights with new lenses. $42 for the pair at Amazon.
2) Clean the headlamps well.
Since you are going to be putting them into an oven to soften up the rubber compound, so you can open them up, you don't want any dirt baking into the lens. First use some soap and water. Then follow up with some rubbing alcohol.
3)Remove any metal, plastic, rubber pieces you can.
You don't want to damage anything when putting the lights into the oven. Remove the light bulb if you haven't already. There is also a rubber ring that goes around the bulb housing that needs to be removed. Lastly, the white adjustment mechanism can be taken off (only part of it comes off).
Edit: Forgot to point out that the plastic bulb retainer ring also needs to be removed.
4) DO NOT PLACE THE HEADLAMPS DIRECTLY ON A WIRE RACK IN THE OVEN!
Use a baking sheet and some parchment paper to prevent the plastic from making direct contact with any metal. Also make sure that the headlamps are not making contact with any metal inside the oven. You want to avoid any damage to the lenses, so make sure they are facing up and not touching anything.
5) Bake 'em!:evil27:
270 degrees for 7 minutes!
Here is a nice how to video by TRS (The Retrofit Source).
6) Pry the lenses off. USE GLOVES!
Use a flat screw driver to separate the lens from the black housing. (The video linked above shows this also). The rubber compound will fight you the whole way, don't be afraid to put a little muscle into it. Do be careful with the plastic clips on the lenses, they will very easily fold over and break now that they have been heated (ask me how I know....:favorites68
7) Set the lenses away in a safe location.
Now that you have them apart, you still want to avoid damaging your lenses. I re-used the boxes the headlamps shipped in, and placed one lens in each box to keep them out of the way and safe.
8) Remove the little halogen bulb cover.
These can be pulled straight out of the housing with a set of pliers. Just grab them at the base and pull.
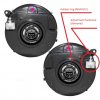
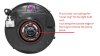
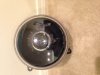
9) It's drilling/cutting time.....:893Chainsaw-Smilie-
How much will depend on your specific projector unit. For the one's I used, I needed to cut away the entire inside ring where the light bulb unit sits inside the housing (see picture). If you are using "mini" projectors or a smaller size, you may not have to cut anything away at all. Remember, measure twice....cut once.
12) Ventilation (if you want to seal the headlamps up fully)
On the stock housing the area around the bulb is not fully sealed off; which allows for ventilation. I wanted to seal mine, so that dust/water, etc (mainly pollen around here) could never enter the headlamps; but I still needed a way to exchange air to prevent moisture building up inside the headlamps. I drilled a small hole on the back of the headlamp housing towards the bottom of the unit behind the reflector. Later (when final assembly was complete) I used gore-tex to cover this hole, to allow for air exchange while keeping out other stuff. I would also use some 100 mm rubber housing caps to cover the outer most plastic ring around the projector on the headlamp housing to seal it up. These fit snugly over the rubber ring that was in place on the stock headlamp, which I reused.
Edit: I forgot to mention that depending on your choice of projector and bulb igniter, you may run into issues with the rubber caps contacting the back of the igniter. I ended up having to modify my rubber caps so that the wiring exited from the bottom of the cap instead of the back.
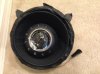
11) Test fit your projectors.
Once you are done cutting (or if you don't need to), test fit the projector. Make sure the rubber cushion offers a nice fit between the reflector housing and projector unit, and that you can tighten the nut on the back of the projector against the housing well, to hold it in place. If everything looks good, remove the projectors again and set them aside if you want to paint the reflector, or skip to step 12 if you want to leave them shiny chrome.
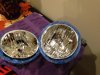
12) Paint! (Skip this if you want to leave the shiny chrome)
If you want to add some color to the headlamps, now is your chance. I used a Krylon matte black spray paint to paint both my reflectors and the projector shrouds. Scuff the surfaces to be painted with some sand paper. Next, clean the areas that are going to be painted well. Then mask off anything you don't want to get paint on. Make sure to mask off the groove in the black housing where the rubber glue goes to re-attach the lenses later; you don't want any paint there. Paint! :weld:
Make sure to let your paint dry well before moving on to do anything else.
13) Aim!
This is probably the most important part of the whole process. You want to mount your projectors and aim them. You will need some JB-weld (or similar compound) to get this done correctly. A picture is worth a thousand words, a video is even better... so again, I will let the fine gents at TRS take it away:
Video 1
Video 2
- Park 25 feet away from a white flat wall, perpendicular to the wall, don't be at an angle.
- Measure how far apart your projectors are
- Aim them so that the notch in the cutoff is the same distance apart on the wall 25 feet away.
- Height: You don't want the cutoff for the low-beam to be above the height of the side mirror on a passenger car (if you preserve the adjustment function from the stock headlamp, you can continue to make minor adjustments later)
Once you have the right aim, tighten down the nut on the back and let the JB-weld harden so that the aim is permanent.
Also, I ran the wiring for the high-beam function on the cut-off shield through the square opening where the old halogen shield used to be. I did that before the final aiming process.
Edit: For the cut off shield motor (high-beam function), you should test to make sure these work before you permanently mount the projector in the housing. You can use a 9 volt battery to test the motor. Do this several times to make sure it works well.
14) Assembly
Fully assemble your projector (shroud, LED halo ring, whatever else you may want to do with it).
15) Assembly 2.0
If you are done working inside the housing and everything is as you want it to be... it's time to seal the headlamps up again. Make sure the lenses are clean and the projector housings are clean before you seal them up. I purchased some extra rubber butyl glue, and it did come in handy. I lined the area where the lenses press into the black plastic housing with the rubber glue. Then I reheated the lenses (you can use the oven or a heat gun). Then press the lenses into the housing making sure they seal well and sink into the rubber glue. This took quite a bit of re-heating with a heat gun as I worked my way around the headlamp to get a good seal. Be careful not to point the heat gun in any one place too long or hold it too close to the plastic.
Let me start by saying that there are two ways of doing something.... the cheap way, and the right way. When it comes to headlamps, don't be cheap. Buy quality parts and take your time to do things right. Better headlights are important for safety, but you also want to make sure you aren't endangering others (and yourself) on the road by blinding them. I recommend TRS (The Retrofit Source) for a lot of information and good parts to do a retrofit. You can find parts cheaper on Ebay, but good luck getting that seller to stand behind their product and help you troubleshoot along the way. Some parts are obviously more critical than others. I'm not advocating that you throw your money out the window (who am I kidding... you're doing a retrofit :happy175
, but pick and choose wisely which parts you want to pinch pennies on.This was my first retrofit and TRS made it very straightforward with very clear instructions and support just a phone call or email away. They also have a good warranty on all the parts and will work with you to trouble shoot any problems you may have down the road.
1) Remove the headlamps from the vehicle. (or order new ones online)
Since you are probably going to spend some money on the retrofit parts, may as well start with a brand new pair of headlights with new lenses. $42 for the pair at Amazon.
2) Clean the headlamps well.
Since you are going to be putting them into an oven to soften up the rubber compound, so you can open them up, you don't want any dirt baking into the lens. First use some soap and water. Then follow up with some rubbing alcohol.
3)Remove any metal, plastic, rubber pieces you can.
You don't want to damage anything when putting the lights into the oven. Remove the light bulb if you haven't already. There is also a rubber ring that goes around the bulb housing that needs to be removed. Lastly, the white adjustment mechanism can be taken off (only part of it comes off).
Edit: Forgot to point out that the plastic bulb retainer ring also needs to be removed.
4) DO NOT PLACE THE HEADLAMPS DIRECTLY ON A WIRE RACK IN THE OVEN!
Use a baking sheet and some parchment paper to prevent the plastic from making direct contact with any metal. Also make sure that the headlamps are not making contact with any metal inside the oven. You want to avoid any damage to the lenses, so make sure they are facing up and not touching anything.
5) Bake 'em!:evil27:
270 degrees for 7 minutes!
Here is a nice how to video by TRS (The Retrofit Source).
6) Pry the lenses off. USE GLOVES!
Use a flat screw driver to separate the lens from the black housing. (The video linked above shows this also). The rubber compound will fight you the whole way, don't be afraid to put a little muscle into it. Do be careful with the plastic clips on the lenses, they will very easily fold over and break now that they have been heated (ask me how I know....:favorites68
7) Set the lenses away in a safe location.
Now that you have them apart, you still want to avoid damaging your lenses. I re-used the boxes the headlamps shipped in, and placed one lens in each box to keep them out of the way and safe.
8) Remove the little halogen bulb cover.
These can be pulled straight out of the housing with a set of pliers. Just grab them at the base and pull.
9) It's drilling/cutting time.....:893Chainsaw-Smilie-
How much will depend on your specific projector unit. For the one's I used, I needed to cut away the entire inside ring where the light bulb unit sits inside the housing (see picture). If you are using "mini" projectors or a smaller size, you may not have to cut anything away at all. Remember, measure twice....cut once.
12) Ventilation (if you want to seal the headlamps up fully)
On the stock housing the area around the bulb is not fully sealed off; which allows for ventilation. I wanted to seal mine, so that dust/water, etc (mainly pollen around here) could never enter the headlamps; but I still needed a way to exchange air to prevent moisture building up inside the headlamps. I drilled a small hole on the back of the headlamp housing towards the bottom of the unit behind the reflector. Later (when final assembly was complete) I used gore-tex to cover this hole, to allow for air exchange while keeping out other stuff. I would also use some 100 mm rubber housing caps to cover the outer most plastic ring around the projector on the headlamp housing to seal it up. These fit snugly over the rubber ring that was in place on the stock headlamp, which I reused.
Edit: I forgot to mention that depending on your choice of projector and bulb igniter, you may run into issues with the rubber caps contacting the back of the igniter. I ended up having to modify my rubber caps so that the wiring exited from the bottom of the cap instead of the back.
11) Test fit your projectors.
Once you are done cutting (or if you don't need to), test fit the projector. Make sure the rubber cushion offers a nice fit between the reflector housing and projector unit, and that you can tighten the nut on the back of the projector against the housing well, to hold it in place. If everything looks good, remove the projectors again and set them aside if you want to paint the reflector, or skip to step 12 if you want to leave them shiny chrome.
12) Paint! (Skip this if you want to leave the shiny chrome)
If you want to add some color to the headlamps, now is your chance. I used a Krylon matte black spray paint to paint both my reflectors and the projector shrouds. Scuff the surfaces to be painted with some sand paper. Next, clean the areas that are going to be painted well. Then mask off anything you don't want to get paint on. Make sure to mask off the groove in the black housing where the rubber glue goes to re-attach the lenses later; you don't want any paint there. Paint! :weld:
Make sure to let your paint dry well before moving on to do anything else.
13) Aim!
This is probably the most important part of the whole process. You want to mount your projectors and aim them. You will need some JB-weld (or similar compound) to get this done correctly. A picture is worth a thousand words, a video is even better... so again, I will let the fine gents at TRS take it away:
Video 1
Video 2
- Park 25 feet away from a white flat wall, perpendicular to the wall, don't be at an angle.
- Measure how far apart your projectors are
- Aim them so that the notch in the cutoff is the same distance apart on the wall 25 feet away.
- Height: You don't want the cutoff for the low-beam to be above the height of the side mirror on a passenger car (if you preserve the adjustment function from the stock headlamp, you can continue to make minor adjustments later)
Once you have the right aim, tighten down the nut on the back and let the JB-weld harden so that the aim is permanent.
Also, I ran the wiring for the high-beam function on the cut-off shield through the square opening where the old halogen shield used to be. I did that before the final aiming process.
Edit: For the cut off shield motor (high-beam function), you should test to make sure these work before you permanently mount the projector in the housing. You can use a 9 volt battery to test the motor. Do this several times to make sure it works well.
14) Assembly
Fully assemble your projector (shroud, LED halo ring, whatever else you may want to do with it).
15) Assembly 2.0
If you are done working inside the housing and everything is as you want it to be... it's time to seal the headlamps up again. Make sure the lenses are clean and the projector housings are clean before you seal them up. I purchased some extra rubber butyl glue, and it did come in handy. I lined the area where the lenses press into the black plastic housing with the rubber glue. Then I reheated the lenses (you can use the oven or a heat gun). Then press the lenses into the housing making sure they seal well and sink into the rubber glue. This took quite a bit of re-heating with a heat gun as I worked my way around the headlamp to get a good seal. Be careful not to point the heat gun in any one place too long or hold it too close to the plastic.
Attachments
Last edited:
As an Amazon Associate we earn from qualifying purchases.


