Jo6pak
Full Access Member
Pics?
Yep, I'll post pics when I get it all back togehter. Still on the jackstands til Wednesday night.


Disclaimer: Links on this page pointing to Amazon, eBay and other sites may include affiliate code. If you click them and make a purchase, we may earn a small commission.
Pics?
OK, so post this one in the "Stupid Questions" or "You should know this by now" section.:think:
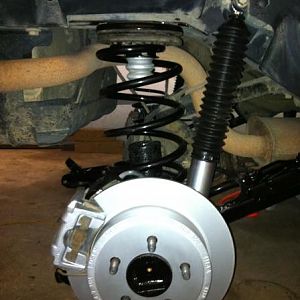
I was re-checking all the torques on the front suspension this morning when I started to wonder if I did the clevis lift right.
Do I measure 3/8" from the top of the clevis to the bottom of the coil isolator? Or do I measure from the clevis to the little flare on the shaft?
BTW, pics are coming, left my camera at a friends place a few weeks ago, I'll be back on the other side of the state next weekend to get it.
You must be registered for see images attach
Wow, that's a quick response
eah, I guess I wasn't very clear. I looked thru you excellent write up again but was still not clear where you had the shim resting in that photo.
If you allow me to use one of your pics, I can try to be more specific
When I did mine I used a 3/8" hex key wedged between the top of the cleivs and the bottom plate. But in the above pic it looks wider than mine is now, so I thought maybe I should have stuck it under the small rifge that is on the shock that sticks below the isolator.
I your finished pics, the bottom of the shock is not sticking out of the clevis bottom, and mine is. Just didn't know if this was just a difference in the shocks or if I did it wrong.
Hope that makes sense
I understand now what you're saying, I just slipped mine under the coil spring plate sounds like what you did too. However, if you're looking for a little more lift you could definitely do it from that small ridge because that is where the clevis stops normally and the safe distance is 3/8" from stock so I would work fine and be safe.
Thanks Wes.
I just raised the passenge side a little and then did the driver's side a touch more since it was sitting a little uneven. The bottom of the shock is now flush with the bottom of the clevis on the DS.
Glad you were around, since I already have the wheels off.
I owe you a drink, thanks again.
PS, You need to change your sig to include your new OME lift:happy107:
Boiler? He isnt around anymoreHis pm box is full and I can't reach him. Does anyone have another way to reach him? I would like to order a set of his shims.
Thanks!
His pm box is full and I can't reach him. Does anyone have another way to reach him? I would like to order a set of his shims.
Thanks!
Great tutorial. This is exactly what I'm looking for. For a novice wrench like myself, there is no such thing as too many pics.
Thanks for taking the extra time to snap the photos and post it.
Someone should buy you a beer:happy160: