Hi, Firstly are you looking at the circuit diagrams 8W-80-66 to 67 to see how the pins are laid out?
If your question is "how do I pull out the wire from the plug without damaging it?" the answer is as follows:
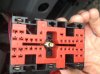
I have not personally examined this plug in question but these type of plugs basically have the same thing in common in that each of the metal connectors at the end of the wire have a "barb" pressed out of the metal that makes up the contact. This is much like a "barb" on a fish-hook that angles back so the fish cannot slip off the hook.
You need to take something small like a very small Jewerlers' screwdriver and slip it carefully down each face of the contact to see if you can find this small "barb" that is facing back towards you and is latching onto the the plastic housing thus preventing the contact from pulling outwards. Then carefully move this "barb" section back into the metal it was pressed from while gently pulling on the lead. The lead should pull outwards and you will see how the "barb" works. Before pushing the wire and contact back in place after your diagnosis slightly pull this "barb" tab out a bit to spring-tenshion again it so that the "barb" will latch back into place.
If you pull ******* the wire without releasing the barb the barb will fold back on itself....if you are very lucky you can unfold this small piece of metal back to its original possition with it snapping off! If it does snap off you will have to glue the assembly back into its slot with a strong epoxy glue. If you cannot get the pin out you have to cut the wire about two inches back and then slip some small heat-shrink insulation over the lead, solder the wires back together again when finished and slide the insulation over the joint and heat gently...not as good as pulling the contact out intact but will do the trick.
It is difficult to try trace the actual wire inside a thick harness to see where it is actually fraying down to ground.
You need to try isolate the suspect section of wire between two connectors...you will see that these two suspect wires go through various connectors such as C100, C105, C201 etc. If these other connectors have "round" pins as appossed to "flat" pins then you nee a special tool to push the "barb" out of the way so as to pull the pin out. This special tool is a thin tube just large enough to fit over the male or female round pin and is then able to collapse the barb out of the way.
Once you have isolated that the wire is bad going between plug "A" and plug "X" then if the wire dissapears into a major harness that runs around the whole chassis/engine bay..the best thing to do is to physically cut this bad wire off at both ends and tape it out of the way. Now run a completely new section of wire...nice if you can get the same colour...from point "A" to point "X" and neatly connect the ends up and tape over the new wire with black insulation tape. I note that the circuit diagram shows our suspect wires to be "Dark Blue" while the pin-outs of the connectors in the circuit diagram shows these wires to be "Dark Blue/White"....there are often errors like this in these diagrams!
I had to isolate about 6 wires on my Jeep in this way as the harness went from the ECU area on the LHS and traveled in a clockwise direction under the radiator through metal chassis beams to appear again at connectors near the air-filter and hence to the fuse box under the hood...a distance of about 6 feet to connect two points together that are actually about 18 inches apart! I marked my changes on the relevant circuit diagrams and keep those diagrams in the glove box for the next owner of this jeep to find!
Edit to add: You originally picked up this problem after switching over between two batteries using a switch-over switch......have you tried switching back to the original configuration ie. back to the original battery?
Hi BillWill,
That was another couple of days with no news from me but this time........
I cracked it !! Thanks to you !!
I did like you said but I couldn't get my head round the disconnection of the wires going to the junction block. Too tricky if I get it wrong. With buildings electricity no problem but with Auto electricity I intend to worry to get things worse than I found them.
So I made a temporary connection to the + of the battery with one 10 A in line fuse to the faulty blue that I just had cut 5 inches away from the reverse switch. The reverse lights went on when I passed the gear lever in reverse and I also tried the indicators at same time and everything worked. So I made my mind up I would isolate the faulty blue wire that I cut and I would run a new wire from another 10 Amp Fuse only used for this supply.
I did the job this afternoon in about 1:30 hr from the time I made the test to the time I finished.
I know this +12v supply doesn't come from the ignition switch so if I was going to park in reverse and leave it like this the reverse lights would stay on but it's me who fitted it and it's me who drives the Jeep so this is not going to happen. And to be honest I always park with the 1st gear on but never in reverse anyway.
I picked the 12 v supply from a junction box that I had fitted 6 months ago for my roof lights there was in there a 6 fuses box with 2 spares so it didn't take me long to run not a single wire but a 2 wires insulated cable from that junction box located on the left panel on footwell of my passenger as it's a RHD. That would be be the driver side in US but not sure in South Africa though. Anyway from there via the engine bay down to the Transmission switch. The faulty wire now double isolated with heat shrink sleeves. All properly fitted with cable ties. If that fuse was blowing again I now know straight away where to look.
So I owe you a really big thank you for your time and efforts to help me. You went to find electric diagrams that I never knew existed !! Now I've got a far better understanding of how the electric runs on my Jeep and that's because you pointed me to those diagrams with clear explanations.
I wish one day I could be of help to you but in the meantime as a good French man I say : Merci Beaucoup Mr Billwill !!
Chris