A Arm bolt removal?

Disclaimer: Links on this page pointing to Amazon, eBay and other sites may include affiliate code. If you click them and make a purchase, we may earn a small commission.

DJSKJ

Full Access Member
Joined
Oct 22, 2009
Messages
149
Reaction score
1
Location
California
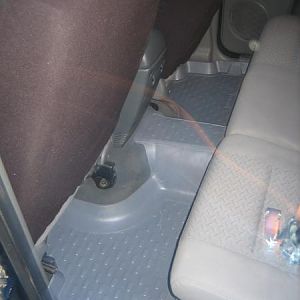
So, I should receive my JBA A arms within the next week (delayed, but that is another thread). I decided to prep the battle field by examining the four bolts that attach the a arm to the body. The front two I can loosen with a fair amount of elbow grease, but the back two (closest to the fire wall) are in a area that makes it difficult to gain leverage. I know these are fairly common r&r items on the KJ and I was looking from some advice or maybe some trick that can be used to loosen these bolts.

DJ
 

Jo6pak

Full Access Member
Joined
Nov 10, 2010
Messages
3,083
Reaction score
284
Location
Left coast of WI
I just replaced my UCAs a week ago.

Twack's "How-to" thread helped me alot.
http://www.jeepkj.com/forum/showthread.php?t=44820

I used this thread and a Haynes manual,. went farily smoothly with those references handy.

I used some left over speaker wire to hold up the sterring knuckle/hub assembly, where Twack uses the jack.

It takes some socket extensions and "wobblies", but it can be done. I reached the rear driver's side from underneath, a gearwrench helped immensely.
 
Last edited:

DJSKJ

Full Access Member
Joined
Oct 22, 2009
Messages
149
Reaction score
1
Location
California
Thanks for the info. I used some PB Blaster on the nuts, waited about 15 minutes and I was able to break them free. Just waiting on the arrival of the A arms. Should be my project for next Saturday.

DJ
 

Jo6pak

Full Access Member
Joined
Nov 10, 2010
Messages
3,083
Reaction score
284
Location
Left coast of WI
Just something to remember when installing the new UCAs. Do not torque the bolts until you put the vehicle's weight on the suspension.
It's much easier if you have a micrometer style torque wrench, since there isn't much room, especially on the driver's side rear bolt.
 

DJSKJ

Full Access Member
Joined
Oct 22, 2009
Messages
149
Reaction score
1
Location
California
Thanks and will do. Probably should have posted this under the How to section, oh well. What did you use to separate the upper ball joint from the steering knuckle? Also, did you enlarge the a-arm pockets?

DJ
 

Jo6pak

Full Access Member
Joined
Nov 10, 2010
Messages
3,083
Reaction score
284
Location
Left coast of WI
I just replaced with OEM UCAs because my upper ball joints were getting pretty rough. Since I wasn't re-using the old parts and didn't care about trashing them, I just used a pickle-fork to pop the balljoint.

I didn't enlarge the pockets. But, I think that most guys using JBA A-arms are doing it.

When we installed the new UCA, we left the top unattached while we inserted the BJ into the steering knuckle, but didn't tighten anything. Then we lifted everything into place and inserted the mounting bolts. Obviously, this won't do if you're working alone, but it seemed to work pretty well with two guys.

I also used a trick that I learned working on motorcycles. While you are torqueing everything into spec, put a little stripe of white-out on the bolts that have been torqued. That way, you can easily see what is done and what is not.

I've only done this once, others may have better ideas or techniques. But we got the job done.
 
Top