Debating An Offroading Lighting Idea

Disclaimer: Links on this page pointing to Amazon, eBay and other sites may include affiliate code. If you click them and make a purchase, we may earn a small commission.

tommudd

Moderator
Staff member
Moderator
Joined
Jul 14, 2005
Messages
22,456
Reaction score
3,642
Location
Southeastern Ohio
My phone chokes on pictures larger than 600k. I really appreciate you trying, though. :(

Ok did you get the text that went with the pictures ?
If so , I emailed you the pictures ,
had to fire up an old ipad that I had laying around and send them since I didn't download to my computer yet.
For some reason my cell phone and computer are fighting, cell phone wants to download photos but my computer says no way are you doing that to me ..............:emotions34::emotions34::icon_razz:
 

profdlp

Counting My Blessings
Staff member
Moderator
Joined
May 21, 2013
Messages
5,817
Reaction score
1,766
Location
Westlake, Ohio
Just checked in and saw them. I replied to the email, too.

Thanks! This is going to get done. :sawzall:
 

profdlp

Counting My Blessings
Staff member
Moderator
Joined
May 21, 2013
Messages
5,817
Reaction score
1,766
Location
Westlake, Ohio
Is that you, Tom? I can hear you but I can't see a dang thing... :hat:

I would like to post all the great pictures I took except...I didn't take any... :hidesbehindsofa:

I work from home and kept running out when I had five minutes here and there and didn't - uh, well, lame excuses won't help. Here is what I did and you can check it for yourself easily:

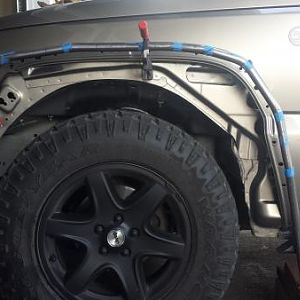
1) Open the driver's side front door. You will see a fat piece of rubber (about 3" wide) on the chassis of the Jeep under the door running from up near the front mount of the roof rail all the way down to the hood area. It is just pressed on there (like a ziplock bag seal) and you can peel it right off.

2) Underneath is a flat piece of metal trim covering the same area. Five or six screws and that comes right off.

3) Remove the inside grab handle and the molded plastic piece that covers the inside of the driver's side A-pillar.

4) What I did was to run the wires along a channel that was there until it got down almost to the bottom of the metal trim plate and rubber door seal I removed in steps 1 & 2. This is also where my lack of experience made things a little harder than it should have been.*

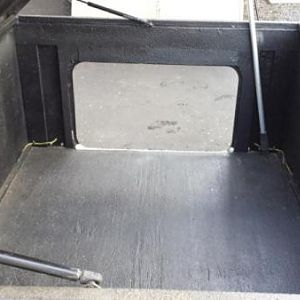
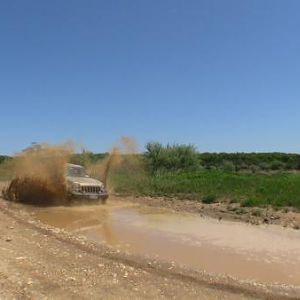
5) There was a hole already present in the cabin side of the A-pillar. I drilled a hole opposite it on the outside of the A-pillar. This allowed for a clear shot from the outside to the inside. I then trimmed a notch in the flat metal trim (the piece that has the groove where the rubber seal sort of snaps onto) so it wouldn't pinch the wires. The rubber seal will prevent any leaks (do NOT trim IT). I know this for a fact because when I went down to the farm a couple days later on Labor Day I drove 130 miles home in the heaviest rain I have seen all summer. Not. One. Drop.

Once the wires were routed through the outside hole (the one I drilled) and the inside (factory) hole, I ran the wires down through the little open corner under the A-pillar trim and - voila - had them all down below the dash right next to the existing firewall pass-through. The rest is up to how you plan to route the switch(es) and where you mount the relays, etc.

*The mistake I made was in trying to drill the tiniest hole possible. The wires all fit, but it was a royal pain in the keister feeding them through. As I recall, I drilled a 3/8" hole. A 1/2" hole would have saved me a lot of frustration. (I am guessing as to the sizes here, just allow yourself plenty of room for the wires.) I had three pair (six wires) since I ran the pair of spots, pair of floods, and the pair of rear work lights all together. Do yourself a favor (I did) and mark each pair so you don't have to guess which ground goes with which each hot wire. I used three separate (but identical) wiring harnesses which I wish I had not bought:

https://www.amazon.com/dp/B06XPJJNST/?tag=p--20

You must be registered for see images attach


The harnesses worked great, but I intend to replace the switches, and since the wires were not long enough to use as-is I bought a big spool of both red and black 14AWG wire which I used instead. All I really got out of it were the three relays. The next Jeep I do I will buy it all piecemeal and save some money.

This all makes perfect sense to me on writing it out, but I realize that some pictures would help anyone starting out blind. If you beg me enough I may get ambitious and remove the trim so I can show you a picture or two. Let the plaintive pleading begin! :pics-****:
 
Last edited:

tommudd

Moderator
Staff member
Moderator
Joined
Jul 14, 2005
Messages
22,456
Reaction score
3,642
Location
Southeastern Ohio
Wow you did a lot of extra things I never do, I'm sure it works great and looks good though.
1) I never remove like a zip lock, just fold rubber up and remove screws
2) these are the screws I remove with everything attached
3)I never remove the grab handle etc
4-5 ) I never drill any holes anywhere
I run the wires down into the windshield pillar, then into engine bay , relays etc all out there ,
But yours is probably better

So you ran grounds / everything all the way down ?
On mine I had two hot wires is all coming from the roof lights, the 2 grounds were just to the roof rail bolts Less wires to mess with
some one do it both ways now and see :happy175:
 

profdlp

Counting My Blessings
Staff member
Moderator
Joined
May 21, 2013
Messages
5,817
Reaction score
1,766
Location
Westlake, Ohio
Wow you did a lot of extra things I never do, I'm sure it works great and looks good though.
There are master builders, then there are master over-builders. Guess which one I am? :gr_grin:

I once built a shed with rafters on 12" centers. To be fair to myself, it was not a large shed (about 8' by 10') and the difference between that and the 18" centers was a couple extra 2x4s. Thirty years later and it still stands with the original roof.

1) I never remove like a zip lock, just fold rubber up and remove screws
2) these are the screws I remove with everything attached
I started that way, based on your advice, but found it easier to peel the whole thing first. Less in the way and it literally takes five seconds to peel it off and less than a minute to replace it.

3)I never remove the grab handle etc
4-5 ) I never drill any holes anywhere
I run the wires down into the windshield pillar, then into engine bay , relays etc all out there ,
I ran one pair of wires from the engine compartment. (Hot and ground.) I already had a set of wires there for my trailer light harness and another set for a subwoofer I had installed. I was trying to limit the amount of holes through the rubber membrane in the firewall.

But yours is probably better
Eh, who's to say. If they work, last, and look right there is no wrong way.

So you ran grounds / everything all the way down ?
On mine I had two hot wires is all coming from the roof lights, the 2 grounds were just to the roof rail bolts Less wires to mess with
some one do it both ways now and see :happy175:
I worked for a master electrician for four years. He was not fond of anywhere-handy grounds. Plus, with all the threads I've read here of phantom electrical issues I didn't want to have a problem someday and start wondering if I should rewire it all.
 

tommudd

Moderator
Staff member
Moderator
Joined
Jul 14, 2005
Messages
22,456
Reaction score
3,642
Location
Southeastern Ohio
I worked for a master electrician for four years. He was not fond of anywhere-handy grounds. Plus, with all the threads I've read here of phantom electrical issues I didn't want to have a problem someday and start wondering if I should rewire it all.

Yes I was a state certified electrician years back, (90% of the Haliburton Buildings built back in the 1980s in Southeastern Ohio I helped wire plus other houses, restaurants etc ) . but while in some cases true, other times its not so much .
Look at how many things are grounded on various places on a vehicle.

But again overbuilt never hurt a thing, so you're good to go ...........:gr_grin:
 

Latest posts

Members online

Top