Last week found an easy way to get the old bumpstops out is to secure a large C-clamp on the very top center before the metal mount and squeeze the rubber until it actually deforms, then you also have a "handle" for downwards leverage and they come out with a couple pokes behind the mounting tabs with a flat screwdriver.
If you are not putting a plate/shim above the front shock coilover mount or doing any clevis lift at all your stock A-arms should likely be fine. You'll want to disconnect them at the upper balljoint to make your install way easier (take off the BJ nut almost all the way and back it on to keep the knuckle from falling with a crash, then a few hard deadblow whacks on the side of the knuckle they
eventually pop out) - just check them once out. Get a good look at the boots as you can move the joint around to see the folds if there are any tears or the seam is bad, and make sure the studs don't turn freely or like me you'll need new gear. (I went with JBA a-arms for that reason mainly but made lift and alignment a cinch - and you won't have to worry about arm contact with the spring if you go that route or lift higher later).
Definitely start with the passenger side to get your bearings and get your confidence up, there's a bit less manoevering room and play on the driver's side but it all comes together with the right tools, gear and a bit of elbow grease.
If you're building your own fronts with spring compressors like I did, take it slow putting the new stuff in - it's under EXTREME compression compared to the old stockers. (Don't forget to re-use your old rubber isolators, upper and lower above and below the spring.) Added bonus if you have spring compressors is you can set them up on the rear springs just a bit to make the install back there go way faster and less flexing back and forth with jacks to get the axle to go down enough to fit the spring - especially if you're adding additional upper isolators. If you're unnerved by the spring compression, take them into your local shop or a buddy with a press and it's way safer... :yawn:
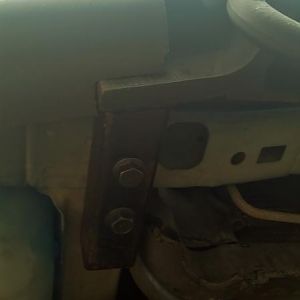
To hold the clevis pinch open slightly when sliding them up onto your new front shock feet I found slipping a 17mm deep socket between the clevis pinch kept it open just enough to slide them on easy, and the longer socket is easy to pop out once you're lined up. The trick around here to muscle the fronts in is to use strong ratchet straps to line up the lower clevis to the lower arm&bushing.
Don't be afraid to push down a tiny bit on the knuckle to get some play on the lower control arm when lining up - just keep them supported and
don't let things go so low or far out you pop your CV axles out. Slide in a tapered punch or another bolt on the opposite side to hold the clevis in place and wiggle the lower bolt in.
(I kept small adjustable jacks under the LCAs the whole time, and even roped the knuckle from the upper BJ hole to a UCA pocket to keep the knuckle where I wanted it and keep it from wandering or causing me CV trouble... but that's just me being a control freak.)
Putting in new bumpstops... be prepared to curse a bit, I lubed the hell outta them, and them stuck a shovel into the spring a pried them in... not pretty but it works. Just don't go too far in with the shovel or you'll scratch your new shocks/boots... or use a well placed prybar to get the finishing leverage.
Good luck, and have fun with it!
(And remember - the beers are for when yer done ") )
)