Jeepin05
Full Access Member
Well I finally got the funds to lift my Jeep! It took me and a buddy a little longer than the "average" time, but we got her done ") .
.
I don't post on here a whole lot, but I have been reading about the Liberty Lifts for a long time and have been wanting to lift mine forever. Everything I've learned thus far was found from this site, and I wanted to start off by saying thanks to everyone.
Here we go:
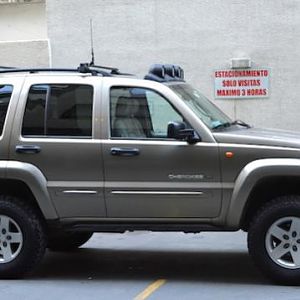
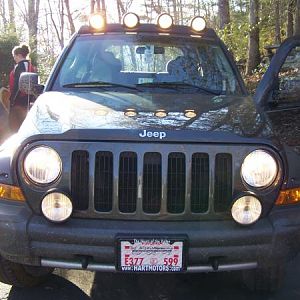
Before Pics:
Parts:
Front Springs - OME927 - $158.70 - JeepinByAl
Rear Springs - OME948 - $158.70 - JeepinByAl
Front Shocks - Rancho RSX 17505 - $235.40 - NAPA
Rear Shocks - Rancho RSX 17004 - $150.27 - NAPA
Boiler's 3/8" Shims - $48 - Boiler
Rear Upper Isolators - 1 extra per side - $17.64 - MoparOnlineParts.com
Terraflex Front Bumpstops - $39.98 - JeepinByAl
Rear Bumpstops - 4 Hockey Pucks - $8.44 - Scheels
Shipping Costs:
JeepinByAl - $33.32
NAPA - $8.09
MoparOnlineParts - $10.99
Parts Total: $869.53
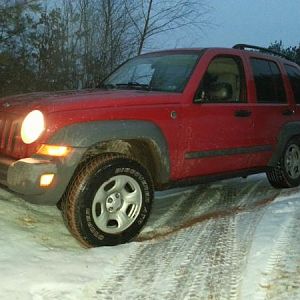
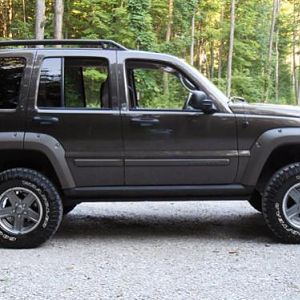
After Pics:
Wheelwell Comparisons:
FL:
FR:
RL:
RR:
Measurements - From middle of wheel hub to Fender
Before:
Front: ~18" on both sides
Rear: ~18.5" on both sides
After:
Front: 22" on both sides
Rear: 22.5" on both sides
After the lift settles, I should have gained 3+".
Goodyear was able to align the Jeep at a reasonable $52. For what it's worth, here are the post-alignment #'s:
Camber: -0.5(LF) -0.6(RF)
Caster: 2.4(LF) 2.8(RF)
Toe: 0.11(LF) 0.11(RF)
Cross Camber: 0.1
Cross Caster: -0.3
Total Toe: 0.22
Set Back: 0.13
As expected, Caster was the only part not able to meet specs. This has been discussed on here as not causing tire wear.
Installation actually went very well, although I'm really wondering how you guys do it in ~4 hours! I definitely would be faster my second time around, but I did run into some unexpected snags:
1. Drilling Mounting Holes for Rear Bumpstops - this was surprisingly tricky. I have a few different drills, although I pretty much had to drill at an angle as I couldn't fit the drill in below the spring top mount. I did pickup a drill bit for steel, although it took a good 25-30min for each side. Once I got through, installing the pucks was cake.
2. Installing Rear springs - I did have to slightly compress the rear springs to get them to fit with the extra isolator. No big deal, a set of small spring compressors were $10 at a local harbor freight.
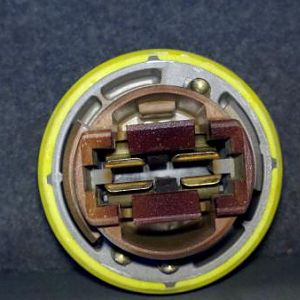
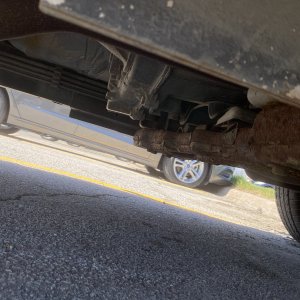
3. When tearing apart the engine compartment (airbox/battery etc), I found a line/wire that was hooked onto one of the driver side strut assembly bolts. Here is a picture -
We ended up hooking it up here (seemed reasonable?) -
4. Disassembly/Reassembly of front shock assemblies. We were able to disassemble them with the cheap compressors, although I know that's not the preferred method. The next step was assembly, and there was no way the little $10 compressors were going to work. I found a local shop that was willing to do it without notice, but they reamed me at $35 per assembly.
5. Bolting down the Upper A Arm with the Hub Assembly. Once we put the nut on, the ball joint sleeve itself spun with the nut. This happened on both sides and stumped us. We cleaned the sleeve threads with a wire brush and eventually was able to get the nut past the point where you can hold the sleeve with a small wrench.
6. Installing Terraflex front bumpstops. As you guys probably noticed from the pictures above, I wasn't able to install these. How the heck do ya get them in there? Do you guys have any tricks? I searched for this and didn't have any luck.
So, add in the few additional expenses:
Parts: $869.53
Spring Compressor: $10.59
Alignment: $51.95
Rear Bumpstop Hardware: $5
Grand Total: $1,007.07.
All in all, I don't think this is incredibly bad. I do think I could have saved a few dollars on the Ranchos by finding them online, although I did order them from Jeg's and they pulled my leg for a few weeks before the order was cancelled (backordered).
After First Drive - the ride is surprisingly responsive. It reacts to pretty much everything on the road, and I'll be honest it seems a little bouncier than expected. I'm pretty sure I've read that the ride will be stiffer at first and will get smoother over time. Overall, I am happy with the decision, I like the look much more and now I can fit some bigger tires.
I want to say thanks again to everybody, especially JFortier777, as his Frankenlift How-To was extremely helpful. Also thanks in advance for the info on how to get those Terraflex's installed.
This is an awesome forum!
.I don't post on here a whole lot, but I have been reading about the Liberty Lifts for a long time and have been wanting to lift mine forever. Everything I've learned thus far was found from this site, and I wanted to start off by saying thanks to everyone.
Here we go:
Before Pics:
You must be registered for see images attach
You must be registered for see images attach
Parts:
Front Springs - OME927 - $158.70 - JeepinByAl
Rear Springs - OME948 - $158.70 - JeepinByAl
Front Shocks - Rancho RSX 17505 - $235.40 - NAPA
Rear Shocks - Rancho RSX 17004 - $150.27 - NAPA
Boiler's 3/8" Shims - $48 - Boiler
Rear Upper Isolators - 1 extra per side - $17.64 - MoparOnlineParts.com
Terraflex Front Bumpstops - $39.98 - JeepinByAl
Rear Bumpstops - 4 Hockey Pucks - $8.44 - Scheels
Shipping Costs:
JeepinByAl - $33.32
NAPA - $8.09
MoparOnlineParts - $10.99
Parts Total: $869.53
You must be registered for see images attach
After Pics:
You must be registered for see images attach
You must be registered for see images attach
You must be registered for see images attach
You must be registered for see images attach
Wheelwell Comparisons:
FL:
You must be registered for see images attach
You must be registered for see images attach
FR:
You must be registered for see images attach
You must be registered for see images attach
RL:
You must be registered for see images attach
You must be registered for see images attach
RR:
You must be registered for see images attach
You must be registered for see images attach
Measurements - From middle of wheel hub to Fender
Before:
Front: ~18" on both sides
Rear: ~18.5" on both sides
After:
Front: 22" on both sides
Rear: 22.5" on both sides
After the lift settles, I should have gained 3+".
Goodyear was able to align the Jeep at a reasonable $52. For what it's worth, here are the post-alignment #'s:
Camber: -0.5(LF) -0.6(RF)
Caster: 2.4(LF) 2.8(RF)
Toe: 0.11(LF) 0.11(RF)
Cross Camber: 0.1
Cross Caster: -0.3
Total Toe: 0.22
Set Back: 0.13
As expected, Caster was the only part not able to meet specs. This has been discussed on here as not causing tire wear.
Installation actually went very well, although I'm really wondering how you guys do it in ~4 hours! I definitely would be faster my second time around, but I did run into some unexpected snags:
1. Drilling Mounting Holes for Rear Bumpstops - this was surprisingly tricky. I have a few different drills, although I pretty much had to drill at an angle as I couldn't fit the drill in below the spring top mount. I did pickup a drill bit for steel, although it took a good 25-30min for each side. Once I got through, installing the pucks was cake.
2. Installing Rear springs - I did have to slightly compress the rear springs to get them to fit with the extra isolator. No big deal, a set of small spring compressors were $10 at a local harbor freight.
3. When tearing apart the engine compartment (airbox/battery etc), I found a line/wire that was hooked onto one of the driver side strut assembly bolts. Here is a picture -
You must be registered for see images attach
We ended up hooking it up here (seemed reasonable?) -
You must be registered for see images attach
4. Disassembly/Reassembly of front shock assemblies. We were able to disassemble them with the cheap compressors, although I know that's not the preferred method. The next step was assembly, and there was no way the little $10 compressors were going to work. I found a local shop that was willing to do it without notice, but they reamed me at $35 per assembly.
5. Bolting down the Upper A Arm with the Hub Assembly. Once we put the nut on, the ball joint sleeve itself spun with the nut. This happened on both sides and stumped us. We cleaned the sleeve threads with a wire brush and eventually was able to get the nut past the point where you can hold the sleeve with a small wrench.
6. Installing Terraflex front bumpstops. As you guys probably noticed from the pictures above, I wasn't able to install these. How the heck do ya get them in there? Do you guys have any tricks? I searched for this and didn't have any luck.
So, add in the few additional expenses:
Parts: $869.53
Spring Compressor: $10.59
Alignment: $51.95
Rear Bumpstop Hardware: $5
Grand Total: $1,007.07.
All in all, I don't think this is incredibly bad. I do think I could have saved a few dollars on the Ranchos by finding them online, although I did order them from Jeg's and they pulled my leg for a few weeks before the order was cancelled (backordered).
After First Drive - the ride is surprisingly responsive. It reacts to pretty much everything on the road, and I'll be honest it seems a little bouncier than expected. I'm pretty sure I've read that the ride will be stiffer at first and will get smoother over time. Overall, I am happy with the decision, I like the look much more and now I can fit some bigger tires
.I want to say thanks again to everybody, especially JFortier777, as his Frankenlift How-To was extremely helpful. Also thanks in advance for the info on how to get those Terraflex's installed
. This is an awesome forum!
Last edited: