KalleXX
New Member
Hi all!
This is what I did when I changed the alternator clutch pulley on my Jeep Liberty 2.8 CRD- 2005 model.
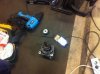
Step 0.1: Get an alternator decoupler pulley
- Order one (from IDparts.com or similar store, or a local store will do) and have it ready. I ordered one with OEM nr 53013554AF.
Step 0.2: Prepare with tools
- Flat headed screwdriver
- Hex sockets, 15 mm and 13 mm
- 10 mm spanner
- 13 mm spanner
- Ratchet (need to be about 30 cm/12 inch long)
- Impact wrench (air or electrical), 1/2" connector.
- 17 mm allen key for the 1/2" impact wrench connector.
You need this for the hex opening on the decoupler pulley.
There are special alternator decoupler pulley tools, but the impact wrench and the allen key will do the job just fine instead.
Step 1: Disconnect the battery
- Tool: 10 mm hex spanner for this.
- Disconnect the cable to the negative pole. Make sure it will not contact any metal. This step is general precaution.
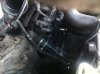
Step 2: Move away the airfilterhouse.
- Tool: Flat headed skrew driver.
- Loosen the airbox outlet hose clamp and move the hose away from its connector.
- Disconnect the two electrical connectors (one to the MAF sensor, the other one to the inlet pressure sensor).
- Pull up and move away the air filter house. You need to twist it gently and it will pop up. Observe the airbox air inlet hose: It can stuck, but it is easy to move it away.
Step 3: Move away the engine plastic cover.
- Tools: Your arms
- Clean the area around the plastic oil cap, then unscrew it.
- Then pull the plastic cover upwards gently. Nothing will break.
- When the cover is lifted away, make sure all the four rubber bushings still are connected to the plastic cover.
- Screw the plastic oil cap back again.
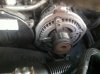
Step 4: Move away the serpentine belt from the alternator decoupling pulley.
- Tool: Ratchet with the 15 mm socket.
- With the 15 mm hex socket on the ratchet, place it on the serpentine belt tensioner.
- Move the ratchet in a clock wise direction and the serpentine belt will come loose (you need some strength).
- Then, move the belt away from the alternator pulley.
- Be careful not to scratch the belt.
Step 5: Disconnect the alternator
- Tools: Ratchet with the 15 mm and the 13 mm socket, 13 mm spanner
- There are four screws to disconnect. Two in front and one on the back of the alternator. The fourth one is on the electrical cable on top of the alternator (is has a black rubber casing that you can move away).
- First, disconnect the electrical cable with the 13 mm spanner.
- Then disconnect the other electrical connector on the alternator.
- Unscrew the three remaining screws. The screw on the back need the 15 mm socket and the two in front needs the 13 mm socket.
- Then, pull out the alternator. Twist and wickle it carefully and it will loose nice and easy.
Step 6: Take away the old alternator pulley.
- Tool: Impact wrench with the 17 mm allen key connected.
- The pulley will disconnect if the allen key is turned counter clock wise. It will only loosen up if the inertial force from the alternator is high enough.
- What worked for me was this: First, speed upp the alternator clock wise as easy as you can till it turns with full speed, then with with full force turn the impact wrench rotation counter clock wise. It took me 3 tries and then the pulley was out from the alternator axle")
Step 7: Install the alternator pulley on the alternator axle
- This is the reverse of step 6.
Step 8: Make the car ready to go again.
- Reverse the installation steps from step 5 to step 1 and you will be done.
Note: One thing when connecting the serpentine belt.
- First, connect the belt to the alternator pulley. Make sure that the belt has not jumped off any other pulley/wheel.
- Now, the only pulley to connect is the idler pulley that sits just below the alternator. Loosen the serpentine belt again with the ratchet and move the belt to the inside of the idler pulley carefully. It worked easy for me. Just be careful and it will be a piece of cake.
The whole operation took me little more than 30 minutes.
Good Luck:favorites13:
/KalleXX
This is what I did when I changed the alternator clutch pulley on my Jeep Liberty 2.8 CRD- 2005 model.
Step 0.1: Get an alternator decoupler pulley
- Order one (from IDparts.com or similar store, or a local store will do) and have it ready. I ordered one with OEM nr 53013554AF.
Step 0.2: Prepare with tools
- Flat headed screwdriver
- Hex sockets, 15 mm and 13 mm
- 10 mm spanner
- 13 mm spanner
- Ratchet (need to be about 30 cm/12 inch long)
- Impact wrench (air or electrical), 1/2" connector.
- 17 mm allen key for the 1/2" impact wrench connector.
You need this for the hex opening on the decoupler pulley.
There are special alternator decoupler pulley tools, but the impact wrench and the allen key will do the job just fine instead.
Step 1: Disconnect the battery
- Tool: 10 mm hex spanner for this.
- Disconnect the cable to the negative pole. Make sure it will not contact any metal. This step is general precaution.
Step 2: Move away the airfilterhouse.
- Tool: Flat headed skrew driver.
- Loosen the airbox outlet hose clamp and move the hose away from its connector.
- Disconnect the two electrical connectors (one to the MAF sensor, the other one to the inlet pressure sensor).
- Pull up and move away the air filter house. You need to twist it gently and it will pop up. Observe the airbox air inlet hose: It can stuck, but it is easy to move it away.
Step 3: Move away the engine plastic cover.
- Tools: Your arms
- Clean the area around the plastic oil cap, then unscrew it.
- Then pull the plastic cover upwards gently. Nothing will break.
- When the cover is lifted away, make sure all the four rubber bushings still are connected to the plastic cover.
- Screw the plastic oil cap back again.
Step 4: Move away the serpentine belt from the alternator decoupling pulley.
- Tool: Ratchet with the 15 mm socket.
- With the 15 mm hex socket on the ratchet, place it on the serpentine belt tensioner.
- Move the ratchet in a clock wise direction and the serpentine belt will come loose (you need some strength).
- Then, move the belt away from the alternator pulley.
- Be careful not to scratch the belt.
Step 5: Disconnect the alternator
- Tools: Ratchet with the 15 mm and the 13 mm socket, 13 mm spanner
- There are four screws to disconnect. Two in front and one on the back of the alternator. The fourth one is on the electrical cable on top of the alternator (is has a black rubber casing that you can move away).
- First, disconnect the electrical cable with the 13 mm spanner.
- Then disconnect the other electrical connector on the alternator.
- Unscrew the three remaining screws. The screw on the back need the 15 mm socket and the two in front needs the 13 mm socket.
- Then, pull out the alternator. Twist and wickle it carefully and it will loose nice and easy.
Step 6: Take away the old alternator pulley.
- Tool: Impact wrench with the 17 mm allen key connected.
- The pulley will disconnect if the allen key is turned counter clock wise. It will only loosen up if the inertial force from the alternator is high enough.
- What worked for me was this: First, speed upp the alternator clock wise as easy as you can till it turns with full speed, then with with full force turn the impact wrench rotation counter clock wise. It took me 3 tries and then the pulley was out from the alternator axle
Step 7: Install the alternator pulley on the alternator axle
- This is the reverse of step 6.
Step 8: Make the car ready to go again.
- Reverse the installation steps from step 5 to step 1 and you will be done.
Note: One thing when connecting the serpentine belt.
- First, connect the belt to the alternator pulley. Make sure that the belt has not jumped off any other pulley/wheel.
- Now, the only pulley to connect is the idler pulley that sits just below the alternator. Loosen the serpentine belt again with the ratchet and move the belt to the inside of the idler pulley carefully. It worked easy for me. Just be careful and it will be a piece of cake.
The whole operation took me little more than 30 minutes.
Good Luck:favorites13:
/KalleXX
Attachments
Last edited: