
I got this Seicane Android radio for my 2002 KJ Liberty because it is the same shape/size as the factory unit and fits on the existing bezel with no need for modifications.
I won't bother describing the installation, because it is quite straightforward. Adapters for factory harness and antenna are included so it is pretty much plug-and-play.
What is not so straightforward is how to get the steering wheel controls to work with this unit.
Good news is that you won't need a special CANbus decoder box.
However a small modification is required because as it turns out, the steering wheel button voltage is slightly higher than what the Seicane can sense.
First step is to remove the steering column plastic cover. It is held by two torx T20 screws
Once you get this off, this is what you'll see:
A yellow and a white connector.
The wire that corresponds to the steering wheel buttons is the middle one on the white connector (red with blue stripe)
Normally, we would splice the wire marked KEY 1 or KEY 2 from the Seicane harness to this red with blue stripe wire and be done with it.
I did just that, and while it seemed to work, I couldn't map the keys that are normally for volume up/down on the SWC app.
I noticed that the voltage generated on the red/blue stripe wire when those two buttons are pressed is the highest relative to other buttons.
Here are the voltages that correspond to each button:
4.99 Volts when no button is pressed, 3.49 when Volume Up is pressed and 4.25 for Volume Down
Apparently the Seicane works on 3.3 Volts internally so it can't recognize anything above that.
So I used a potentiometer between the steering wheel wire and Seicane to drop the voltage. I set it at the midpoint, which means all voltages would be halved.
And it worked! All buttons could be mapped on the SWC application.
Here's my test apparatus, the potentiometer shown by the red arrow
I didn't have the time to make permanent connections, so I removed all extra wiring and put the radio back in.
If I find some time tomorrow, I will make a simple resistive divider (more reliable than a potentiometer) and splice it on the steering wheel wire. I'll post detailed photos and maybe a video.
I won't bother describing the installation, because it is quite straightforward. Adapters for factory harness and antenna are included so it is pretty much plug-and-play.
What is not so straightforward is how to get the steering wheel controls to work with this unit.
Good news is that you won't need a special CANbus decoder box.
However a small modification is required because as it turns out, the steering wheel button voltage is slightly higher than what the Seicane can sense.
First step is to remove the steering column plastic cover. It is held by two torx T20 screws
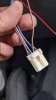
Once you get this off, this is what you'll see:
You must be registered for see images attach
A yellow and a white connector.
The wire that corresponds to the steering wheel buttons is the middle one on the white connector (red with blue stripe)
You must be registered for see images attach
Normally, we would splice the wire marked KEY 1 or KEY 2 from the Seicane harness to this red with blue stripe wire and be done with it.
I did just that, and while it seemed to work, I couldn't map the keys that are normally for volume up/down on the SWC app.
You must be registered for see images attach
I noticed that the voltage generated on the red/blue stripe wire when those two buttons are pressed is the highest relative to other buttons.
Here are the voltages that correspond to each button:
You must be registered for see images attach
4.99 Volts when no button is pressed, 3.49 when Volume Up is pressed and 4.25 for Volume Down
Apparently the Seicane works on 3.3 Volts internally so it can't recognize anything above that.
So I used a potentiometer between the steering wheel wire and Seicane to drop the voltage. I set it at the midpoint, which means all voltages would be halved.
And it worked! All buttons could be mapped on the SWC application.
Here's my test apparatus, the potentiometer shown by the red arrow
You must be registered for see images attach
You must be registered for see images attach
I didn't have the time to make permanent connections, so I removed all extra wiring and put the radio back in.
If I find some time tomorrow, I will make a simple resistive divider (more reliable than a potentiometer) and splice it on the steering wheel wire. I'll post detailed photos and maybe a video.