@DadOSix, thanks for the encouragement!Just my opinion:
I would try to source new pins and do the whole Circuit end to end.
It needs a special pin tool to get them out and fairly easy to reinsert.
For just the reasons you said - resistance issues. If a pin gets loose, spread, or green and crusty, the issue will persist.
But then again, I tend to go the extreme when trying to get it fixed.


You are using an out of date browser. It may not display this or other websites correctly.
You should upgrade or use an alternative browser.
You should upgrade or use an alternative browser.
2003 Liberty 3.7L sport, Reman engine from Tri-Star, p0304 code
- Thread starter dtennes
- Start date
Disclaimer: Links on this page pointing to Amazon, eBay and other sites may include affiliate code. If you click them and make a purchase, we may earn a small commission.
Recap after 5 weeks of effort.
I figured I would create a new bypass harness from the PCM to all fuel injectors and ignition coils. I only have a misfire problem on cylinder 4, but the thought was, if I gotta bypass one cylinder I might as well do all six.
Unless you are an electrical engineer, or some sort of electrical professional, I can tell you that trying to build and install bypass harness is a bad idea. At least it was for me. Used TXL wire according to specs, kept wire lengths as close to original lengths as possible, twisted the wires as recommended by the various YouTube tutorials (one of many examples:
Fortunately, I left the old harness in place so all I had to do was disconnect the temporary inline Wago splice connectors from the new harness ends and swap the old ends back. Engine fired right up, and I dodged a bullet, after spending 5 weeks and a couple of $100 tracking down and assembling factory spec harness components from scratch.
After all was said and done, I did peel apart the old harness wrapping in various places that were showing age and used crimped butt connectors (with shrink tubing for weatherproofing) to splice in new replacement coil and injector end connectors. I was overly cautious about allowing butt connectors inline in the beginning because of voltage variation warnings from electrical experts (which is very important because of the way the PCM decides when a misfire happens)... but the voltage meter shows no variation across a well-crimped butt connector down to 1/1000th of a volt.
So now what? Read on in next section...
I figured I would create a new bypass harness from the PCM to all fuel injectors and ignition coils. I only have a misfire problem on cylinder 4, but the thought was, if I gotta bypass one cylinder I might as well do all six.
Unless you are an electrical engineer, or some sort of electrical professional, I can tell you that trying to build and install bypass harness is a bad idea. At least it was for me. Used TXL wire according to specs, kept wire lengths as close to original lengths as possible, twisted the wires as recommended by the various YouTube tutorials (one of many examples:
xc_hide_links_from_guests_guests_error_hide_media
), used brand new connector housings/terminals/seals/etc, did voltage tests on everything, hooked it all up... and nothing. Starter turns and the engine doesn't fire. Not one cylinder.Fortunately, I left the old harness in place so all I had to do was disconnect the temporary inline Wago splice connectors from the new harness ends and swap the old ends back. Engine fired right up, and I dodged a bullet, after spending 5 weeks and a couple of $100 tracking down and assembling factory spec harness components from scratch.
After all was said and done, I did peel apart the old harness wrapping in various places that were showing age and used crimped butt connectors (with shrink tubing for weatherproofing) to splice in new replacement coil and injector end connectors. I was overly cautious about allowing butt connectors inline in the beginning because of voltage variation warnings from electrical experts (which is very important because of the way the PCM decides when a misfire happens)... but the voltage meter shows no variation across a well-crimped butt connector down to 1/1000th of a volt.
So now what? Read on in next section...
I still get the misfire code p0304. However, while I was waiting for components to ship I really started to read up on how the PCM thinks in the Jeep KJ Service manual (which can be found on this site). The very last chapter in the manual is all about Emissions Control and how the PCM goes about throwing a MIL (malfunc indicator light), why it stores emission malfunction codes, and how that propagates into engine behavior that makes your Jeep run like crap.
To give you an idea of the complexity of the root of this rogue p0304 (or p0306, whatever) code, here's a quote from the Emissions chapter of the Service Manual:
If any of these monitors detect a problem affecting vehicle emissions, the Malfunction Indicator Lamp (MIL) will be illuminated. These monitors generate Diagnostic Trouble Codes that can be displayed with the MIL or a scan tool. The following is a list of the system monitors:
² Misfire Monitor
² Fuel System Monitor
² Oxygen Sensor Monitor
² Oxygen Sensor Heater Monitor
² Catalyst Monitor
² Leak Detection Pump Monitor (if equipped)
All these system monitors require two consecutive trips with the malfunction present to set a fault.
Note the word "monitor". These are individual systems, each of which has several *sensors*. Unfortunately, the "Misfire Monitor" is not the sole contributing factor to a misfire code. If you read the manual, it turns out that every one of those monitor systems can precipitate a p03xx, and worse yet the interaction of more than one of those systems *in combination* with other systems can cause the code.
On the bright side, what it all comes down to is the air:fuel mix, which is a universal target of 14.7:1 so the sensors that are directly responsible for detecting that ratio is what I am now replacing.
The logic being, if I know for a fact that all sensors related to air:fuel are new, then the problem is not bad sensors. There are also a couple of small mechanicals that are involved in the engine compartment: Intake Air Control Valve (on the throttle body) and the Evap Purge Solenoid (which recirculates emission vapors). I am waiting for the delivery of a new Evap Solenoid which is part of the vapor detection/management system, and may be the problem solution.
It turned out that the MAP sensor was bad (broken o-ring), and most of the sensor connectors turned out to be broken by past garage mechanics and simply wedged back on. There was fouling on everything, so now everything is fresh, clean and properly connected. Except for the crankshaft and camshaft sensors, also candidate problemn solutions because their signals interact in the PCM and are the final trigger of a misfire condition. The detection of crankshaft position is the actual misfire detection trigger, everything else are contributing factors that cause engine behavior that impacts crankshaft position. So it's all important, but a bad CKP sensor can happen.
So with clean splices on injectors and coils, and most of the new sensors and mechanicals in place, I took the KJ out for a 120 mile test run. Start, run 50+ miles local and highway, turn off, let rest for an hour, repeat. Let rest for 2 hours, start, drive over to gas station to refill, stop, rest for 10 minutes while refilling, start... and a minute later the MIL pops with a p0304.
So what we know is that everything seems to be working fine until I fill up the tank, which is full of vapor at this point. Gas cap gets removed and then put back on... some sensor tracks vapor in the system, so I think I'm getting closer to the root problem and my gut tells me that it's not the crank and cam sensors, but the evap purge solenoid. 120 miles and not a peep out of the crank or cam.
There is no capacitor required/used with the 3.7L."Missing Ignition capacitor"
Apparently there is supposed to be one of these installed (see capacitor_b1 photo) on the left engine compartment firewall (see cpacitor_b2 photo) according to the manual (see capacitor_b3 photo).
The point of a capacitor (I'm no electrician but I can understand definitions/explanations) is to provide a stable charge delivery of _____ amps at the expected level of voltage.
There's a reason why these things get included in a circuit, and mine seems to be missing from the engine compartment. The hypothesis is that a mechanic ended up with a loose cable/connector, couldn't figure out where it went, and "since the engine seemed to be running fine at the time, we'll just cut it off and forget about it".
If that hypothesis is truth, then the new/replacement capacitor needs to be screwed into the firewall where it belongs... but I have no idea where to splice in the connector whip. The anticipation is that it is a single-wire splice because there is only one connector pin exposed in the connector socket on this part.
- I scoured the Service Manual text, reviewed all wiring schematics multiple times.
- There is a capacitor for the 2.4L... *but not for the 3.7L*.
Wiring bypass progress update:
I literally woke up in the middle of the night with a nagging suspicion that I should go back and check which PDC (power distro center) wires I had identified to be in the two circuits. With a dose of embarassment, I must report that I tried to splice in the Fuel Injector harness with the wrong PDC wire. Yep, two wires that look pretty similar on that 10-pin wiring block and I of course used the wrong one. I did manage to get the ignition coil PDC wire right the 1st time (mainly because no other wire in that 10-pin connector looked similar).
Where I am at right now is that I have successfully installed two bypasses:
1 bypass for the cyl 4 fuel injector ...and...
1 bypass for the cyl 4 ignition coil...
The engine is running smooth.
A side note I've learned that if you have good crimps and use quality (TXL) wire that is the correct gauge, heat shrink splices, construct brand new connectors using the OEM specs, etc... the electricity will flow and you don't have to worry about EMI or increased resistence. Resistence starts to come into play as a wire gets longer, but if you keep the length as close (+- 1 ft) to the original length as possible it doesn't make a difference in the amount of voltage delivered to the device.
Regarding the electrical connectors used in the various Liberty models (regardless of year), you have to be very careful about terminal pin designs, seal sizes, weatherproof plugs, etc. I got set back a cumulative 2 weeks because I didn't match female terminal to connector housings properly.
Rebuilding new connectors is a LOT cheaper than buying from AutoZone/etc, and those sources have proved to sell generic connector pigtails that use the wrong gauge wires.
When fabricating new connectors from scratch, get a 10x jeweler loop from Amazon and really inspect old connector housings for mfg clues. I discovered that a 2003 Liberty uses several different connector manufacturers, and the housings can have special "keying" tabs that make two similar looking connectors completely different when you try to actually install them.
Be methodical, precise and cross-reference info from:
Aptiv/Delphi (research): https://www.aptiv.com/en/solutions/connection-systems/catalog/connectors?language=en
TE Connectivity (research): https://www.te.com/usa-en/products/connectors/automotive-connectors.html
Mouser (good research, buy them here also): https://www.mouser.com/c/connectors/automotive-connectors/
I will post a complete list of searchable manufacturer part-number for all of the components once this electrical work is 100% complete and validated.
Update: Successful fabrication, installation, and testing of complete replacements for ignition coil harness and fuel injector harness for all 6 cylinders.
I still have that rogue cylinder 4 misfire, but I now have absolute confidence that the problem is not related to either fuel injector or ignition coil wiring.
That question of faulty wiring originally occurred as a result of the discovery of a segment of harness that had been abraded by contact with the front (4WD) drive shaft. A mechanic was careless and did not properly secure said harness, which I discovered and took back to have inspected/tested/repaired. Still not sure if the damage was effectively handled because the segment is now tucked up on top of the trans housing where you need the Jeep up on a lift to confirm that the fix was correctly done once and for all.
In any case, the replacement harnesses are themselves working great.
What I will do now is to create a separate posting that is 100% harness replacement exercise for the benefit of this Forum, in case someone else wants to replace ignition and injector wiring... without the clutter of the rest of this weird rogue misfire odyssey. The title will be "How to rebuild and install a wiring harness for either fuel injectors of ignition coils".
I will continue the random misfire odyssey monologue for the benefit of others suffering from this nuisance that plagues emission compliance, and maybe one day I will finally stumble upon the root cause after eliminating most (if not all) of the possible factors.
CarabouSpider
New Member
- Joined
- Mar 31, 2023
- Messages
- 5
- Reaction score
- 0
Hi @dtennes ,
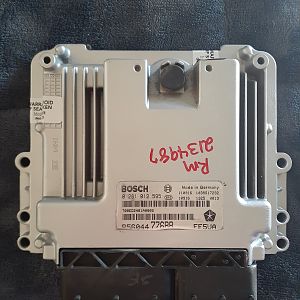
Did you ever get this resolved? I am experiencing very similar symptoms than you and have done the same level of troubleshooting. I was convinced it was the PCM (for such a common problem after lots of researching), but the new one from Flagship 1 didn’t solve it (same as you)…
Thanks!
Did you ever get this resolved? I am experiencing very similar symptoms than you and have done the same level of troubleshooting. I was convinced it was the PCM (for such a common problem after lots of researching), but the new one from Flagship 1 didn’t solve it (same as you)…
Thanks!
CarabouSpider
New Member
- Joined
- Mar 31, 2023
- Messages
- 5
- Reaction score
- 0
Hi @dtennes ,Hi @dtennes ,
Did you ever get this resolved? I am experiencing very similar symptoms than you and have done the same level of troubleshooting. I was convinced it was the PCM (for such a common problem after lots of researching), but the new one from Flagship 1 didn’t solve it (same as you)…
Thanks!
My apologies, I didn’t see that the thread was 3 pages long when I posted the above question and that you had an update as recent as Thursday of this last week. I was still on p1 of this thread that came from another post that you directed from.
With that said, you ended up narrowing down that the wiring bypasses and fixing the MAP sensor fixed the issue, correct?
Thanks!
I'm still struggling through this... Are you experiencing 1 cylinder or multiple? Is it always the same one (which?) and is there any apparent pattern/frequency?Hi @dtennes ,
Did you ever get this resolved? I am experiencing very similar symptoms than you and have done the same level of troubleshooting. I was convinced it was the PCM (for such a common problem after lots of researching), but the new one from Flagship 1 didn’t solve it (same as you)…
Thanks!
I have posted a (nearly) final draft of "How to build and install an injector and coil harness"...
Coil and Injector harnesses, how to...
Coil and Injector harnesses, how to...
Sorry, I didn't see this earlier. The software that drives the discussions takes some getting used to...Hi @dtennes ,
My apologies, I didn’t see that the thread was 3 pages long when I posted the above question and that you had an update as recent as Thursday of this last week. I was still on p1 of this thread that came from another post that you directed from.
With that said, you ended up narrowing down that the wiring bypasses and fixing the MAP sensor fixed the issue, correct?
Thanks!
The answer is: neither the bypass wiring or the MAP sensor replacement solved the misfire problem. However, either of those two things could cause a misfire. Wiring is cylinder specific, and my misfire was always on #4, so that was the highest probability. A MAP sensor is sort of a 'whole-engine' component, like a throttle body... and in that case the misfire should bounce from cylinder to cylinder... rather than being consistent. Another example would be fuel pumps because all cyls share the same fuel rail flow equally. This is specific to #4.
I have swapped ignition coils around, and the misfire stays on #4, so it isn't a coil. That leaves the injector. What I have learned is that all injector manufacturers have slightly different specs... small voltage variances and small volume variances. The injector on #4 is a different manufacturer from the other 5 cyls, so I am going to try one last fix... new matching injectors.
Masterbrewer
New Member
- Joined
- Nov 20, 2019
- Messages
- 7
- Reaction score
- 1
My friend was pulling the same misfire code. The same cylinder would log a misfire at around 50 miles of driving. After everything else was tried the head was sent to the machine shop to be redone. After the head was replaced he never had the misfire code again. I only bring this up because you installed a rebuilt engine and there could be problems with the build. Misfire doesn’t mean it is an electrical problem exclusively.
Masterbrewer
New Member
- Joined
- Nov 20, 2019
- Messages
- 7
- Reaction score
- 1
I assume it was but we couldn’t know that for sure as the whole head was rebuilt. After the head was reinstalled he never did get the code again and it’s been about a year since it was completed.
Johnny O
Just hangin' out.
Agreed.You should replace those platinum plugs with NGK copper. I’m not saying it’s the cause of your issue, but these Jeeps are particular about their electrical parts. Also check the engine grounds for corrosion. A number of problems can be caused by bad ground wires.
I’m an electronics geek myself, and I have no evidence that Libertys are more susceptible to random EMI interference.
Johnny O
Just hangin' out.
What battery are you running? Age?
Dutchman61
New Member
- Joined
- Jun 14, 2023
- Messages
- 5
- Reaction score
- 7
I bought a Launch Diagnostic tool on Amazon for under $200 and it will do everything but program keys. There is another one a step up from that which I have that does everything on all 52 makes programs the ECU, keys, and everything else from bumper to bumper.I just mean when the engine got up to temperature, a bad connection in a wire going to a fuel injector got worse and the injector stopped working. When things cooled down, the resistance in the wire lessened and it started working again.
Have you tried noting the color of the wires that terminate at the coil and injector then looking for those same ones coming out of the PCM?
A scanner that advertises it can read mode 6 data would fit the bill there. I wouldn't worry too much about running out and getting a new scanner right now, though, as I doubt it would aid much in your diagnoses in your particular case.
Dutchman61
New Member
- Joined
- Jun 14, 2023
- Messages
- 5
- Reaction score
- 7
I have a Jasper Engine and Transmission in my 2007 Jeep Liberty Sport and have put in larger fuel injectors, changed up the air induction jto a doubl;e filter and going to add a 3 inch exhaust to help it breath easily. Should gain about 100 more HP than factory.Agreed.
Similar threads
- Replies
- 1
- Views
- 1K
- Replies
- 0
- Views
- 1K
- Replies
- 2
- Views
- 449