
KJ604
Full Access Member
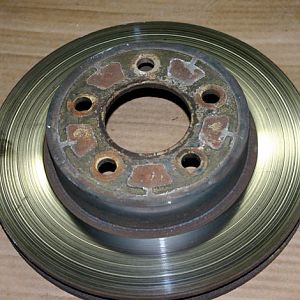
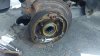
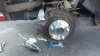
Pic #1 Old axle pulled out, ready to pull the bearing out
#2 New bearing and seal pressed in
#3 Shiny new axle installed
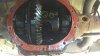
#4 Shot of diff with the cover off, the head of the pinion shaft bolt can be seen
#5 Closer shot of the diff, the c-clip on the end of the drivers side axle can be seen
So I swapped out the bent axle the other weekend. I ordered the dorman kit off of rock auto. http://www.rockauto.com/catalog/moreinfo.php?pk=2478124&cc=1430900&jnid=460&jpid=2 The Kit comes with axle, studs, nuts, bearing and seal. The axle I have no problems with, the bearing was complete garbage. The cage cracked while I was trying to install it. So I threw the seal away too. The kit is still a good price for just the axle, studs, and nuts, but plan on buying a bearing separately. I swapped the bent axle out and put a new bearing and seal on both sides.
Took me a good 4 hours in my driveway, but this was my first time even putting this jeep on jackstands. I was not moving fast.
Start blocking the front wheels and jacking up the rear end and removing the wheels. Remove the caliper by removing the 2 bolts, compressing the retention clip and rolling the caliper upwards. Mine needed some persuading. The rotor should then slide off, but if its stuck on just leave it for now and you can pull it and the axle out as one piece later. Once youre at this point, unbolt the diff cover and drain the diff. The pinion shaft bolt can be seen in pic #4 just to the right of the pinion shaft, both are circled. This runs through the center of the diff and holds the axles in place. Remove the bolt and then rotate the diff until the pinion shaft slides out. Once you pull the pinion shaft out then go push inward on the hub of the axle you want to remove. It will slide inward and then when you look in the diff you will be able to see the c-clip that holds the axle in place. You need to get that c-clip off, it should just slide off but i had to wiggle the axle a bit to get mine off. Once that clip is off the axle will slide right out.
Now to remove the old bearing and seal you need a slide hammer and a rear wheel bearing puller. I ordered both off of amazon for $100, and i got a set of 3 different sized pullers. Hammer the old bearing out with the puller, then install the new bearing. I used a 1-3/4" socket to tap my new bearings into place. Make sure the bearing is going in square to the housing and evenly all the way around. For the seal I used a rubber mallet on the metal flange of the seal and gently tapped it into place.
Installing the new axle is the reverse of removal. Slide it all the way in, get the c-clip on the end, and while youre holding the cclip in place slide the axle outward and it will lock the c-clip in place. Re-install the pinion shaft. Clean up all surfaces and use Red or Black RTV to make a new gasket. Refill the diff to the bottom of the filler hole. Make sure to add LSD additive if you have Trac-lock. Put the breaks and the wheels back on.
Not a difficult job at all. I didnt know how the calipers work and mine were rusted on so it took me a minute to figure out how to get them off. And I found cleaning the old gasket off of the top side of the diff was akward because youre tight to the gas tank. Everything else is straight forward and simple. :favorites13:
#2 New bearing and seal pressed in
#3 Shiny new axle installed
#4 Shot of diff with the cover off, the head of the pinion shaft bolt can be seen
#5 Closer shot of the diff, the c-clip on the end of the drivers side axle can be seen
So I swapped out the bent axle the other weekend. I ordered the dorman kit off of rock auto. http://www.rockauto.com/catalog/moreinfo.php?pk=2478124&cc=1430900&jnid=460&jpid=2 The Kit comes with axle, studs, nuts, bearing and seal. The axle I have no problems with, the bearing was complete garbage. The cage cracked while I was trying to install it. So I threw the seal away too. The kit is still a good price for just the axle, studs, and nuts, but plan on buying a bearing separately. I swapped the bent axle out and put a new bearing and seal on both sides.
Took me a good 4 hours in my driveway, but this was my first time even putting this jeep on jackstands. I was not moving fast.
Start blocking the front wheels and jacking up the rear end and removing the wheels. Remove the caliper by removing the 2 bolts, compressing the retention clip and rolling the caliper upwards. Mine needed some persuading. The rotor should then slide off, but if its stuck on just leave it for now and you can pull it and the axle out as one piece later. Once youre at this point, unbolt the diff cover and drain the diff. The pinion shaft bolt can be seen in pic #4 just to the right of the pinion shaft, both are circled. This runs through the center of the diff and holds the axles in place. Remove the bolt and then rotate the diff until the pinion shaft slides out. Once you pull the pinion shaft out then go push inward on the hub of the axle you want to remove. It will slide inward and then when you look in the diff you will be able to see the c-clip that holds the axle in place. You need to get that c-clip off, it should just slide off but i had to wiggle the axle a bit to get mine off. Once that clip is off the axle will slide right out.
Now to remove the old bearing and seal you need a slide hammer and a rear wheel bearing puller. I ordered both off of amazon for $100, and i got a set of 3 different sized pullers. Hammer the old bearing out with the puller, then install the new bearing. I used a 1-3/4" socket to tap my new bearings into place. Make sure the bearing is going in square to the housing and evenly all the way around. For the seal I used a rubber mallet on the metal flange of the seal and gently tapped it into place.
Installing the new axle is the reverse of removal. Slide it all the way in, get the c-clip on the end, and while youre holding the cclip in place slide the axle outward and it will lock the c-clip in place. Re-install the pinion shaft. Clean up all surfaces and use Red or Black RTV to make a new gasket. Refill the diff to the bottom of the filler hole. Make sure to add LSD additive if you have Trac-lock. Put the breaks and the wheels back on.
Not a difficult job at all. I didnt know how the calipers work and mine were rusted on so it took me a minute to figure out how to get them off. And I found cleaning the old gasket off of the top side of the diff was akward because youre tight to the gas tank. Everything else is straight forward and simple. :favorites13:
Attachments


Last edited:
 arty52: