SourKraut
New Member
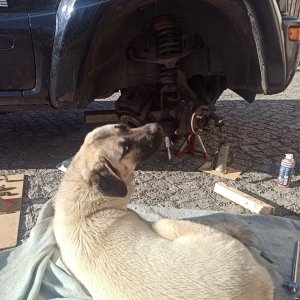
Saw quite a few posts about replacing the steering rack bushings and what a PITA it was along with the different things that may or may not need to be removed to do it. I noticed the top of the bushing on the drivers side on my 05 was coming apart on top, which seems pretty typical due to oil contamination from changing filters. As title says, I was already in the process of replacing radiator due to leak along with water pump and thermostat. With that stuff removed, along with oil filter, oil drain chute, and both front tires I was able to maneuver the rack enough to get it to rest behind the frame crossmember in a position that I could pound out the bushings with a socket attached to a long extension. I did wedge a small 2x4 cutoff on the passenger side and a pry bar on the drivers side to absorb some of the impact and firm up the rack while pounding out the bushings.
Of course, this probably only helps if you need to R/R the radiator, but I didn't see anything mentioning this method so here ya go.
Now, my question...
The new Moog bushings are only flanged on the bottom along with the metal sleeve compared to the factory bushings that also have a rubber flange/lip on top. The rubber on the Moog bushings protrudes straight up about 1/4 inch on top. Is there any technique to tightening the bolts to the new Moog bushings or just crank it down and let the rubber on top do what it does?
And yes, I know there are poly bushings now available that are better and longer lasting, but I had already ordered the Moogs when I was getting my radiator parts before I looked on here for install tips. Plus, I'm figuring on being in a position to replace them again in a year or two due to other planned repairs/upgrades.