OK as far as the P0645 code for the AC is concerned:
I presume that you are using the 200KJ Service Manual from:
Index of /manuals/Jeep/KJ
The DTC codes at the end of the Index will direct you to page 9 - 484/5 for this code.
Possible causes:
Fused B+ Circuit
A/C Clutch Relay Control Open Circuit
A/C Clutch Relay Control Circuit Shorted To Ground
A/C Clutch Relay
PCM.
It then tells you to swap over the A/C Relay, check the relay resistance etc.
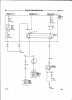
Looking at the wiring diagram 8W-42-5 you need to:
1. With ignition started and A/C ON check that you have + 12 volts on pin 86 of the A/C relay. You can flip over the fuse/relay box under the hood so as to get access to the bottom of the relay socket while the relay is still in place.
2. Do the above first with respect to ground ie. engine/chassis and then with respect to pin 85 of the relay.
3.If you do not have +12 volts on pin 86 with respect to ground then chase it back to page 8w-12-17 etc. to find where the run/start voltage has gone missing.
4.Most likely pin 85 is not being switched down to ground via the PCM so the relay is not energizing. With battery disconnected unplug the A/C Relay and unplug PCM connector C3 so that the Light Blue/Orange wire going from the PCM to pin 85 of A/C Relay should be completely floating.
Check for continuity along this lead from both ends with meter set to Ohms....should be continuity.
Now check each end of this lead for continuity ie. a short to ground....should be no continuity shown at all!
Use a cheap Digital Multi Meter for these tests and do not touch the lead ends with bare hands.
If this Light Blue/Orange lead is either open circuit or is shorting...or semi shorting...to chassis then it is best to replace it.
The wiring on the KJ does not take the shortest route from point to point but travels around the whole engine bay like the Washington Beltway!
The wire is usually within a large harness with several connectors in series which could have bad connections and this harness usually goes through a large square metal tubing up front by the radiator....very hard to access.
So if this lead is open circuit or shorted then cut it off near to both ends and tape up the lead ends. Then fit a new wire of any color from pin 85 of A/C Relay directly to the short section of wiring at PCM connector C3 pin 11....Light Blue/Orange wire. Take the shortest neatest route for this new wire and then make a note of this wiring change on the wiring diagram for the next owner to find someday!
There is a remote chance that the A/C control switch is failing but unlikely as the PCM is at this time checking this connection and is not happy!
Do you hear the A/C clutch clicking when A/C is turned On?
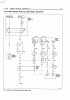
If there is no "click"but you are sure that the A/C Relay Coil is getting voltage then check that the relay pins 30 and 87 do have +12 volts on them with respect to chassis and with respect to pin 2 of the AC clutch connector...Black wire. This second reading checks that chassis ground G103 is not bad. Ground point locations are shown in the wiring diagram location section.
Page 8W-42-5 to follow: