
42RLE Removal and Replacement [2004 Jeep Liberty Sport] ---
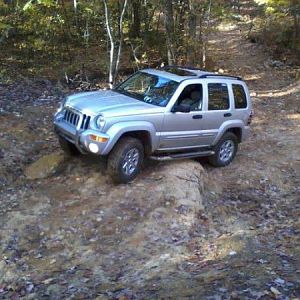
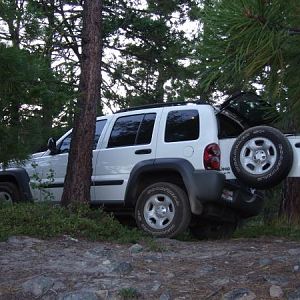
Figured I would contribute finally after using all the helpful information on the forums over the last few years! I inherited a ’04 Jeep Liberty (Sport trim) by means of my wife back in 2014 with about 75k miles on it. I am a GM guy, so all this Chrysler stuff was new to me. While I’ve spent too much $$ keeping this car running at this point, it has taught me more than I previously knew about car mechanical details and I’d be lying if I said I had not enjoyed the projects here and there lol.
In 2017 at only 115k miles, the transmission went out… what crap. The car has the 42RLE 4-speed trans which yes, I’ve read people hate and the 45RFE is superior. Alas, in the name of no car payment, we decided to take the plunge and swap the old transmission out for a refurbished one.
Obviously, I am writing this now in basically 2020, so socket sizes, steps, etc. may be somewhat out of order, missing, or slightly incorrect. However, during the swap, I could find no step-by-step transmission swap guide specifically for our 2004 and the 42RLE trans. Given the length of time since doing this job, you’ll notice lots of holes for sure in my write-up. Feel free to comment and I can revise. Also see photos as those are arguably more helpful and can assist in following along. So here it goes.
**Use common sense judgement and adhere to all safety precautions noted on/with your tools. I hold no responsibility for any injuries or damage caused by following this write-up**
LINK TO PHOTOS --- https://imgur.com/a/qiwdo1V
Removal of transmission:
1. Place vehicle up on ramps and put parking brake all the way on! Place rock or something behind the back wheels. As you see, we did this in a gravel driveway at my folks house. We were up on ramps both with 2 pieces of 2x4 under them – so as to gain clearance to lower the trans down and out later on.
a. *We did all this with 1 floor jack – no transmission jack needed*
2. Place the transmission in Neutral and the transfer case in Neutral.
a. *neither of these may be necessary I cannot recall… *
3. Disconnect battery.
4. Drain transmission oil fluid (remove the pan). This helps remove some weight. It will continue to drain forever FYI so keep your catch pan there.
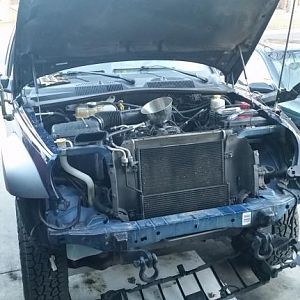
5. Drain the coolant system. You have to remove heater hoses. Could probably do just that, but we did radiator at the same time so it was required for us.
6. Remove coolant reservoir. Disconnect hoses at bottom.
7. Remove air filter box and intake hoses all the way back to the throttle body.
8. Remove oil filler neck. This allows space to remove the heater hoses.
9. Remove front grille facia (the plastic part that is body colored).
10. Putting a drain pan underneath to catch fluid, remove the transmission oil cooler located (if looking at the front of the car) to the lower left of the power steering cooler. See picture. It’s a long horizontal black thing. We also replaced the radiator which made access here easier, but not necessary.
a. **our ’04 Sport had a factory tow hitch on it which included a factory trans oil cooler. This part is ONLY available from the dealer. About $275. The version sold on RockAuto (at this time) was not correct for our vehicle. Do your research here.
b. If swapping the transmission, it is HIGHLY recommended you replace this and the trans oil cooler lines (also ONLY available from the dealership from what I saw) in case metal pieces got into them from the old trans crapping out. Do it. Don’t skimp if committing to a job this size already.
11. Remove trans oil cooler lines. These run from the cooler up front, along the passenger side, to the transmission. Remove at the transmission too.
a. **I took the heater hoses off as well to replace the valve cover gaskets during this job too. Can’t recall if those made it easier to access trans oil cooler lines.
12. Head back under the car now… remove trans oil cooler lines and all electrical connections from the transmission on both sides. This includes the input & output trans speed sensors. There are additional connections (maybe 3?) on the top which you will gain access to later once lower the trans slightly – see below.
13. Remove the shifter cable assembly, attached via a bracket (take that off too) from the transmission.
14. Remove the starter + heat shield on driver side of vehicle.
15. Remove the Y-pipe exhaust assembly. Disconnect it right ahead of the muffler – easy. Disconnect it from the exhaust manifolds – PITA. The connection at the manifolds are these stupid v-band clamps which I now despise.
16. Remove the secondary driveshaft – the one that connects from transfer case to drive the front wheels when 4WD engaged. 8mm wrench.
17. Remove the primary driveshaft from back of the transmission. If able to, just drop it down and keep connected to rear axle.
18. I am fuzzy here…. But remove the transfer case. I believe it bolted to the back of the transmission (?). Unbolt and should slide off since you took out driveshaft. I would have to climb back under car to look again.
a. **There is a seal between where the transfer case mounts to the transmission, a rubber circular gasket. Upon removal we noticed our gasket was torn. A new one was a DEALER ONLY part of less than $10. I would replace anyhow just to be safe.
19. Drain the trans oil fluid from the transfer case. You will be doing a DRY FILL of BOTH the transfer case and transmission at the end remember.
20. Placing your floor jack under the transmission cross member support and stabilizing, remove all cross-member bolts. I believe 3 (?) on each side.
21. Loosen (but do not yet remove) the bolts holding the transmission to the flywheel / back of engine.
22. Slightly lower your floor jack (holding the transmission) and look up top the trans. Here you will see those additional electrical connections noted earlier + access to the remaining trans/engine connection bolts. Undo connections and remove these bolts.
23. Remove previously loosened bolts holding trans to engine.
24. Lower your jack, pull it towards rear of the vehicle – halfway there! Transmission is out! Take a break and grab a well-deserved beer.
There are numerous companies who will sell you a refurbished transmission. I was between Jasper and Street Smart Transmission Authority. I ended up going with Street Smart. Idk why, they did have a 3-year unlimited mile warranty, but I’m sure others did too. Their customer service was great I will say, over phone and email, to return our old transmission + deal with some post-install issues I have had with the unit in it just being a 42RLE lol (that should be another post). My 3-year warranty period ends in March ’20 and the car has 141,*** miles on it now.
Figured I would contribute finally after using all the helpful information on the forums over the last few years! I inherited a ’04 Jeep Liberty (Sport trim) by means of my wife back in 2014 with about 75k miles on it. I am a GM guy, so all this Chrysler stuff was new to me. While I’ve spent too much $$ keeping this car running at this point, it has taught me more than I previously knew about car mechanical details and I’d be lying if I said I had not enjoyed the projects here and there lol.
In 2017 at only 115k miles, the transmission went out… what crap. The car has the 42RLE 4-speed trans which yes, I’ve read people hate and the 45RFE is superior. Alas, in the name of no car payment, we decided to take the plunge and swap the old transmission out for a refurbished one.
Obviously, I am writing this now in basically 2020, so socket sizes, steps, etc. may be somewhat out of order, missing, or slightly incorrect. However, during the swap, I could find no step-by-step transmission swap guide specifically for our 2004 and the 42RLE trans. Given the length of time since doing this job, you’ll notice lots of holes for sure in my write-up. Feel free to comment and I can revise. Also see photos as those are arguably more helpful and can assist in following along. So here it goes.
**Use common sense judgement and adhere to all safety precautions noted on/with your tools. I hold no responsibility for any injuries or damage caused by following this write-up**
LINK TO PHOTOS --- https://imgur.com/a/qiwdo1V
Removal of transmission:
1. Place vehicle up on ramps and put parking brake all the way on! Place rock or something behind the back wheels. As you see, we did this in a gravel driveway at my folks house. We were up on ramps both with 2 pieces of 2x4 under them – so as to gain clearance to lower the trans down and out later on.
a. *We did all this with 1 floor jack – no transmission jack needed*
2. Place the transmission in Neutral and the transfer case in Neutral.
a. *neither of these may be necessary I cannot recall… *
3. Disconnect battery.
4. Drain transmission oil fluid (remove the pan). This helps remove some weight. It will continue to drain forever FYI so keep your catch pan there.
5. Drain the coolant system. You have to remove heater hoses. Could probably do just that, but we did radiator at the same time so it was required for us.
6. Remove coolant reservoir. Disconnect hoses at bottom.
7. Remove air filter box and intake hoses all the way back to the throttle body.
8. Remove oil filler neck. This allows space to remove the heater hoses.
9. Remove front grille facia (the plastic part that is body colored).
10. Putting a drain pan underneath to catch fluid, remove the transmission oil cooler located (if looking at the front of the car) to the lower left of the power steering cooler. See picture. It’s a long horizontal black thing. We also replaced the radiator which made access here easier, but not necessary.
a. **our ’04 Sport had a factory tow hitch on it which included a factory trans oil cooler. This part is ONLY available from the dealer. About $275. The version sold on RockAuto (at this time) was not correct for our vehicle. Do your research here.
b. If swapping the transmission, it is HIGHLY recommended you replace this and the trans oil cooler lines (also ONLY available from the dealership from what I saw) in case metal pieces got into them from the old trans crapping out. Do it. Don’t skimp if committing to a job this size already.
11. Remove trans oil cooler lines. These run from the cooler up front, along the passenger side, to the transmission. Remove at the transmission too.
a. **I took the heater hoses off as well to replace the valve cover gaskets during this job too. Can’t recall if those made it easier to access trans oil cooler lines.
12. Head back under the car now… remove trans oil cooler lines and all electrical connections from the transmission on both sides. This includes the input & output trans speed sensors. There are additional connections (maybe 3?) on the top which you will gain access to later once lower the trans slightly – see below.
13. Remove the shifter cable assembly, attached via a bracket (take that off too) from the transmission.
14. Remove the starter + heat shield on driver side of vehicle.
15. Remove the Y-pipe exhaust assembly. Disconnect it right ahead of the muffler – easy. Disconnect it from the exhaust manifolds – PITA. The connection at the manifolds are these stupid v-band clamps which I now despise.
16. Remove the secondary driveshaft – the one that connects from transfer case to drive the front wheels when 4WD engaged. 8mm wrench.
17. Remove the primary driveshaft from back of the transmission. If able to, just drop it down and keep connected to rear axle.
18. I am fuzzy here…. But remove the transfer case. I believe it bolted to the back of the transmission (?). Unbolt and should slide off since you took out driveshaft. I would have to climb back under car to look again.
a. **There is a seal between where the transfer case mounts to the transmission, a rubber circular gasket. Upon removal we noticed our gasket was torn. A new one was a DEALER ONLY part of less than $10. I would replace anyhow just to be safe.
19. Drain the trans oil fluid from the transfer case. You will be doing a DRY FILL of BOTH the transfer case and transmission at the end remember.
20. Placing your floor jack under the transmission cross member support and stabilizing, remove all cross-member bolts. I believe 3 (?) on each side.
21. Loosen (but do not yet remove) the bolts holding the transmission to the flywheel / back of engine.
22. Slightly lower your floor jack (holding the transmission) and look up top the trans. Here you will see those additional electrical connections noted earlier + access to the remaining trans/engine connection bolts. Undo connections and remove these bolts.
23. Remove previously loosened bolts holding trans to engine.
24. Lower your jack, pull it towards rear of the vehicle – halfway there! Transmission is out! Take a break and grab a well-deserved beer.
There are numerous companies who will sell you a refurbished transmission. I was between Jasper and Street Smart Transmission Authority. I ended up going with Street Smart. Idk why, they did have a 3-year unlimited mile warranty, but I’m sure others did too. Their customer service was great I will say, over phone and email, to return our old transmission + deal with some post-install issues I have had with the unit in it just being a 42RLE lol (that should be another post). My 3-year warranty period ends in March ’20 and the car has 141,*** miles on it now.