NJallDAY
Full Access Member
This write up is for those of you that need to relocate your fluid bottle due to a smaller bumper or just a replacement for a cracked OE bottle.
Things you need:
Material:
1.5L coolant overflow bottle $9 at advanced auto or autozone.
16 or18 gauge wire
Electrical tape or shrink tubing
Sheet metal screws or self taping screws
Original fluid pump
Tools:
Wire strippers
Drill
Metal drill bit (step bits work good)
3/4 spade bit or hole saw.
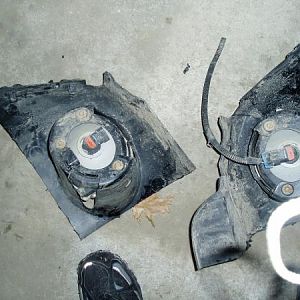
First thing you need to do is remove your original fluid bottle. Unplug the connector from the fluid pump along with the two hoses, wrap a piece of tape around the hose on the black nipple so they dont go on reversed later. you also need to remove the connector from the low coolant sensor. Theres a 10mm bolt holding the bottle on behind the inner wheel well and clip towards the front of the bottle. Once you have the bottle off gently remove the pump from the bottle and remove the rubber grommet as well. Now that the pump is removed its a good idea to clean out the filter on the inlet end of the pump(mine had some flemmy looking stuff rinse out) put everything aside for later.
Next get you drill with 3/4 spade bit or hole saw and drill a hole in the right side of the bottle, down as low as possible.
Next take the original grommet and push it through the hole so that the end is tight against the outside of the bottle making sure it isnt wrinkled. Then push the pump inlet through the grommet until it fits snug. (You ca. Use a sealant to make sure its water tight but the pressure of the pump inlet will push the grommet against the hole and form an extremely tight seal)
Now your ready to install your bottle, the best fit is behind the air box. Attach the supplied hanger to the bottle and hold in place and mark and drill your holes with a step bit or metal bit.(using wd40 helps the bit cut through the metal.)
Next step will be extending the pump wires. I had some 18gauge laying around but any auto parts store sells rolls for about $5. Cut one lead at a time, strip and add your length of wire in between. Make sure your extending the pump wire and not the low coolant sensor, it isnt needed.2 10" lengths should be enough. I soldered my splices and then used shrink tubing but solder isnt needed.
Now connect your plug back into the pump. And slide the hoses over the nipples making sure the front hose goes to the F and the rear hose goes to the R markings on the pump. Fill with washer fluid and check to make sure its in working order.
Things you need:
Material:
1.5L coolant overflow bottle $9 at advanced auto or autozone.
16 or18 gauge wire
Electrical tape or shrink tubing
Sheet metal screws or self taping screws
Original fluid pump
Tools:
Wire strippers
Drill
Metal drill bit (step bits work good)
3/4 spade bit or hole saw.
First thing you need to do is remove your original fluid bottle. Unplug the connector from the fluid pump along with the two hoses, wrap a piece of tape around the hose on the black nipple so they dont go on reversed later. you also need to remove the connector from the low coolant sensor. Theres a 10mm bolt holding the bottle on behind the inner wheel well and clip towards the front of the bottle. Once you have the bottle off gently remove the pump from the bottle and remove the rubber grommet as well. Now that the pump is removed its a good idea to clean out the filter on the inlet end of the pump(mine had some flemmy looking stuff rinse out) put everything aside for later.
You must be registered for see images attach
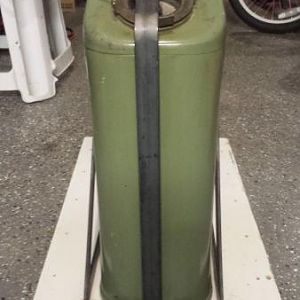
Next get you drill with 3/4 spade bit or hole saw and drill a hole in the right side of the bottle, down as low as possible.
You must be registered for see images attach
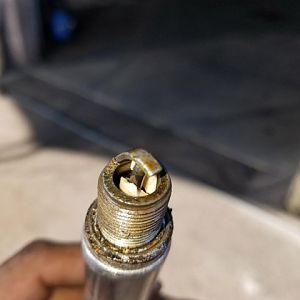
Next take the original grommet and push it through the hole so that the end is tight against the outside of the bottle making sure it isnt wrinkled. Then push the pump inlet through the grommet until it fits snug. (You ca. Use a sealant to make sure its water tight but the pressure of the pump inlet will push the grommet against the hole and form an extremely tight seal)
You must be registered for see images attach
Now your ready to install your bottle, the best fit is behind the air box. Attach the supplied hanger to the bottle and hold in place and mark and drill your holes with a step bit or metal bit.(using wd40 helps the bit cut through the metal.)
You must be registered for see images attach
Next step will be extending the pump wires. I had some 18gauge laying around but any auto parts store sells rolls for about $5. Cut one lead at a time, strip and add your length of wire in between. Make sure your extending the pump wire and not the low coolant sensor, it isnt needed.2 10" lengths should be enough. I soldered my splices and then used shrink tubing but solder isnt needed.
You must be registered for see images attach
Now connect your plug back into the pump. And slide the hoses over the nipples making sure the front hose goes to the F and the rear hose goes to the R markings on the pump. Fill with washer fluid and check to make sure its in working order.
You must be registered for see images attach