ptsb5a
Full Access Member
OK, seeing as some of you wanted an axle seal how to, here it is...
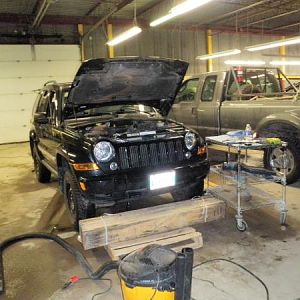
First off, secure your KJ on a hoist/lift or stands. I'm lucky to be a member of a local off-road club and have access to a really well equiped shop. Housing prices here are ******** and I couldn't afford to live in a house with a garage and eat at the same time. Besides, it's a nice place to keep my tools.
Start the disassemble process, remove the wheel, brake caliper, brake pads, brake caliper retaining bracket, and the rotor. Remember to keep the rotor and pads away from grease and oil. I kept them on some thick paper shop towels away from the rest of my pile of stuff. Don't lose the wee anti rattle clips either, they're not cheap!!
Remove the upper ball joint nut (1 1/16"), lower ball joint nut(22mm), tie rod end nut(21mm), clevis bolts upper and lower(21mm) and the 36mm axle nut. You may have to pull out the BFH (big F****** hammer) and massage the steering knuckle a little to break the ball joints free. Don't use a pickle fork, you'll wreck the boots and don't actually whack on the joints themselves. You'll hurt them. With all the bits out of the way, pull the clevis out and remove the axle. A sharp tug should do it. All that holds the axle into the carrier is a wee circlip. If the sharp tug doesn't do it, use a small prybar between the diff housing the the CV cup, pry lightly outboard, the shaft should pop out. You should be about here... staring at the leaky axle seal.
Now remove the old axle seal with a seal removal tool, I should of taken a picture of it for clarity.
EDIT:::: here's the tool
Clean the mating surfaces really well to ensure that the new seal doesn't leak either. Check out the stupid little plastic bushing that Dana/Spicer cheaped out on.
Lay all the parts out and inspect them, now is the time to check for cracking boots and stuff.
Push the new seal into place. I used a socket the same size as the seal's flange to tap it into place. Try to make sure that it goes in evenly, if it gets jammed in all ****-eyed, you might need to go and get another seal.
Now jam your axle back in and reassemble the works. Hey, while you've got the brake caliper bracket out, remove the pins, clean 'em and lube 'em like so...
When you put stuff back together, do it well, pay attention to the details. You never know when you'll get to make a good impression. Check out this cotter pin. Freaking hot....
Also take the time to poke around and check out other stuff that needs to be looked at once in a while. It's better to identify potential problems and rectify them before they become show stoppers. Also check out your handiwork and revel in your own ingenuity. Like these panels I made when My pinch weld pounding didn't go so well....
Now, before I put the heap back on the ground, do you think that I should check the gear oil level? Damn skippy.
So, remove the skid, and check the gear oil level, top up as required..
While the skid is off, clean it and reapply a coat of corrosion preventative compound. I use basic black Tremclad. Once dry, bolt it back into place too...
Lower the Jeep, torque the wheel lugs and start to clean up.
I like to clean these...
and these...
and these...
by now I'm pretty tired of wiping down tools so I skip the rest.
I finished by backing out of the bay and sweeping the floor clean, then hosing it down and scrubbing. That's how I roll, but, they're also the club rules for using the place.
Anyways, sit back, enjoy the smug satisfaction that you've done something that most can't or probably don't care to do and you got to spend some quality time with your kJ.
Rock on.
First off, secure your KJ on a hoist/lift or stands. I'm lucky to be a member of a local off-road club and have access to a really well equiped shop. Housing prices here are ******** and I couldn't afford to live in a house with a garage and eat at the same time. Besides, it's a nice place to keep my tools.
You must be registered for see images attach
Start the disassemble process, remove the wheel, brake caliper, brake pads, brake caliper retaining bracket, and the rotor. Remember to keep the rotor and pads away from grease and oil. I kept them on some thick paper shop towels away from the rest of my pile of stuff. Don't lose the wee anti rattle clips either, they're not cheap!!
You must be registered for see images attach
Remove the upper ball joint nut (1 1/16"), lower ball joint nut(22mm), tie rod end nut(21mm), clevis bolts upper and lower(21mm) and the 36mm axle nut. You may have to pull out the BFH (big F****** hammer) and massage the steering knuckle a little to break the ball joints free. Don't use a pickle fork, you'll wreck the boots and don't actually whack on the joints themselves. You'll hurt them. With all the bits out of the way, pull the clevis out and remove the axle. A sharp tug should do it. All that holds the axle into the carrier is a wee circlip. If the sharp tug doesn't do it, use a small prybar between the diff housing the the CV cup, pry lightly outboard, the shaft should pop out. You should be about here... staring at the leaky axle seal.
You must be registered for see images attach
Now remove the old axle seal with a seal removal tool, I should of taken a picture of it for clarity.
You must be registered for see images attach
EDIT:::: here's the tool
You must be registered for see images attach
Clean the mating surfaces really well to ensure that the new seal doesn't leak either. Check out the stupid little plastic bushing that Dana/Spicer cheaped out on.
Lay all the parts out and inspect them, now is the time to check for cracking boots and stuff.
You must be registered for see images attach
Push the new seal into place. I used a socket the same size as the seal's flange to tap it into place. Try to make sure that it goes in evenly, if it gets jammed in all ****-eyed, you might need to go and get another seal.
You must be registered for see images attach
Now jam your axle back in and reassemble the works. Hey, while you've got the brake caliper bracket out, remove the pins, clean 'em and lube 'em like so...
You must be registered for see images attach
When you put stuff back together, do it well, pay attention to the details. You never know when you'll get to make a good impression. Check out this cotter pin. Freaking hot....
You must be registered for see images attach
Also take the time to poke around and check out other stuff that needs to be looked at once in a while. It's better to identify potential problems and rectify them before they become show stoppers. Also check out your handiwork and revel in your own ingenuity. Like these panels I made when My pinch weld pounding didn't go so well....
You must be registered for see images attach
Now, before I put the heap back on the ground, do you think that I should check the gear oil level? Damn skippy.
So, remove the skid, and check the gear oil level, top up as required..
You must be registered for see images attach
While the skid is off, clean it and reapply a coat of corrosion preventative compound. I use basic black Tremclad. Once dry, bolt it back into place too...
You must be registered for see images attach
Lower the Jeep, torque the wheel lugs and start to clean up.
I like to clean these...
You must be registered for see images attach
and these...
You must be registered for see images attach
and these...
You must be registered for see images attach
by now I'm pretty tired of wiping down tools so I skip the rest.
I finished by backing out of the bay and sweeping the floor clean, then hosing it down and scrubbing. That's how I roll, but, they're also the club rules for using the place.
Anyways, sit back, enjoy the smug satisfaction that you've done something that most can't or probably don't care to do and you got to spend some quality time with your kJ.
Rock on.
Last edited: