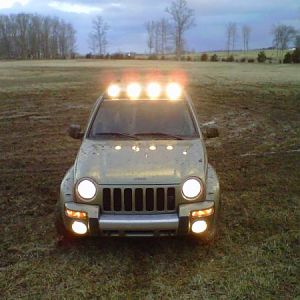
My 2008 KK's headlights were looking pretty shabby. The headlights are not phenomenal anyway on the KK, but in their condition they were scattering light instead of focusing it down the road. New headlights can be $250 each! But a headlight restoration kit is only about $19, so I figured I'd give it a shot. The Sylvania Headlight Restoration Kit has a lifetime warranty, so that's what I got.
Here are the housings removed from the Jeep. You can see how scratched up and faded they are. 11 years of UV and road debris have taken their toll.
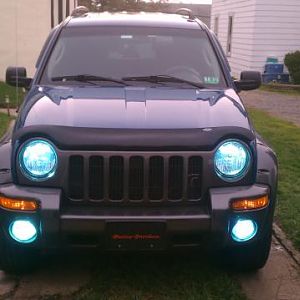
I also had a fog light bulb out, so I decided to replace the fogs while I was at it. I went with LED's from GTR lighting, which get amazing reviews. I have my eye on the GTR Ultra 2 LED headlight bulbs for when the time comes. The Silverstar headlight bulbs are still ok for now.
Here is a comparison of the GTR LED fog light bulb on the left with the Sylvania Silverstar fog light bulb on the right. Notice that the height and position of the LED chips mimics the location of the lighting filament in the conventional bulb.
Fogs installed. Note I have them positioned so the light gets thrown sideways, not up and down which would blind oncoming drivers. The GTR bulbs have an adjustable allen key screw that allows you to fine tune the bulb's direction.
Here's the Jeep with the grille and headlights removed. I'm starting to mask off the turn signals with painter's tape so that I won't damage the Jeep's paint when I am sanding them.
I reinstalled the headlights and masked off the rest of the paint. I wanted to be able to work in a single area to simplify the headlight restoration process. Thus, I put all the light housings back on the vehicle.
The headlight restoration kit came with just about everything needed to perform the work, except for the painter's tape and a spray bottle with water. (All of the sanding is wet sanding.) Follow the directions and you will be good.
1. Spray the headlight activator on the plastic and let sit 30 seconds. This dissolves the yellow oxidized plastic from the outside of the housings. Then wash.
2. Wet sand with 400 grit sandpaper for 5 minutes. Here's what it looked like after this stage. Pretty hazy.
3. Repeat the previous step with 1000 grit and then 2000 sandpaper. Things are looking better.
4. Repeat again using the polishing compound, then wash and dry.
5. Spray the activator on it again, let sit 30 seconds, then wash and dry.
6. The final treatment is the UV resistant coating. This needs to be applied with a rubber glove because it isn't good for you. You put it on a folded paper towel and wipe across the lens in a single direction, just once. You do several passes from top to bottom. What a difference!
So, how much of a change did we get?
Before restoring (but with GTR fog lights):
After restoring:
I'm very happy with how things turned out. You have to wait 6 hours before driving, so that the UV resistant coating can cure. I think I'll take it through a car wash tomorrow to get rid of the tan "mud" which is actually just plastic dust from the sanding.
You must be registered for see images attach
Here are the housings removed from the Jeep. You can see how scratched up and faded they are. 11 years of UV and road debris have taken their toll.
You must be registered for see images attach
I also had a fog light bulb out, so I decided to replace the fogs while I was at it. I went with LED's from GTR lighting, which get amazing reviews. I have my eye on the GTR Ultra 2 LED headlight bulbs for when the time comes. The Silverstar headlight bulbs are still ok for now.
You must be registered for see images attach
Here is a comparison of the GTR LED fog light bulb on the left with the Sylvania Silverstar fog light bulb on the right. Notice that the height and position of the LED chips mimics the location of the lighting filament in the conventional bulb.
You must be registered for see images attach
Fogs installed. Note I have them positioned so the light gets thrown sideways, not up and down which would blind oncoming drivers. The GTR bulbs have an adjustable allen key screw that allows you to fine tune the bulb's direction.
You must be registered for see images attach
Here's the Jeep with the grille and headlights removed. I'm starting to mask off the turn signals with painter's tape so that I won't damage the Jeep's paint when I am sanding them.
You must be registered for see images attach
I reinstalled the headlights and masked off the rest of the paint. I wanted to be able to work in a single area to simplify the headlight restoration process. Thus, I put all the light housings back on the vehicle.
You must be registered for see images attach
The headlight restoration kit came with just about everything needed to perform the work, except for the painter's tape and a spray bottle with water. (All of the sanding is wet sanding.) Follow the directions and you will be good.
1. Spray the headlight activator on the plastic and let sit 30 seconds. This dissolves the yellow oxidized plastic from the outside of the housings. Then wash.
2. Wet sand with 400 grit sandpaper for 5 minutes. Here's what it looked like after this stage. Pretty hazy.
You must be registered for see images attach
3. Repeat the previous step with 1000 grit and then 2000 sandpaper. Things are looking better.
You must be registered for see images attach
4. Repeat again using the polishing compound, then wash and dry.
5. Spray the activator on it again, let sit 30 seconds, then wash and dry.
6. The final treatment is the UV resistant coating. This needs to be applied with a rubber glove because it isn't good for you. You put it on a folded paper towel and wipe across the lens in a single direction, just once. You do several passes from top to bottom. What a difference!
You must be registered for see images attach
So, how much of a change did we get?
Before restoring (but with GTR fog lights):
You must be registered for see images attach
After restoring:
You must be registered for see images attach
I'm very happy with how things turned out. You have to wait 6 hours before driving, so that the UV resistant coating can cure. I think I'll take it through a car wash tomorrow to get rid of the tan "mud" which is actually just plastic dust from the sanding.
")