
Could call it cowl removal as that is the only tricky part.
So apparently the PO of mine must have had a partially plugged nozzle on the driver's side. They must have tried to ream it out and the result was a messed up exit port. Too big to allow any pressure and spray pattern was just a stream or trickle. I've put up with the lazy stream of washer that would just clear the blade for about 9 years. Finally, thanks to a thread on here, I found that a replacement nozzle is readily available. Ordered (Amazon) from some dealership in Duncanville Texas for about 16 bucks. Tiny piece of plastic but 16 bucks. :favorites68:
The cat liked it:
Remove Wiper arm: I used a small pitman arm puller I had to do some tie-rod ends a while back. Made real quick work of breaking them free:
The pins near the hood gasket at the base of the cowl near the engine were very simple. Didn't get pics of these but a small pair of Channel Locks and the center just pops up and the pin comes right out. (Thanks teeje and uss2defiant)
You can see them here:
http://www.jeepkj.com/forum/f293/how-cabin-air-filter-27186/
Once these are out the cowl slides down toward engine to release molded clips that fit around bottom of windshield.
Windshield clips after removal:
Don't just horse it around at this point as the washer hose keeps things a bit tight. The washer fluid hose starts near the passenger side and is just clipped to the cowl by some built in clips. I lifted the front of the cowl (engine side) and just popped it out of all those points and detached the small elbow from each of the nozzle ends. The foam pieces at both sides near the hood hinges are just glued to the cowl with a dab of weatherstripping adhesive. They are tucked into the fender on the sides too but very flexible. I just popped the passenger side foam off to give more space to maneuver and slide the cowl out and then you can remove the whole thing.
Out:
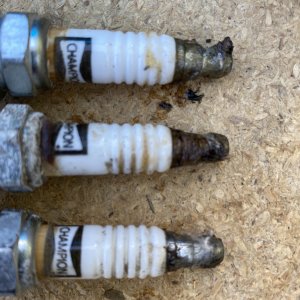
The old nozzle just popped out with some pliers. I wasn't concerned about breaking it as it was toast as you can see (new on right):
Continued in next post...
So apparently the PO of mine must have had a partially plugged nozzle on the driver's side. They must have tried to ream it out and the result was a messed up exit port. Too big to allow any pressure and spray pattern was just a stream or trickle. I've put up with the lazy stream of washer that would just clear the blade for about 9 years. Finally, thanks to a thread on here, I found that a replacement nozzle is readily available. Ordered (Amazon) from some dealership in Duncanville Texas for about 16 bucks. Tiny piece of plastic but 16 bucks. :favorites68:
The cat liked it:
You must be registered for see images attach
Remove Wiper arm: I used a small pitman arm puller I had to do some tie-rod ends a while back. Made real quick work of breaking them free:
You must be registered for see images attach
The pins near the hood gasket at the base of the cowl near the engine were very simple. Didn't get pics of these but a small pair of Channel Locks and the center just pops up and the pin comes right out. (Thanks teeje and uss2defiant)
You can see them here:
http://www.jeepkj.com/forum/f293/how-cabin-air-filter-27186/
Once these are out the cowl slides down toward engine to release molded clips that fit around bottom of windshield.
Windshield clips after removal:
You must be registered for see images attach
Don't just horse it around at this point as the washer hose keeps things a bit tight. The washer fluid hose starts near the passenger side and is just clipped to the cowl by some built in clips. I lifted the front of the cowl (engine side) and just popped it out of all those points and detached the small elbow from each of the nozzle ends. The foam pieces at both sides near the hood hinges are just glued to the cowl with a dab of weatherstripping adhesive. They are tucked into the fender on the sides too but very flexible. I just popped the passenger side foam off to give more space to maneuver and slide the cowl out and then you can remove the whole thing.
Out:
You must be registered for see images attach
The old nozzle just popped out with some pliers. I wasn't concerned about breaking it as it was toast as you can see (new on right):
You must be registered for see images attach
Continued in next post...