SDLiberty
Full Access Member
OK so after gathering info and how-to ideas from you. It's time i give back a little.
Please keep in mind that oil fittings could leak. Causing potential engine problems, Fires, Break downs, and One hell of a mess if not tightened, checked and re-checked. All fittings and sending units are under pressure while engine is operating. DO NOT loosen fittings while engine is running!!! Thank you!
Things you will need:
Gauge pod from Lotek
Preferred style/type oil pressure gauge to be used
18 gauge wire
1/8 x 1 1/2 nipple
1/8 T fitting
1/8 close nipple
1/8 npt x 1/4 compression elbow
1/8 npt x 1/4 compression fitting
1/4 copper tubing
1, 2-2.5 hose clamp
Use Thread sealant on all threads!!
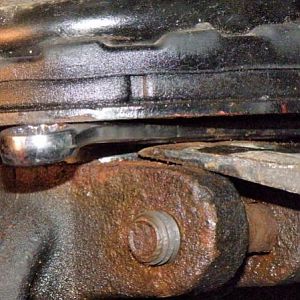
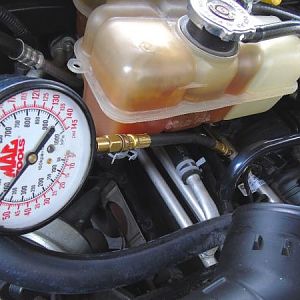
Easiest time to do this is during an oil change. Oil filter must be removed to remove OEM sending unit. Sender is just above oil filter. Unplug sender and tuck out if the way. YOU NEED THIS! You will need a rather large deep socket to remove the sending unit from block. I didn't have one, so short vise grips did the trick. Not much room as you can tell. Use caution when removing not to break the plastic plug housing. Connect all fittings with sealant and tighten. You may have noticed the OEM sender pointed towards the front of the vehicle. Once your fittings are together, it will now face the driver side wheel well. As shown in pictures.
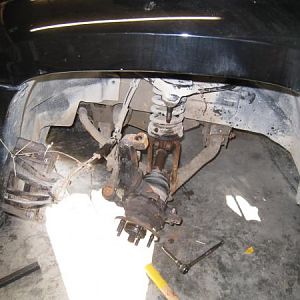
Next you want to find a place for the aftermarket sending unit. (This is called a remote sending unit. Typically used on high vibration race motors, etc. ) I found a spot just under the battery box and fuse block. Next to the horn. Disconnect and remove the battery and battery tray. Position you sender and screw hose clamp to wheel well. This will hold sender in place.
Run your piece 1/4 copper tubing from t block to sender. Don't cut to short. Give yourself enough room for a few slight bends. I will be changing mine from copper tubing to a 1/4 breaded line in the future. But really no need to. Copper tubing seems to be holding up rather well. Breaded line would be just for looks really.
Now that the plumbing is done. On to the cab. Pull down the compartment under the steering wheel. Remove kick plate by peddles. If you pull down the carpet on left side of peddles you should see a little dimple in fire wall to drill through. This is the thinnest point I can tell. (SORRY NO PICS) Will take some work to get a grommet on there but it's better to have one than not. Run your 18 gauge wire to your sender on the wheel well and connect. With this done, you can now re install Batt. tray and Battery. Don't forget to plug OEM sender back in. Install NEW oil filter and fill with oil. DOUBLE CHECK ALL FITTINGS. Start engine and check for leaks. At 75+ psi it won't take long to make a real mess. If no leaks.... On to your gauge pod and install of you new gauge. Follow install directions for your specific gauge. Failure to do so could result in and electrical fire.
I painted my pod duplicolor flat black and the passenger side to match. That color actually matches the dash really well
Hope this covered all of it?? If there are question, I'll be happy to answer them
Please keep in mind that oil fittings could leak. Causing potential engine problems, Fires, Break downs, and One hell of a mess if not tightened, checked and re-checked. All fittings and sending units are under pressure while engine is operating. DO NOT loosen fittings while engine is running!!! Thank you!
Things you will need:
Gauge pod from Lotek
Preferred style/type oil pressure gauge to be used
18 gauge wire
1/8 x 1 1/2 nipple
1/8 T fitting
1/8 close nipple
1/8 npt x 1/4 compression elbow
1/8 npt x 1/4 compression fitting
1/4 copper tubing
1, 2-2.5 hose clamp
Use Thread sealant on all threads!!
Easiest time to do this is during an oil change. Oil filter must be removed to remove OEM sending unit. Sender is just above oil filter. Unplug sender and tuck out if the way. YOU NEED THIS! You will need a rather large deep socket to remove the sending unit from block. I didn't have one, so short vise grips did the trick. Not much room as you can tell. Use caution when removing not to break the plastic plug housing. Connect all fittings with sealant and tighten. You may have noticed the OEM sender pointed towards the front of the vehicle. Once your fittings are together, it will now face the driver side wheel well. As shown in pictures.
You must be registered for see images
You must be registered for see images
Next you want to find a place for the aftermarket sending unit. (This is called a remote sending unit. Typically used on high vibration race motors, etc. ) I found a spot just under the battery box and fuse block. Next to the horn. Disconnect and remove the battery and battery tray. Position you sender and screw hose clamp to wheel well. This will hold sender in place.
You must be registered for see images
Run your piece 1/4 copper tubing from t block to sender. Don't cut to short. Give yourself enough room for a few slight bends. I will be changing mine from copper tubing to a 1/4 breaded line in the future. But really no need to. Copper tubing seems to be holding up rather well. Breaded line would be just for looks really.
Now that the plumbing is done. On to the cab. Pull down the compartment under the steering wheel. Remove kick plate by peddles. If you pull down the carpet on left side of peddles you should see a little dimple in fire wall to drill through. This is the thinnest point I can tell. (SORRY NO PICS) Will take some work to get a grommet on there but it's better to have one than not. Run your 18 gauge wire to your sender on the wheel well and connect. With this done, you can now re install Batt. tray and Battery. Don't forget to plug OEM sender back in. Install NEW oil filter and fill with oil. DOUBLE CHECK ALL FITTINGS. Start engine and check for leaks. At 75+ psi it won't take long to make a real mess. If no leaks.... On to your gauge pod and install of you new gauge. Follow install directions for your specific gauge. Failure to do so could result in and electrical fire.
I painted my pod duplicolor flat black and the passenger side to match. That color actually matches the dash really well
You must be registered for see images
You must be registered for see images
Hope this covered all of it?? If there are question, I'll be happy to answer them