Stampey
Full Access Member
UPDATED-- Status Complete
Hey everybody. I have all the materials, and will be attempting to make my own light bar for under 100$.
WELL ITS DONE!!!!! \ / \/ \/ .
TOTAL COST:46.87$$
40" hanger rack: 11.49
Flat pl. slot: 5.88
U-bolts x 2 : 1.96
Extra wire x2: 7.00
Flex tubing: .99
Halogen lightsx4:19.55
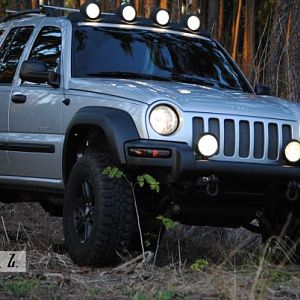
I finished when it was dark so no good pictures to show how everything went together. For now pictures of them light up.
All thats left to do, is to adjust the lights, and find an area in the cab for the switches to go. I also need to trim some of the excess stuff i used to secure the Light bar to the roof rack.
Ok here goes...
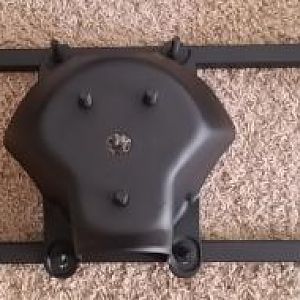
Step 1: First step i did was too get both the hanger bar rack (the grey piece) and the Flat metal piece "( the piece with holes every 1inch) centered. I then used 3 bolts to secure the flat metal piece to the underside of the hanger rack. as seen here.
Heres one of the bolts to secure the metal piece with the holes to the underside.-
Step:2 Next, Mark and drill the holes for your lights. Since the Hanger rack was 40 inches long, i decided to put my lights 10 inches apart. Drilling the holes was probably one of the most difficult parts of this project. After the holes are drilled, bolt on your lights-- just hand tightening will work for now.
Step 3: Next step is to get that baby up on our roof. Its your choice how far up on your roof rack to attach it. I chose to get it as close as i could to the front of the Roof rack. IMPORTANT. MAKE SURE IT IS CENTERED. If its not centered it will look pretty goofy.
Step 4: Using your two U-BOLTS secure it to your Roof rack. You may run into some difficulties at this point. If you lucky, the Holes on the Flat metal strip will line up with your roof rack. If not, like me you will need to drill, or enlarge the existing holes to make room for the bolts. Seen here--
Step 5: Now that the the bar is on your Jeep, you can tighten the bolts down. To take care of the excess Metal piece with holes, you can either hacksaw it off, or bend it down like i did.
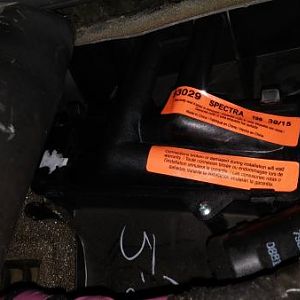
Step 6: Wiring. Wiring was fairly complicated. Sorry no real good pics of the wiring process. But to wire everything together, i used extra accessory wire to hardwire it directly to my battery, and to get the switches to reach my cab. Basically i used the "Bennett style of wiring" going through the plastic pieces down the front of my windshield channle.
seen here is a picture of the switches in my Cab.---
Step 7: Last step is to tighten all the bolts, and make sure to adjust your lights so they are shining all over the place. Also to make it more presentable, and weatherproof, i used some 99 cent wire cover to put over the wire.--
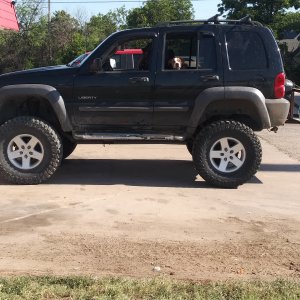
Step 8: Enjoy. Its up to you to decide where you want to put your switches.. I still havent placed them yet. For now heres a day time finished picture.. ---
- if you have any extra questions just ask.. \/
Hey everybody. I have all the materials, and will be attempting to make my own light bar for under 100$.
WELL ITS DONE!!!!! \
/ \/ \/ . TOTAL COST:46.87$$
40" hanger rack: 11.49
Flat pl. slot: 5.88
U-bolts x 2 : 1.96
Extra wire x2: 7.00
Flex tubing: .99
Halogen lightsx4:19.55
I finished when it was dark so no good pictures to show how everything went together. For now pictures of them light up.
You must be registered for see images
You must be registered for see images
You must be registered for see images
All thats left to do, is to adjust the lights, and find an area in the cab for the switches to go. I also need to trim some of the excess stuff i used to secure the Light bar to the roof rack.
Ok here goes...
Step 1: First step i did was too get both the hanger bar rack (the grey piece) and the Flat metal piece "( the piece with holes every 1inch) centered. I then used 3 bolts to secure the flat metal piece to the underside of the hanger rack. as seen here.
You must be registered for see images
Heres one of the bolts to secure the metal piece with the holes to the underside.-
You must be registered for see images
Step:2 Next, Mark and drill the holes for your lights. Since the Hanger rack was 40 inches long, i decided to put my lights 10 inches apart. Drilling the holes was probably one of the most difficult parts of this project. After the holes are drilled, bolt on your lights-- just hand tightening will work for now.
You must be registered for see images
You must be registered for see images
Step 3: Next step is to get that baby up on our roof. Its your choice how far up on your roof rack to attach it. I chose to get it as close as i could to the front of the Roof rack. IMPORTANT. MAKE SURE IT IS CENTERED. If its not centered it will look pretty goofy.
Step 4: Using your two U-BOLTS secure it to your Roof rack. You may run into some difficulties at this point. If you lucky, the Holes on the Flat metal strip will line up with your roof rack. If not, like me you will need to drill, or enlarge the existing holes to make room for the bolts. Seen here--
You must be registered for see images
Step 5: Now that the the bar is on your Jeep, you can tighten the bolts down. To take care of the excess Metal piece with holes, you can either hacksaw it off, or bend it down like i did.
You must be registered for see images
Step 6: Wiring. Wiring was fairly complicated. Sorry no real good pics of the wiring process. But to wire everything together, i used extra accessory wire to hardwire it directly to my battery, and to get the switches to reach my cab. Basically i used the "Bennett style of wiring" going through the plastic pieces down the front of my windshield channle.
seen here is a picture of the switches in my Cab.---
You must be registered for see images
Step 7: Last step is to tighten all the bolts, and make sure to adjust your lights so they are shining all over the place. Also to make it more presentable, and weatherproof, i used some 99 cent wire cover to put over the wire.--
You must be registered for see images
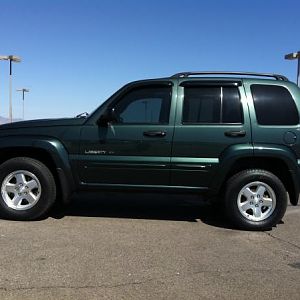
Step 8: Enjoy. Its up to you to decide where you want to put your switches.. I still havent placed them yet. For now heres a day time finished picture.. ---
You must be registered for see images
- if you have any extra questions just ask.. \
/