Well Hopefully I've picked the proper place to start a build thread. If not I'll move it if someone tells me where I should go. Lol (Don't take that one too serious!) So me and a buddy decided to go in on a project to keep from going stir crazy with this Covid thing and to see if we can make some money doing things the way we want. We have been looking for a couple of months for different projects and trying to realize what we can actually do limited to our space and time. So we came across this decent 2005 KJ that neither of us thought we could pass up, especially for the money. 
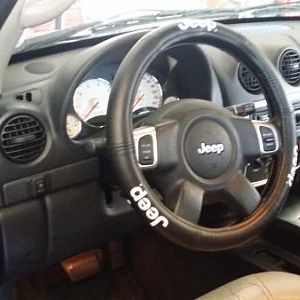
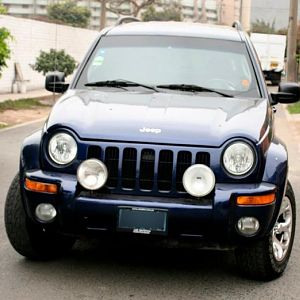
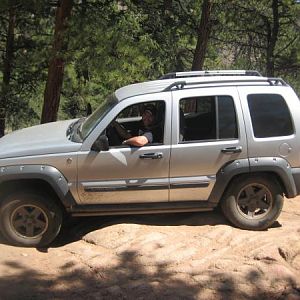
The KJ, a 2005 with 194K (yeah, yeah we know its a lot) however it runs like a champ. AC doesn't work, rear windows don't roll down, drivers door panel is broken, the roof and hood and drivers fender need paint attention. The radio's volume knob has a mind of its own, there's 5 mismatched tires on it, and the lights are all fogged up. See, how could you say no to this?
All good ! Anytime you can find a good running KJ & make some repairs, polishing paint etc, is good experience ! You never know you might even want to keep it..!!
Hey sounds perfect. I picked mine up in the same condition as yours from a neighbor for $400. Any maintenance since 39,000 was neglected. Best purchase I've ever made
So the first thing after getting her home was to figure out where we are going to start. So took her for a serious test drive and played with all the bells and whistles, which led to a ton of online shopping for parts. Ugh, now I had to wait a couple of days for them to start trickling in. First job was to figure out the AC issues. It's hot in Texas and this is a must for any vehicle, after some initial investigating, I found out that it had some of the usual jeep problems. Bad blower resistor pack, since I only had 1 speed on the fan motor, yep you guessed it high! So I removed the glove box door to access the blower resistor. Here is the new part, having had a couple of jeeps in the past I thought it was best to get the one with a good pigtail. I've had to repair this in the past. Luckily mine was perfectly fine. So just swap out the bad part for the new part. Easy enough to get to and swap out. Whaa-la, now I have all 4 speeds of blower motor. Yea!!!
If you're AC's out 99% of the time its the compressor/compressor clutch, meaning new compressor and condenser. then recharge the system and all good. That's what I had to do to mine.
Now that the blower works, I put some gauges on it to see what kind of pressures I had. A big fat ZERO.... Hmm there's a bad seal or hole some where. Well after some messing with it I found that the front condenser had a hole in it. So I bought an AC kit online with new seals, oil, dryer, and orifice tube (not sure if that's what jeep calls it) in the line. I picked up some refrigerant locally so I could finish the system out. So after flushing out the old lines and evaporator that I was keeping I decided to pull the Compressor to make sure and put in a proper amount of oil. before I created a vacuum in the system. As I was pulling the compressor out I noticed a broke MAP sensor. Yikes. So a quick run over to the auto parts store for a replacement. For good measure I also but on a new belt since I was already in their. With the sensor replaced and the Compressor oiled and back in, it was time to evacuate the system and recharge it. Working AC! And amazingly the idle cleaned up a the same time, go figure right. lol. With the holidays fast approaching, it was time to get busy on the paint work. It's going to get way to cold to paint if I don't hurray this up. Like I said the hood and roof were bad, and one spot on the drivers fender which bugged me.
By the way if anybody needs the Blower Motor Pigtail PM me about it since I wont be needing it now. So lets start by removing the roof trim. Luckily all you need to do is pry either end of the plastic covers apart to access the bolts that hold the rack on. Once you get the bolts, remove the Philips trim screws down the A pillar and door. Then you can peel off the roof gutter trim.
After removing the tri m and the 3rd brake light I noticed there was some rust around the brake light. Well that just means a little more work. Luckily its mainly surface so I don't need to weld in any replacement panels just clean it up really well seal the metal and prime it over. Now for the sanding fun. With all the sanding out of the way its not time to add some primer but first I've got to tape it all up. Not to spray the primer and sealer where needed. And the rear.
Now its time to wet sand the surface so that I can add new paint. Tape it all up again and spray on the color. And now for the clear. On the roof, I decided that I would do a vinyl wrap with Flat Black so I was only worried about painting the window jam area since the roof paint was in good enough shape after sanding and adding sealer for the wrap.
With the AC & Paint taken care of it was time to take the electronics. So I decided to look into why both the rear windows didnt go up and down. I could hear the motors making noise but nothing happend. So I figured it was something to do with the linkage. First step take off the door panel. Take the screws out and unlatch the door handle rod and viola. Now to remove the water barrier seal. Hmm, why is this loose in the door. Well lets remove the linkage. But first I had to remove this bolt that the previous owner put in the inner door in to hold the window up. I guess this is an ingenious way of fixing it on the cheap but the parts are cheap for this. Found the replacement rod guides on eBay for like $11.00 for a full set of four. Well to remove the linkage and replace the guides. For those who don't know this is a simple job. You drill out a rivet, and bend a couple of metal tabs to remove the rod guide (white plastic on the end of the metal guide). Then slide off the broke plastic guide, thread the rod into the new guide, not to far to break the plastic guide. Slide it back into the metal guide, you can add a bit of white lithium grease here. Align up the angle guide that sits on the end and re-bend your metal tabs and add a replacement rivet. That easy.
So I repeated the same steps for the passenger side rear door to fix the window. I left the door panels off so I could replace the speakers. Next I decided to take care of the back glass since I was getting tired of it not opening all the way up. A couple of new struts. And whaa-la, no more constantly hitting my head. Lol Now for the Car stereo. I just can't have something simple and factory, I NEED IT ALL! So I went with something I have always liked. MB Quart. A set of components for the front doors and dash, 2 10 inch woofers for sub, some 6.5" coaxial's for the rear doors and a 6 channel amp to power it all. So now to replace the door speakers. I opted to install new baffles for each speaker. Along with some poly fiber fill. I made it quick and easy using some Metra brackets and plugs to install the speakers. No reason to make it difficult right? The baffles for me help the midrange and midbass sound better. Now to add some poly fill. And for the rear coaxial speakers. And the front doors.
Now I could simply find a place to shove the crossovers in the dash but I don't want to do that. Pop the covers apart and remove the Capacitor in the for the tweeters. This keeps you from blowing out the tweeters by eliminating part of the frequencies the tweeters can play. The Capacitor is the cylinder laying on the table. Latter I will solder these into the wiring for the audio system. For now I will just install the tweeters in the dash locations.
Speakers in now lets remove the radio. Pull the cover off and unplug the AC controls. Now to remove the seats and clean all the carpet stains and run some wires for the stereo. Yuck what did they spill in here? Vacuuming and carpet shampooing. You know that even after all of that, I only found like $ .15 cents under the carpet. I guess I can use that for the upgrades. lol So I took the time to run all my cables to the back. Secure them in place. Hmm. I bet I could build a Sub box in this tailgate? What do you think?
Just wonder if I can get all those wires through this factory grommet? I also don't like where the cigarette lighter plug is. I want to relocate that. How about right here. Yep that's better. Now what should I put in place of the old lighter plug? Yea, the USB & line level input for the new radio and lets add the amplifiers bass controller knob up front too. Wow look at that. all my wires fit in their nicely with room to spare. Now to put the interior back together. Now to test fit the new radio and make sure it aligns properly in the dash. Found out I had a light out in the AC controls. Ugh something else to order. So the neighbor has this old push bar he wants to sell me on the cheap. Hmm, I'm not sure. What do you think, Maybe this could work? Now to figure out how to do up the Sub Box? Do I put the amplifier back here too? I'll stop there for tonight. I have more to show.
Forget the cheap so called push bar also only changed the belt, why no idler / tensioner? I'm more worried about them blowing aprt than the belt. Guess having to drive an hour or two in the middle of the night to help 3 different friends changes my need on what to replace
Nice write up. Why did you eliminate the capacitor in the crossover? That eliminates the lower frequencies that the tweeter can't play.
You’ve done a crap load of work to bring your KJ back from the dead! Nice job. This is fun to watch. Thanks for the posts.
I'm not eliminating them. I just took removed them from that massive plastic box. I wired them into the harness for less space.
I did actually, I just didn't say anything...Whoops, sorry. Please forgive me as this is my only second time to do a write up. It was a belt kit from Rockauto. Sorry, I'll try to be more transparent in the future. Lol! I know your not razzing me.