Center Brake Light Corrosion Check/Change Bulb

Disclaimer: Links on this page pointing to Amazon, eBay and other sites may include affiliate code. If you click them and make a purchase, we may earn a small commission.

LibertyTC

Well-Known Member
Staff member
Moderator
Joined
Oct 24, 2008
Messages
9,098
Reaction score
1,766
Location
B.C. Canada
37599[/ATTACH]"]
You must be registered for see images attach

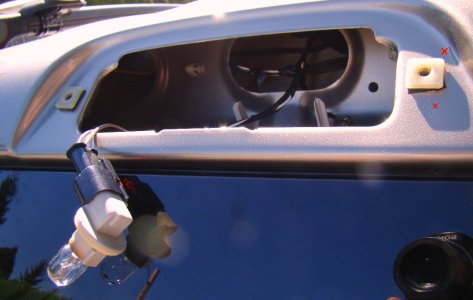
Cyclop Brake Light should be removed every once in a while to clean, as the plastic red lens puts wear marks onto the steel.
The socket is removable from red plastic lens.
Rust will eventually take over if you do not clean this area, and apply a thick coating of HJ's Meguires wax treatments!:icon_lol:

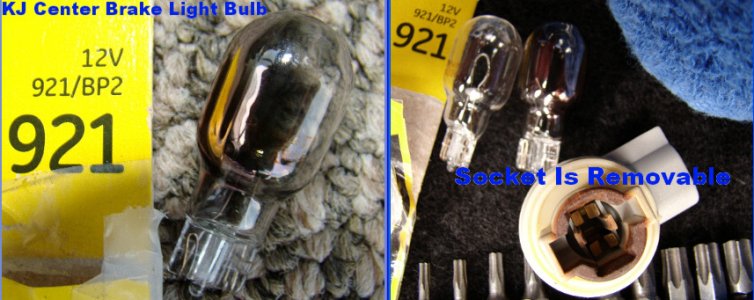
This is the 921 bulb that I removed, still working, but as you can see in diminished condition.
Try to find LL (long life) bulbs when replacing.
37601[/ATTACH]"]
You must be registered for see images attach

Use soap and water only to clean lens. Wax can be applied afterwards.
Do not use alcohol, it will stain the plastic.
 

Attachments

  • aEbMsaF.jpg
    aEbMsaF.jpg
    252.7 KB · Views: 1
  • 57B7iG9.jpg
    57B7iG9.jpg
    194.8 KB · Views: 1
Last edited:

Okura_hubby

Full Access Member
Joined
Sep 8, 2011
Messages
154
Reaction score
0
Location
north carolina
What I would recommend on the areas where the paint is breaking through is lightly sand down to ruff up the area. And area that has rust, sand it down to remove what is there. And get blue painters tape and mask off the body paint around the hole and paint the cavity with POR-15. This rust preventative paint works wonders. You can get it in Gloss Black, Silver and Clear. They have a semi flat black that doesnt come out consistent in gloss/flat. I would recommend the silver for the pocket.
You must be registered for see images

Site here >> http://www.por15.com/POR-15/productinfo/1GB/

Also there is LED bulbs for the 921 Type.

You must be registered for see images


Several styles on Amazon to choose from..
http://www.amazon.com/s/ref=nb_sb_noss?url=search-alias=automotive&field-keywords=recon+921+T-15
 
Last edited:

Okura_hubby

Full Access Member
Joined
Sep 8, 2011
Messages
154
Reaction score
0
Location
north carolina
After exmining mine tonight. I saw rubbing on both sides identical to the top pic on thread. I put some primmer over mine and touched it up. I think my original idea of putting POR15 would work, but ultimately the rubbing contact will eventually rub through the POR15, it would take longer but. I think the real answer is to stop the rubbing contact with the paint all together.
Maybe a solution is create a barrier so the hard plastic lense doesnt come direct contact to the paint, example I am talking is the rubber washer on either side of the grill around the headlight rounds between grill and fenders. I am thinking taking a piece of newspaper to make a template. The first part would be remove the lense. and tuck the bulb into the pocket. Then take the newspaper and hold over the pocket and take a marker and push the paper into the pocket and draw the outline of the pocket. Now take sizzors and cut the outline you traced.. Cut larger than needed then tweek after you get close. Place the new template back on the pocket. Does it fit flush to the parameter or does it need trimming. Keep doing till fits just a tiny bit large. Once it that is accomplished, mark the two plastic nut thing locations on the template and mark the hole for the lense/bulb opening. I would recommend using an exacto or razor blade to cut the square holes. Now retest your template. Does it fit good? If so take the template and transfer it to some thin rubber (big fat bicucle tube would work, maybe a motorcycle or car tube).. Just take the tube and cut it so it is a flat piece of rubber. Position the template so you can mark the rubber from your template. How you mark it may require some creativity. Maybe greese pencil, maybe sharpie.. Once it is marked, use an exacto knife and/or sizzors to cut the rubber gasket out.
Now you have a gasket.. How to secure it, you could just simply wedge between and go. Or you could get a little more agressive with some Silicon or RTV or...
This gasket should do two things.. First provide a barrier between the red lense and the paint of your Liby. And second seal the two better than currently.

What do you guys think of that idea?
 

RedKJ04

Full Access Member
Joined
May 10, 2009
Messages
104
Reaction score
0
Location
Northern Kentucky
Not a bad idea, about making a rubber gasket. That should take care of the problem as well.
When I noticed mine was rubbed through in those locations I sanded and repainted the spots and then removed the two plastic stand-offs on the back of the lens that were causing the wear. They are only there to keep you from tightening the light up too much so when you put it back be careful not to go too tight with it. This also allows you to compress the gasket more when you tighten it up as the light isn't held by the plastic stops and they won't be able to wear into the paint as they aren't there anymore. All that will touch is the gasket on the light.
 

Okura_hubby

Full Access Member
Joined
Sep 8, 2011
Messages
154
Reaction score
0
Location
north carolina
What is touching/rubbing on mine. Is the edge of the red lense. I thought about taking a file to it but I notice it is lightly rubbing on top and bottom along the paremeter of the lense. So either sanding it down with a file or gasket is the only solution I could think of. Taking the standoffs off would make the plastic more contact? I will have to relook..

I sanded mine a bit and put primer on it and some touchup. I ordered a LED for the bulb. Should be here next week. When I get it I will fabricate the gasket and take some pics.
 
Top