OME is on his way!

Disclaimer: Links on this page pointing to Amazon, eBay and other sites may include affiliate code. If you click them and make a purchase, we may earn a small commission.

spideyrdr

Full Access Member
Joined
Apr 9, 2012
Messages
73
Reaction score
0
Location
Centennial, CO
OME is INSTALLED!

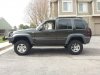
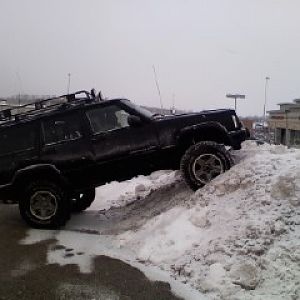
Back story: My 2005's spacer-lifted suspension is finally crapping out to the point where it drives poorly on road. I went offroading a couple of weeks ago and it performed 'meh', and with the lift height as measured from center to flare being around 20" vs. the ~22" it was not too long ago, I knew it was about that time. By 'meh' I mean I got over everything fine while traversing Left Hand Canyon here in Colorado, but bottomed out on the descent and I knew I shouldn't tackle anything overly challenging. The ARB bumper, Warn winch, and Hi-Lift jack hanging off the front don't help, nor do the skid plates, Super Skinks, and ever-present layer of dirt are weighing me down too much for that MOPAR suspension + spacer lift that was put on before I bought it 6.5 years and 28,000 miles ago.

So, fast forward to a smoking credit card later (today), and I've ordered up a set of OME shocks and springs for the front and rear, JBA's UCA's, Teraflex bumpstops, and a few additional items that I may or may not incorporate once it's time to the install (spacer plates for the front, (4) upper rear spring isolaters for the rear). I am very anxious to get the kit on since I've known for 6+ months that it was about time, but hated to pull the trigger on such a large purchase.

I guess there's not much I'm saying here other than venting / sharing. I'm no suspension guru, so this will be a new install for me but am relatively capable. I was |<-this->| close to buying the "Tommudd's Econo 3.5" Lift Kit KJ" from JBA instead, but a few concerns kept me from going that route. I can't wait for that particular kit to be thoroughly tested, reviewed, and vetted, because it has some attractive promises.

Meanwhile, I'll be looking forward to getting back 2 or so inches of lift that's evaporated over the last year or so AND better on road manners and no more bottoming the $*!% out on the way down trails. If anyone's got any words of advice on the install process, "did you remember to get...?" thoughts, or general "wtf were you thinking" or "great choice" feedback, I'm all ears.

Trail on!

Jamie
 
Last edited:

tommudd

Moderator
Staff member
Moderator
Joined
Jul 14, 2005
Messages
22,456
Reaction score
3,643
Location
Southeastern Ohio
Good luck since we don't have a full list of everything you purchased we can't comment on if you got everything ha ha
As far as everything tested on the Econo kit it has been and continues to be tested. I ran the first setup for a while and its now on another KJ being driven daily with no issues.
But you got a great kit as well thats been proven time and time again
 

TwoBobsKJ

Full Access Member
Joined
Jan 28, 2011
Messages
2,637
Reaction score
17
Location
Northern Ohio
Looks like you ordered everything you'll need for a great lift!

As far as the install goes...Have a tire shop assemble the front shocks & springs for you. "Don't try this at home..." Work out a deal where they do the assembly and an alignment for one bundled price. They'll have the fronts done by the time you complete the rear spring and shock installation.

The only thing you didn't mention was rear bumpstops. Two hockey pucks - yes, real hockey pucks - bolted to the lower spring perch work great. And yes, install the front spacer plate and at least one rear upper isolator. To put them on later means you'll need to tear everything apart again. Also consider putting a two or three 2" conduit nuts on the bottom of the shock to lift the clevis 1/2" or 3/4" depending on how many you use.

When installing the front you may need to use ratchet straps to pull the clevis fork into position to get the bolt through the fork and the lower control arm. Don't tighten the upper shock mount bolts all the way until the lower clevis bolt is in place. Attach the strap to the other side of the undercarriage and around the fork and tighten until the fork and control arm line up and slide the bolt in.

Other than that follow the installation How-To here on JeepKJ. And of course take come pics and show us your rig when you're all done! :happy160:

Bob
 

spideyrdr

Full Access Member
Joined
Apr 9, 2012
Messages
73
Reaction score
0
Location
Centennial, CO
Good luck since we don't have a full list of everything you purchased we can't comment on if you got everything ha ha
As far as everything tested on the Econo kit it has been and continues to be tested. I ran the first setup for a while and its now on another KJ being driven daily with no issues.
But you got a great kit as well thats been proven time and time again

I have no doubts the econo lift is sweet, and is priced well, but I just was not quite sold on the Ironman equipment as much as OME. I have tons of respect for the kit you endorse, just not ballsy enough to be running it. :)
 

spideyrdr

Full Access Member
Joined
Apr 9, 2012
Messages
73
Reaction score
0
Location
Centennial, CO
Looks like you ordered everything you'll need for a great lift!

As far as the install goes...Have a tire shop assemble the front shocks & springs for you. "Don't try this at home..." Work out a deal where they do the assembly and an alignment for one bundled price. They'll have the fronts done by the time you complete the rear spring and shock installation.

The only thing you didn't mention was rear bumpstops. Two hockey pucks - yes, real hockey pucks - bolted to the lower spring perch work great. And yes, install the front spacer plate and at least one rear upper isolator. To put them on later means you'll need to tear everything apart again. Also consider putting a two or three 2" conduit nuts on the bottom of the shock to lift the clevis 1/2" or 3/4" depending on how many you use.

When installing the front you may need to use ratchet straps to pull the clevis fork into position to get the bolt through the fork and the lower control arm. Don't tighten the upper shock mount bolts all the way until the lower clevis bolt is in place. Attach the strap to the other side of the undercarriage and around the fork and tighten until the fork and control arm line up and slide the bolt in.

Other than that follow the installation How-To here on JeepKJ. And of course take come pics and show us your rig when you're all done! :happy160:

Bob

Thanks for the advice Bob! Yeah, I didn't mention the rears - I do plan to do the puck bumpstops in the rear. I didn't order the pucks - going to swing by a sports store though!

Good tip on the front assembly. I've got a buddy who is capable of doing the assembly, but if that doesn't pan out, I'll try your advice and get one shop to do it AND the alignment.

I've read over the how-to's on the install and definitely appreciate the guys who have done it already and their tips. The one thing sorely missing from most of the instructions is to have a cold beer or two on hand for yourself and and helpers. I get so frustrated that this vital step is so often missed in how-to's!

Cheers,
Jamie
 

tommudd

Moderator
Staff member
Moderator
Joined
Jul 14, 2005
Messages
22,456
Reaction score
3,643
Location
Southeastern Ohio
Beer bad during install
wait till you're done and then celebrate
Out of all I have done have never drank a beer during the install
too many things can be missed or forgotten
 

DJSKJ

Full Access Member
Joined
Oct 22, 2009
Messages
149
Reaction score
1
Location
California
Beer bad during install
wait till you're done and then celebrate
Out of all I have done have never drank a beer during the install
too many things can be missed or forgotten

Agree with that. Productivity decreases proportionally to amount of beer consumed.

DJ
 

TwoBobsKJ

Full Access Member
Joined
Jan 28, 2011
Messages
2,637
Reaction score
17
Location
Northern Ohio
Beer sure is a nice reward for a job well done - and a great looking Jeep! :happy160:

Bob
 

spideyrdr

Full Access Member
Joined
Apr 9, 2012
Messages
73
Reaction score
0
Location
Centennial, CO
Just a quick update. OME parts all arrived today and the remaining parts that I ordered from JBA should be here Friday. That's the good!

Now the bad.

1) I planned to assemble the front 'towers' ahead of time with new mounts that I had bought. The mounts arrived earlier, and the left side one had a spring isolator that looked odd. Sure enough, it won't fit IN the OME front spring like the iso that came with the right side mount. @(%# new left side mount will be here tomorrow.

2) I mistakenly thought the shocks themselves would come with (1) iso each. As in, the mount would have 1, the shock would have 1, and I would be able to assemble the 'towers'. Bonehead assumption on my part. I placed an order for a couple more of those today.

3) Since I have a Daystar-like spacer lift already installed in the front and the rear ("El Libertad" came like that when I bought it used), there ARE no lower iso's on the rear to re-use. Again, bonehead oversight on my part. Those are on order now too.

Apparently the take-away here is to make sure you have enough of the right iso's. If going from a spacer lift to a 'real' lift, even if you are reusing some of the existing spring isolators, you might need to get some more since the spacer lift replaces some of the iso's along the way.

Nothing like having a couple of hundred dollars worth of sproingy parts on hand that you literally can't do anything with! 100% my fault (well, except for the left mount that clearly has the wrong isolator, that wasn't my fault) but hopefully my experience and teeth gnashing will help some other poor sucker.

To be continued...

Cheers,
Jamie
 

tommudd

Moderator
Staff member
Moderator
Joined
Jul 14, 2005
Messages
22,456
Reaction score
3,643
Location
Southeastern Ohio
All comes with time and experience, do 10-15 more and you'll have it all down :Big Laugh:
 

spideyrdr

Full Access Member
Joined
Apr 9, 2012
Messages
73
Reaction score
0
Location
Centennial, CO
All parts are in and I got the front assemblies put together today! I went with the OME 970 spings because of the ARB bumper, winch, and Hi-Lift jack hanging off the front. I did one of the towers myself using (3) compressors, but it was a bit of a bear with the 970 springs. Not unsafe, just a really tight fit with the beefy 970 springs.

As I attempted the 2nd one, the shock sleeve (not sure if that's what it's called) got bound up slightly on the compressor fingers and it was just scaring the bejesus out of me. So I undid that one, took it to Peerless tire, and the dude did it for $20. Next time I am just taking it to these guys to put together - $20 is WELL worth it to avoid the risk and hassle of doing it myself with loaner tools.

Now, before anyone flames me for using compressors and doing it myself, I was fully aware how dangerous it can be. I did homework and knew I was undertaking a possibly lethal task. To mitigate this somewhat I used (3) compressors with a battery powered impact wrench and went slow. I also built a tower out of tires to work in in case it exploded sideways, and of course kept myself as clear as I could. In the end, I am glad I had the experience *grunt grunt grunt* but now that I know the Peerless tire guys down the road from me will do it for $20, I'm definitely going that route in the future.

I am really hoping to do the install this weekend - factors might prevent that but if I get to it, I'll be sure to do a before and after set of pics.

Cheers,
Jamie
 

TwoBobsKJ

Full Access Member
Joined
Jan 28, 2011
Messages
2,637
Reaction score
17
Location
Northern Ohio
...In the end, I am glad I had the experience *grunt grunt grunt* but now that I know the Peerless tire guys down the road from me will do it for $20, I'm definitely going that route in the future.

I am really hoping to do the install this weekend - factors might prevent that but if I get to it, I'll be sure to do a before and after set of pics.

Cheers,
Jamie

Congrats Jamie. Now be sure to post pics so others can see how you did it. Before and afters would be great.

Also, appreciate the fact you told about your experience compressing the front assemblies. Those of us who try to tell others to take the fronts to a shop and have them do it often get sneered at - but you told it like it is with the challenge of using compressors at home vs taking to a local shop. You're right - for $20 bucks why mess around with it?

We've said it before but worth saying again: Work out a deal with a shop like yours to assemble the fronts for you and do an alignment for a bundled price. Most shops love to have combos like that cuz it keeps their guys busy. And it might just save somebody's life too :boxed:

Bob
 

tommudd

Moderator
Staff member
Moderator
Joined
Jul 14, 2005
Messages
22,456
Reaction score
3,643
Location
Southeastern Ohio
790s not 970s
BUT yes I'd never attempt to do them with compressors
The shop that does all of mine ( they had done over 20 sets of 927s at the time for me ) but when they did the 790s they asked me WTH those were since it took so much more to compress them. Well that and the fact one jumped out of the cage, bounced across the shop 20 foot and put a nice little crack in the block wall :icon_lol:

Glad you got them altogether and sounds like you're on the way !!:popcorn:
 

spideyrdr

Full Access Member
Joined
Apr 9, 2012
Messages
73
Reaction score
0
Location
Centennial, CO
Whoops, you're right, 790's. Alternate name is "big honking springs!" :)

It was actually pretty funny, the gentleman who did the assembly goes "What is that going in?" and when I told him it was a Liberty, his jaw about hit the floor. His daughter used to have a Liberty so he was surprised to see what I was up to. Meanwhile one of the other techs there was asking all sorts of questions - his GF has a Liberty too. Asking about the ARB bumper, where I get parts from, etc. It's was a big ol' Liberty love fest in there!

Bob, I definitely agree with your advice on having them do it if they'll bundle it. I couldn't get the Peerless shop down on the alignment price - $80 minimum. I have a service coupon at my local dealership to do it for $50, so it'll all work out for me I think. Alternatively Firestone near me does a 'lifetime alignment' package for $180, but my issue with that is they are only obligated to do the service every 6000 miles. I only put about 5000 a year on my Jeep so I don't know if that would work out to be a good option for me. I figure I'll want to have the alignment re-done in a few months rather than wait a certain number of miles.

Thanks for the encouragement, guys. Looking forward to this upgrade!

Cheers,
Jamie
 

spideyrdr

Full Access Member
Joined
Apr 9, 2012
Messages
73
Reaction score
0
Location
Centennial, CO
And I'm done! New OME shocks and springs all around, new JBA A-arms, and new hubs.

Went from about 19.5" in the front and 20" in the rear to about 23" (rear passenger was 24" for some odd reason- hopefully it'll settle and even out quickly).

Overall it took probably twice as long as I would have liked it to, but when you're working in a short 2 car garage that's also got a fold-up trailer, two street motorcycles, a scooter, a pit bike, and a race motorcycle, you end up having to maneuver in weird and inefficient ways. I also had the garage door down for 90% of the time since I live in an HOA - that slowed things down.

Thanks to all the advice given, and I may try to pull some pictures and / or tips from my notes but I'm too damn tired to think about it now. Getting an alignment on Friday and may take it on the trail this weekend! Woot!

Cheers,
Jamie
 

Attachments

  • LiftedLiberty.jpg
    LiftedLiberty.jpg
    74.8 KB · Views: 109

VAhlene

Full Access Member
Joined
Apr 12, 2013
Messages
411
Reaction score
0
Location
Castle Rock, CO
Nice Man! Still keepin an eye out for you hopefully we will pass each other sometime and we can compare rigs!
 
Top