HOW TO: Add Aftermarket Heated Seats [06]

Disclaimer: Links on this page pointing to Amazon, eBay and other sites may include affiliate code. If you click them and make a purchase, we may earn a small commission.

Canuck

New Member
Joined
Jan 9, 2010
Messages
24
Reaction score
1
Location
Ontario Canada
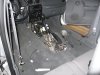
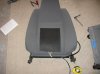
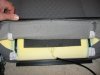
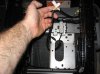
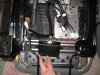
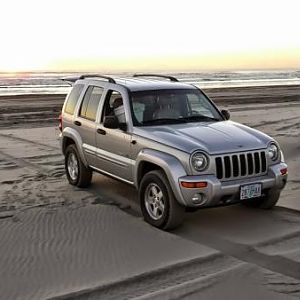
I purchased a 2006 Liberty KJ for my wife. I was never really a big fan of the Liberty but I must say it has grown on me, it's a nice vehicle.

My wife really likes seat heaters and being from Northern Ontario they are a nice option. So I decided to look into doing an aftermarket install in her cloth seats.

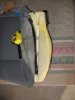
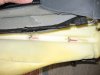
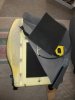
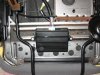
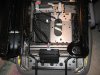
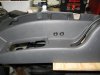
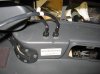
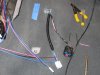
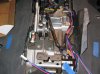
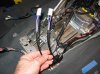
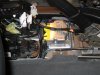
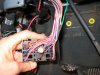
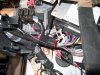
I decided on Rostra Heaters model 250-1550, www.rostra.com/seat-heater.htm

I purchased them from Summit Racing for $99.95 a seat. I'll post a few pictures of the installation.
 
Last edited:

Canuck

New Member
Joined
Jan 9, 2010
Messages
24
Reaction score
1
Location
Ontario Canada
First I removed the seats and center console.
 

Attachments

  • rsz_img_0538.jpg
    rsz_img_0538.jpg
    78.7 KB · Views: 216
Last edited:

Canuck

New Member
Joined
Jan 9, 2010
Messages
24
Reaction score
1
Location
Ontario Canada
I removed the seat backs off the seats. The majority of the upholstry is held on by plastic J channel which is easily unclipped by hand. I found that the seat bottom covers also had hog rings holding the upholstry on. I didn't cut the rings I just bent them open slightly and unhooked them. You don't have to completely remove the bottom cover, you just need to be able to lift it. I found a hole was already present in the bottom seat foam for the wiring. The heating elements have adhesive tape already attached to hold them in place.
 

Attachments

  • rsz_img_0543.jpg
    rsz_img_0543.jpg
    52.3 KB · Views: 175
  • rsz_img_0542.jpg
    rsz_img_0542.jpg
    78.8 KB · Views: 157
  • rsz_img_0540.jpg
    rsz_img_0540.jpg
    46.7 KB · Views: 162
Last edited:

Canuck

New Member
Joined
Jan 9, 2010
Messages
24
Reaction score
1
Location
Ontario Canada
The seat backs were very easy to install the heating elements in. I just unclipped the J channel and slid the elements up into the seat back. I routed the wire out one side of the seat back near the hinge.
 

Attachments

  • rsz_img_0544.jpg
    rsz_img_0544.jpg
    53.7 KB · Views: 146
  • rsz_img_0546.jpg
    rsz_img_0546.jpg
    94.6 KB · Views: 132

RageOfFury

Full Access Member
Joined
Jul 7, 2009
Messages
794
Reaction score
0
(welcome) to the forum. A 06 KJ and a Canadian to boot. Awesome!:D
 

Canuck

New Member
Joined
Jan 9, 2010
Messages
24
Reaction score
1
Location
Ontario Canada
Thanks for the welcome!!

There is a control module and wiring harness that needs to be mounted under the seat. I used pop rivets to attach the module to the seat bottom. There are two plugs that will come off of the seat to the harnesses that need to be mounted in the Jeep. I attached the plugs beside the plug that was already present on the seat.
 

Attachments

  • IMG_0549.jpg
    IMG_0549.jpg
    90 KB · Views: 151
  • IMG_0550.jpg
    IMG_0550.jpg
    94.9 KB · Views: 146
  • IMG_0553.jpg
    IMG_0553.jpg
    95.7 KB · Views: 139
  • IMG_0555.jpg
    IMG_0555.jpg
    93.3 KB · Views: 144

Canuck

New Member
Joined
Jan 9, 2010
Messages
24
Reaction score
1
Location
Ontario Canada
I installed the switches in the console. Due to the depth needed for the switches there weren't very many places that they would fit. I ended up putting them beside the emergency brake handle. The holes are easily drilled in the console with a step drill. I also added a bit of epoxy to the back of the switches where the clips were, to make them more secure.
 

Attachments

  • IMG_0557.jpg
    IMG_0557.jpg
    92 KB · Views: 183
  • IMG_0556.jpg
    IMG_0556.jpg
    87.7 KB · Views: 164

Canuck

New Member
Joined
Jan 9, 2010
Messages
24
Reaction score
1
Location
Ontario Canada
I added the wiring harnesses to the Jeep. There are two harnesses for each seat, one for the power and one for the switch. Both harnesses are 3 wires. I decided combine the harnesses together and run them under the carpet with the stock wiring for a cleaner installation. They run under the carpet and into the console where they hook to the switches, I attached the wiring to the existing stock harnesses. In the last picture you can see where the harness comes out from under the carpet near the air bag control module.
 

Attachments

  • IMG_0559.jpg
    IMG_0559.jpg
    97 KB · Views: 120
  • IMG_0560.jpg
    IMG_0560.jpg
    94.4 KB · Views: 121
  • IMG_0562.jpg
    IMG_0562.jpg
    92.9 KB · Views: 116
  • IMG_0564.jpg
    IMG_0564.jpg
    93.3 KB · Views: 121

Canuck

New Member
Joined
Jan 9, 2010
Messages
24
Reaction score
1
Location
Ontario Canada
NOW I COULD USE SOME HELP - I had to run the power wires up under the dash. One lead needs to go to a minumum 10A unswitched source. The other lead needs to go to an ignition switched source to turn the control boxes off when the ignition is off to prevent the battery from being run down. Does anyone know the wiring color codes for a 2006 Liberty? I would prefer to splice into the existing harnesses that are under the seats. There is a 15A fuse in the fuse block for the seat heaters and I assume that the wiring is in place.

My write up isn't as nice as some of the how-to ones that are already on the site but hopefully it will help out anyone considering aftermarket seat heaters.
 
Last edited:

Canuck

New Member
Joined
Jan 9, 2010
Messages
24
Reaction score
1
Location
Ontario Canada
TonyCRD reposted my question in the General Forum and rockymountain sent me the wiring diagram for the factory heated seats. I'm busy at work right now and haven't had a chance to have a look at the Jeep. Hopefully I'll get to it early in the week and I'll post my results.

Thanks to everyone who helped out!
 

Thantos31

New Member
Joined
Jan 20, 2010
Messages
2
Reaction score
0
Location
Ontario, Canada
Don't keep us ( or specifically me) in suspense, i'm installing a set of after market heated seat pads as well, not as nice as your set, a cheaper version from ebay. i was going to just piggy back the power supply off of the power window harness, knowing it's 40 amp. i'd love to know where you ended up drawing power before i go any further. thank you for posting all of the pictures as well, this will help with my final assembly.
 

Canuck

New Member
Joined
Jan 9, 2010
Messages
24
Reaction score
1
Location
Ontario Canada
I finally got around to the final hook-up today.

I received a copy of the heated seat wiring diagram for my 06 Liberty but I wasn't able to locate the power feed (RD/WT wire, fuse 30) or the ignition switched feed (GY/PK wire, fuse 25) anywhere under the seats. I checked the harness under the driver floor, passenger floor and center console.

So I decided to tap into the GY/PK wire (fuse 25) at the back of the fuse block. It's supposed to be for the seats anyway so why not use it. I pulled the plug from the back of the fuse block, removed the GY/PK wire from the block by releasing the pin. I removed the pin from the block so that I could slide heat shrink onto the wire. If you are not comfortable removing a pin from the block then you can just use electrical tape. I soldered a side-tap into the GY/PK wire and insulated it with heat shrink. There are actually two GY/PK wires that come from fuse 25, the other wire goes to the heater control.

For the main power I used a spade terminal and plugged it into one of the unused circuit breaker slots. I added an inline fuse to protect the circuit.

In the pictures you can also see the Chrysler remote start module that I installed. If anyone is doing a remote start install you should take a quick look at the sheet metal bracket that I made up to mount the module (last picture). It's pretty simple and makes for a nice neat installation. The instructions just called for tye wrapping the module to a wiring harness.
 

Attachments

  • IMG_0728.jpg
    IMG_0728.jpg
    86.3 KB · Views: 117
  • IMG_0739.jpg
    IMG_0739.jpg
    90.8 KB · Views: 121
  • IMG_0743.jpg
    IMG_0743.jpg
    96.3 KB · Views: 128
Last edited:
Top