HOW TO: Steering rack replacement

Disclaimer: Links on this page pointing to Amazon, eBay and other sites may include affiliate code. If you click them and make a purchase, we may earn a small commission.

yellocoyote

Administrator
Joined
May 14, 2008
Messages
7,187
Reaction score
11
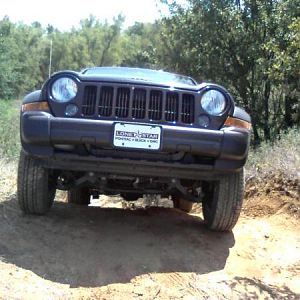
The Boy swapped out the steering rack on my KJ today - it ended up being more of a 1-person job.

I was concerned that it would be a huge production based on how the remove and replace instructions read in the FSM and on some of the threads I researched here and on LOST. Everywhere I read said that the front differential and/or lower control arms would have to be removed or loosened in order to do the swap.

He managed to remove the old rack and reinstall the new one without touching the diff/LCA's or loosening anything related to them. :badger_1: He's going to have the write-up on it later (he says) - I'll repost it here to share.

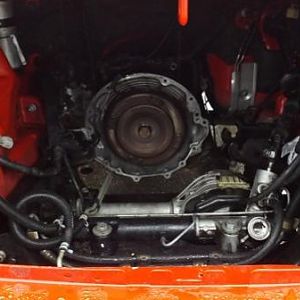
Nasty mess that was the old rack:
You must be registered for see images

You must be registered for see images


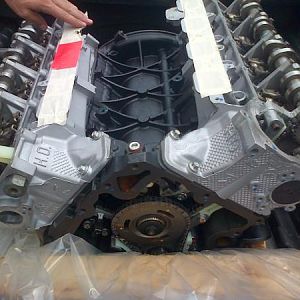
New rack, waiting to be installed:
You must be registered for see images


RIP steering rack (169,100 miles) :025:
You must be registered for see images


The Boy, posing like it's a prize catch or something :p:
You must be registered for see images


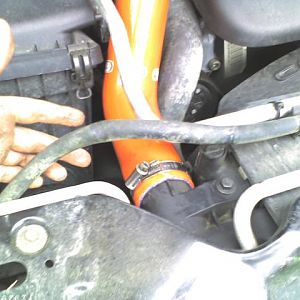
The void where the old rack once was - out with the old...
You must be registered for see images


And in with the new! :D
You must be registered for see images

You must be registered for see images

You must be registered for see images

You must be registered for see images


Once everything was reinstalled and put back together, I helped him bleed the power steering system... and then took it for an alignment. All is well once again.

:pepper::pepper::pepper:
 
Last edited:

jnaut

Full Access Member
Joined
Apr 17, 2008
Messages
2,233
Reaction score
9
Location
Seattle
Yeah, any writeup which describes how to do the steering rack without removal of major front end components will be appreciated.
 

yellocoyote

Administrator
Joined
May 14, 2008
Messages
7,187
Reaction score
11
Here's his write-up:

Steering Rack

Removal
-Set parking brake
-Raise front, set on jack stands and remove wheels
-Center steering
-Disconnect tie rod ends (21 mm)
-Remove drivers side tie rod end (count rotations and make note of it for installation)
-Remove fans (Electric fan 10 mm, requires unbolting upper cross member 10 mm)
-Remove serpentine belt (Tensioner 15 mm, clockwise to releave tension)
-Disconnect sensor in power steering line that connects below the power steering pump just behind the pulley.
-Disconnect this same power steering line (16 mm / flange wrench recommended)
-Slightly turn the steering wheel to position the steering shaft linkage bolt for easy access, then lock the steering wheel.
-Remove the steering shaft linkage retaining bolt (13 mm)
-Lift the steering linkage to remove it from the steering rack input shaft
-Remove steering rack retaining bolts (24 mm for both the bolt and nuts under the cross member)
-Grab the input shaft and rotate the steering rack forward
-Remove the power steering supply lines (18 mm / flange wrench recommended)
-Remove the hard lines from the steering rack (13 mm / flange wrench recommended)
-Remove oil filter drainage tray from front diff (13 mm nut on passenger side / 10 mm bolt on drivers side)
-If possible remove the bushings from the steering rack
-Rotate the steering rack forward and push back so the cross member mounts drop behind the cross member
-Push the drivers side tie rod all the way in
-Fish the steering rack out the passenger side wheel well. The drivers side tie rod will have to be moved occasionally. When the steering rack input shaft is near the front diff mount the rack will need to swing towards the front of the vehicle and the drivers side tie rod will pass under the oil pan and trans cooler lines.
-Remove passenger side tie rod end and jam nut (count rotations and make note of it for installation)

Installation
-Install passenger side jam nut and tie rod end (used recorded count rotation for installation)
-Remove the hard lines from the new steering rack (13 mm / flange wrench recommended)
-Push the drivers side tie rod all the way in
-Fish the steering rack in the passenger side wheel well so that the cross member mounts are behind the cross member. The drivers side tie rod needs to pass under the trans cooler lines and oil pan. The accordion boot will have to be pushed up to clear the front diff mount.
-Lift and rotate back the steering rack so the cross member mounts are above the cross member
-Install the steering rack bushings
-Install oil filter drainage tray on front diff (13 mm nut on passenger side / 10 mm bolt on drivers side)
-Install the hard lines on the steering rack (13 mm / flange wrench recommended)
-Install the power steering supply lines (18 mm / flange wrench recommended)
-Rotate the steering rack back
-Install steering rack retaining bolts (24 mm for both the bolt and nuts under the cross member / 120 ft-lbs)
-Install drivers side tie rod end (used recorded count rotation for installation)
-Connect tie rod ends (21 mm / 80 ft-lbs)
-Straighten steering knuckles
-Install the steering linkage on the steering rack input shaft
-Install the steering shaft linkage retaining bolt (13 mm)
-Connect the power steering line that connects below the power steering pump just behind the pulley (16 mm / flange wrench recommended)
-Connect sensor to this same power steering line
-Install serpentine belt (Tensioner 15 mm, clockwise to releave tension)
-Install fans (Electric fan 10 mm, requires unbolting upper cross member 10 mm)
-Add power steering fluid
-Bleed power steering
-Install wheels, remove from jack stands
-Release parking brake
 
Last edited:

LibertyTC

Well-Known Member
Staff member
Moderator
Joined
Oct 24, 2008
Messages
9,095
Reaction score
1,765
Location
B.C. Canada
Great How TO

That is fantastic!:waytogo:
My Guess about 6 hours work with 2 :drink_nl: breaks, and then off to alignment..:smokin:
 

mx_599

New Member
Joined
Sep 15, 2011
Messages
23
Reaction score
0
Location
The Black Hills
quick question...

when you remove the tie rod end from the spindle, is it just the nut? or do you also have to put 10mm on bottom of ball link and unscrew that as well?

things are pretty corroded. do i need a big hammer and beat it until it comes free?

thanks
 

yellocoyote

Administrator
Joined
May 14, 2008
Messages
7,187
Reaction score
11
You do have to separate the tie rod from the knuckle, if that's what you're asking.

We used a ball joint press to press it out from the knuckle, but I'm sure you can probably carefully beat it out with a hammer.
 

mx_599

New Member
Joined
Sep 15, 2011
Messages
23
Reaction score
0
Location
The Black Hills
You do have to separate the tie rod from the knuckle, if that's what you're asking.

We used a ball joint press to press it out from the knuckle, but I'm sure you can probably carefully beat it out with a hammer.

does craftsman sell ball joint presses do you think?

yes i know you need to remove it...but I was not sure if it was threaded into spindle/knuckle?

I bought a bigger hammer, will try tomorrow. it has a 10mm before threads start so wanted to make sure you didn't need wrench for it.

I am started to slightly mushroom the 10 mm stud from the hammer.

it makes me want to buy a new one now :(
 

mx_599

New Member
Joined
Sep 15, 2011
Messages
23
Reaction score
0
Location
The Black Hills
can you do this without undoing fan and upper cross member? the upper cross member on mine has rivets involved??? did you guys deal with rivets? maybe they are just plastic cheap rivets you can get at NAPA?

any advice for the pump as well?

also, the ball joint press I rented from Autozone doesn't work for my set-up...how did you guys get it to work? I had to use a pickle fork...now a definitely need new outer tie-rod ends.

do you guys think I should buy nicer ones made by Moog for 50 ea or cheaper ones at 20 ea.?

thanks
 

mx_599

New Member
Joined
Sep 15, 2011
Messages
23
Reaction score
0
Location
The Black Hills
why do you have to remove the hard lines from the steering rack? 13mm ones

is only to help slide it out through wheel well? is it necessary?
 

tjkj2002

Full Access Member
Joined
Dec 17, 2006
Messages
10,612
Reaction score
39
Location
Somewhere between being sane and insane!
does craftsman sell ball joint presses do you think?

yes i know you need to remove it...but I was not sure if it was threaded into spindle/knuckle?

I bought a bigger hammer, will try tomorrow. it has a 10mm before threads start so wanted to make sure you didn't need wrench for it.

I am started to slightly mushroom the 10 mm stud from the hammer.

it makes me want to buy a new one now :(

can you do this without undoing fan and upper cross member? the upper cross member on mine has rivets involved??? did you guys deal with rivets? maybe they are just plastic cheap rivets you can get at NAPA?

any advice for the pump as well?

also, the ball joint press I rented from Autozone doesn't work for my set-up...how did you guys get it to work? I had to use a pickle fork...now a definitely need new outer tie-rod ends.

do you guys think I should buy nicer ones made by Moog for 50 ea or cheaper ones at 20 ea.?

thanks
Easy way to get the tie rod end out of the knuckle is to put a 10mm socket/ratchet and apply pressure(either way,does not matter) while hitting the knuckle right were the tie rod end goes through,couple of good hits and it will pop loose.Buy the better tie rod ends.Never use a pickle fork unless your replacing the balljoint/tie rod end and a ball joint press is just that,for balljoints.Never hit the threaded unds of balljoints/tie rod ends as it will make it harder to remove.

Just drill out those rivits on the upper crossmember,replace with 1/4 bolts/nuts unless you got a hardon for rivits.
 

mx_599

New Member
Joined
Sep 15, 2011
Messages
23
Reaction score
0
Location
The Black Hills
Easy way to get the tie rod end out of the knuckle is to put a 10mm socket/ratchet and apply pressure(either way,does not matter) while hitting the knuckle right were the tie rod end goes through,couple of good hits and it will pop loose.Buy the better tie rod ends.Never use a pickle fork unless your replacing the balljoint/tie rod end and a ball joint press is just that,for balljoints.Never hit the threaded unds of balljoints/tie rod ends as it will make it harder to remove.

Just drill out those rivits on the upper crossmember,replace with 1/4 bolts/nuts unless you got a hardon for rivits.

thanks for these tips. well, I got higher quality MOOG tie-rods coming...at least I think they were higher quality, about 50 dollars each.
 
Top