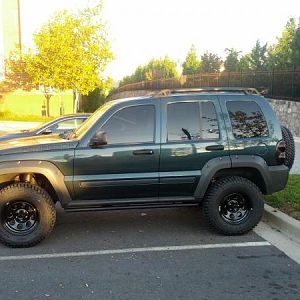
Pounding the pinchwelds and altering the fenders are common modifications that needs to be done if you go bigger on the tires and lift. Once I put on my 245/75-16 General Grabber AT2's on, seen HERE, I had some noticeable rubbing even with Rusty's coil lift. Well, I looked everywhere and found several methods to do this, but not one definitive way that was easy and had plenty of pics, explanations for the noobs, etc...so here you go.
Some people remove all the plastic, or cut both sides. Being in the medical field, aesthetics are important to me, and I KNEW it would be easier to just cut one side.....less cutting means less repair, better end result. So....
YOU WILL NEED: Heat gun, vice grips, leather gloves, large flathead screwdriver, large heavy hammer or mallet, cutting tool (dremel), jack stand, jack, primer, paint (or undercoat), beer.
1) First, remove your tire, and have the Lib on one jackstand. You can jack it up under the lower control arm.
I started to cut across the top, and then down the groove on the inside of the wheel well using a dremel with a cutting wheel. This works great, although you could use a pair of trauma scissors, metal snips, etc. I cut the flap then using a heat gun melted the plastic along the bend of where I was going to pull it back.
2) Soften up the plastic (it is super easy to work with, the hotter it gets, the gooier and more malleable it becomes, almost like glue. Grab the flap with a tool (I used vice grips) or leather gloves, and slowly pull back, heating the whole time. Vice this in place. This gives you a great shot for your surgery.
3) Using a BFH, pound the pinch weld tight against the body, as far up as you can go.
4) Once this is complete, break out the automotive primer. I did three light coats, warmed up and cured with the heat gun for expedience sake.
5) Opinions vary, but after this I just sprayed on two coats of heavy duty black spray paint. It should hold up just fine.
6)Once you have painted the weld, its time to replace the plastic on it. Heat the plastic up along the crease, and bend it back half way. You will notice that you still have that huge outcropping of plastic...no worries. This is where you heat up the entire flap, and using gloved bend and shape the plastic flap completely flat (or as close as you can get it.)
7)After you get the flap physically flat, heat it up again and bend it to the other side, placing the excess under the opposite side, and get ready to start the re-seal process.
8) You will notice that since you flattened the flap out, it is much wider and does not match up with the other side. Don't worry! This is by design...by having that flap longer, you now have 10x the surface area to join the edges. Just tuck the flap and edges completely under the opposite side. This will be a much sturdier and stronger setup then just having a couple of welds on either side.
9) Now it is time to rejoin the edges. Heat up both ends (also heat from the inside) and start to mash them together using a large flat headed screwdriver. This is fairly easy but requires a gentle touch.
10) Once you are satisfied with the strength of the weld, its time to clean things up. Gently heat up the edges...not enough to melt, but enough to make it soft and malleable. I had a 150 sand paper block, which works perfectly. Dap the area, then slowly, as the plastic cools, apply more force. After just one or two times of this, you can flatten out the plastic to look very nearly as if nothing has happened.
11) Once you are done, take a cold wet rag to it...this will cool it and prevent it from moving any more. Obviously, the area is still wet and dirty, but you can get the idea. I continued to touch it up after I took this pic. It came out looking great.
12) Now, its time to move onto the fronts, where the fog light door often hits. This was super easy, just figure out what needs to be moved. What we are going to do is heat up that area, then force an object onto it until it cools, permanently changing its shape. I just a couple BFH's, and it couldnt have been easier.
13) And here is the final product! Don't let the "clean" area fool you, the plastic matches perfectly. I'm so happy with this mod, now no more RRRRRRRRRRRR as I turn....
Some people remove all the plastic, or cut both sides. Being in the medical field, aesthetics are important to me, and I KNEW it would be easier to just cut one side.....less cutting means less repair, better end result. So....
YOU WILL NEED: Heat gun, vice grips, leather gloves, large flathead screwdriver, large heavy hammer or mallet, cutting tool (dremel), jack stand, jack, primer, paint (or undercoat), beer.
1) First, remove your tire, and have the Lib on one jackstand. You can jack it up under the lower control arm.
I started to cut across the top, and then down the groove on the inside of the wheel well using a dremel with a cutting wheel. This works great, although you could use a pair of trauma scissors, metal snips, etc. I cut the flap then using a heat gun melted the plastic along the bend of where I was going to pull it back.
You must be registered for see images attach
2) Soften up the plastic (it is super easy to work with, the hotter it gets, the gooier and more malleable it becomes, almost like glue. Grab the flap with a tool (I used vice grips) or leather gloves, and slowly pull back, heating the whole time. Vice this in place. This gives you a great shot for your surgery.
You must be registered for see images attach
3) Using a BFH, pound the pinch weld tight against the body, as far up as you can go.
You must be registered for see images attach
4) Once this is complete, break out the automotive primer. I did three light coats, warmed up and cured with the heat gun for expedience sake.
5) Opinions vary, but after this I just sprayed on two coats of heavy duty black spray paint. It should hold up just fine.
You must be registered for see images attach
6)Once you have painted the weld, its time to replace the plastic on it. Heat the plastic up along the crease, and bend it back half way. You will notice that you still have that huge outcropping of plastic...no worries. This is where you heat up the entire flap, and using gloved bend and shape the plastic flap completely flat (or as close as you can get it.)
7)After you get the flap physically flat, heat it up again and bend it to the other side, placing the excess under the opposite side, and get ready to start the re-seal process.
You must be registered for see images attach
8) You will notice that since you flattened the flap out, it is much wider and does not match up with the other side. Don't worry! This is by design...by having that flap longer, you now have 10x the surface area to join the edges. Just tuck the flap and edges completely under the opposite side. This will be a much sturdier and stronger setup then just having a couple of welds on either side.
9) Now it is time to rejoin the edges. Heat up both ends (also heat from the inside) and start to mash them together using a large flat headed screwdriver. This is fairly easy but requires a gentle touch.
You must be registered for see images attach
10) Once you are satisfied with the strength of the weld, its time to clean things up. Gently heat up the edges...not enough to melt, but enough to make it soft and malleable. I had a 150 sand paper block, which works perfectly. Dap the area, then slowly, as the plastic cools, apply more force. After just one or two times of this, you can flatten out the plastic to look very nearly as if nothing has happened.
You must be registered for see images attach
11) Once you are done, take a cold wet rag to it...this will cool it and prevent it from moving any more. Obviously, the area is still wet and dirty, but you can get the idea. I continued to touch it up after I took this pic. It came out looking great.
You must be registered for see images attach
12) Now, its time to move onto the fronts, where the fog light door often hits. This was super easy, just figure out what needs to be moved. What we are going to do is heat up that area, then force an object onto it until it cools, permanently changing its shape. I just a couple BFH's, and it couldnt have been easier.
You must be registered for see images attach
13) And here is the final product! Don't let the "clean" area fool you, the plastic matches perfectly. I'm so happy with this mod, now no more RRRRRRRRRRRR as I turn....
You must be registered for see images attach
You must be registered for see images attach
You must be registered for see images attach
You must be registered for see images attach
Last edited by a moderator:
 I did the same on my liberator, unfortunately it didn't turn out as "clean" as yours but I seemed to have everyone in the world bugging me when I was trying to do it!! It still works for me though, if it holds up I will leave it the way it is but if it falls apart on me some how I'm thinking about just cutting that part of the fenderwell out